CSIEM Administration Guide
Dashboard
Search
- Query History
- Query Example
- Save Query
- Query Keywords
- Source
- Source Category
- Source Type
- Source Tag
- Save Button Popup
- Save query Example
- Saved Queries
- Search Timespan
- Timespan Example
Reports
Alerts
Assets
Index Management
Source Types
Dashboard
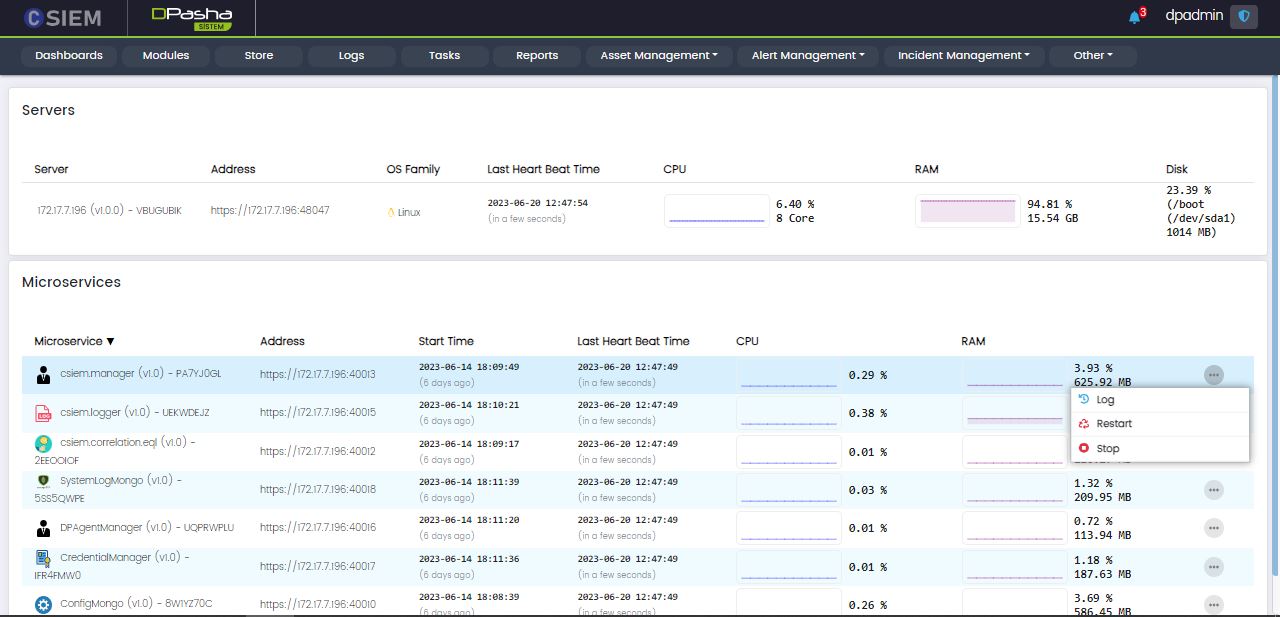
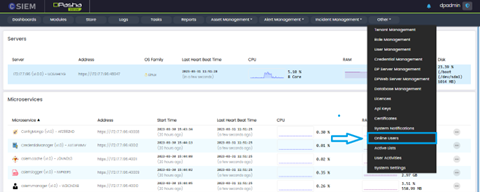
The dashboard contains information about the CSIEM Servers and Microservices.
Servers
This section contains the following columns:
- Server: This contains the name of the server.
- Address: The complete URL of the server containing the IP address and port.
- OS Family: This shows the operating system of the server
- Last Heart Beat Time: This shows the latest timestamp of the server status
- CPU: This shows the CPU usage in percentage and the number of cores of the CPU.
- RAM: This shows the RAM usage and the total RAM space.
- Disk: This shows the Disk usage, the path of the disk, and the total disk space.
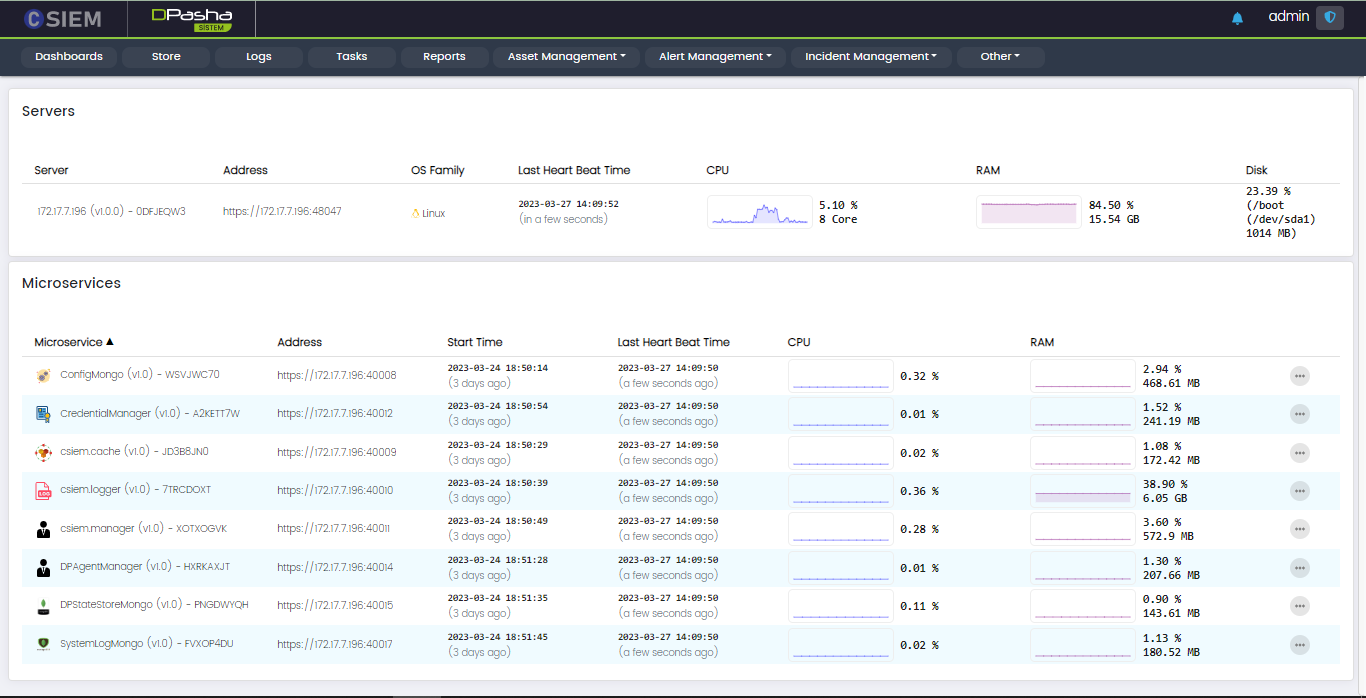
Microservices
Each microservice has the following options:
- Log
- Restart
- Stop
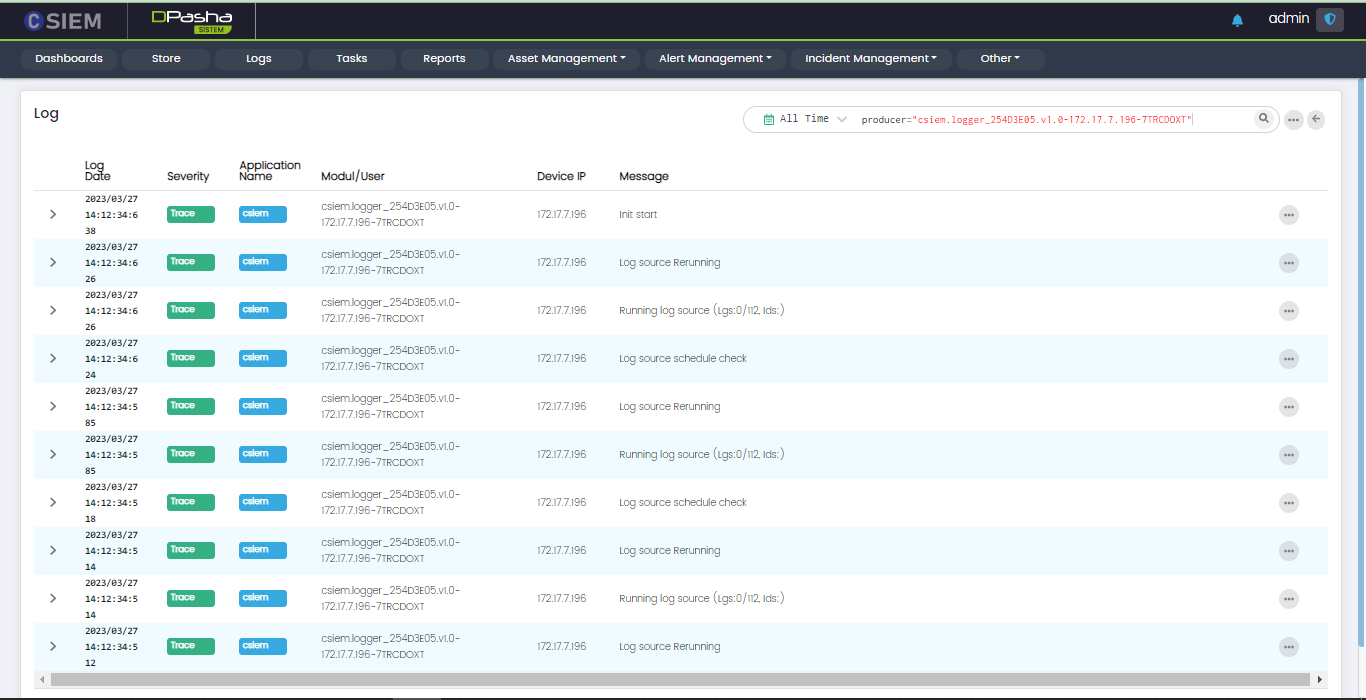
Log options
This option leads to the logs page, showing the logs specific to the selected microservice. An example is given in the figure below.
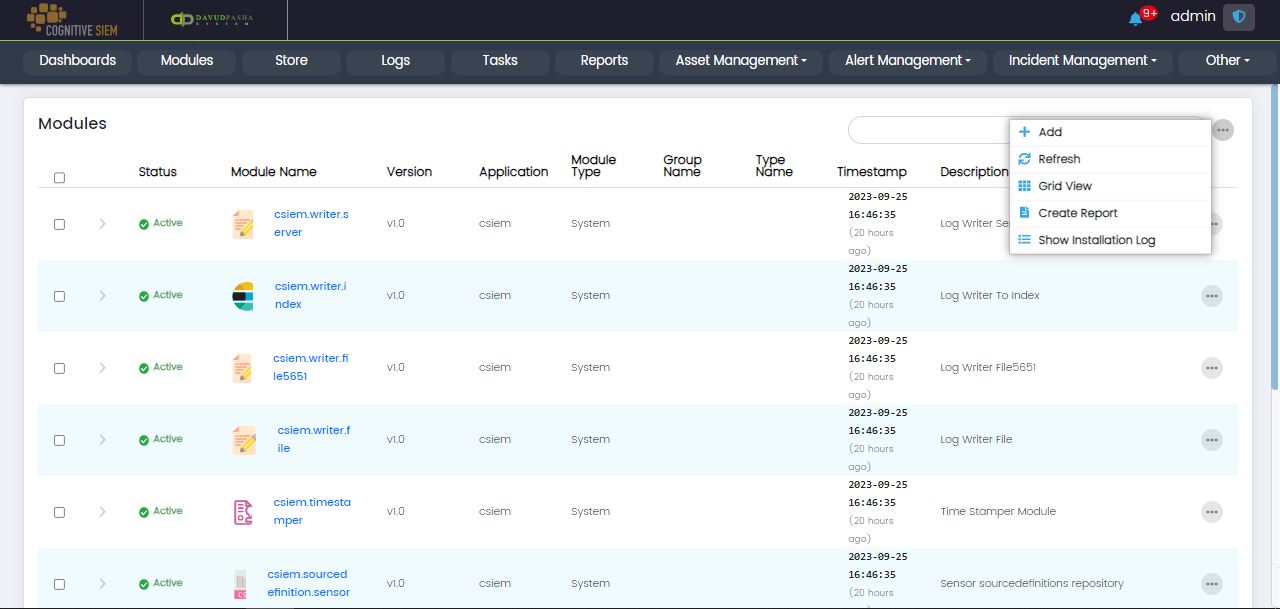
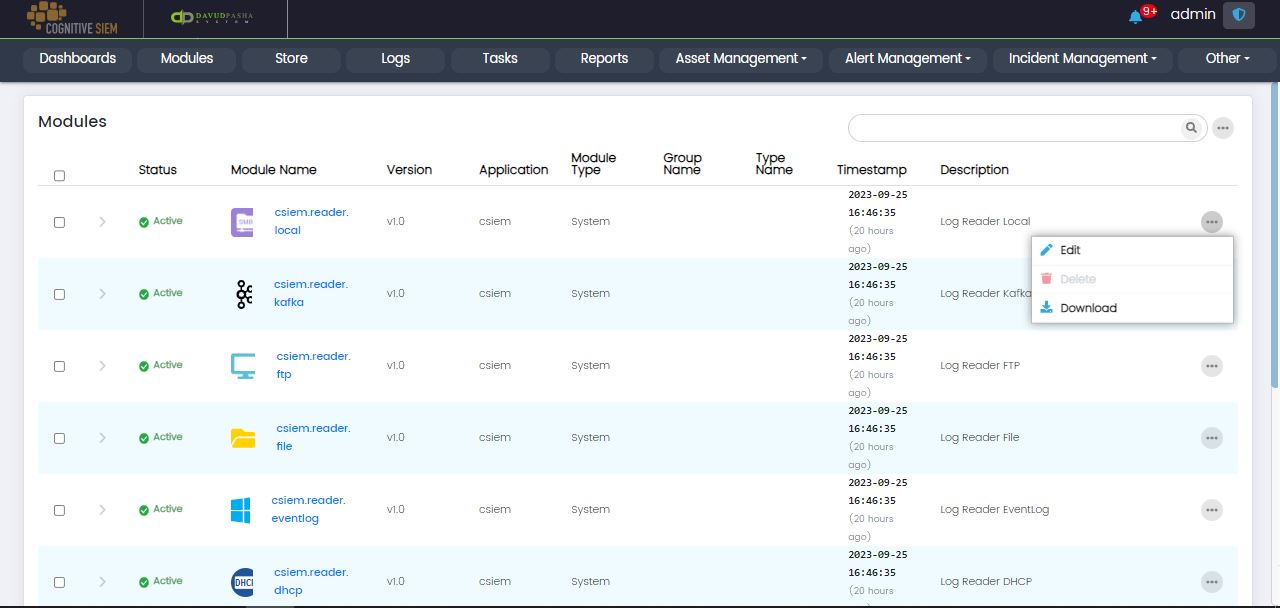
Modules
This page contains information about the modules integrated into the CSIEM platform.

Page Columns
This page contains the following columns.
- Status
- Module Name
- Version
- Application
- Module Type
- Group Name
- Type Name
- Timestamp
- Description
Page Options
The Modules page contains the following options.
- Add
- Refresh
- Grid View
- Create Report
- Show Installation Log
Page Item Options
Each row on the page is a module item. Each module item has the following options.
- Edit
- Delete
- Download
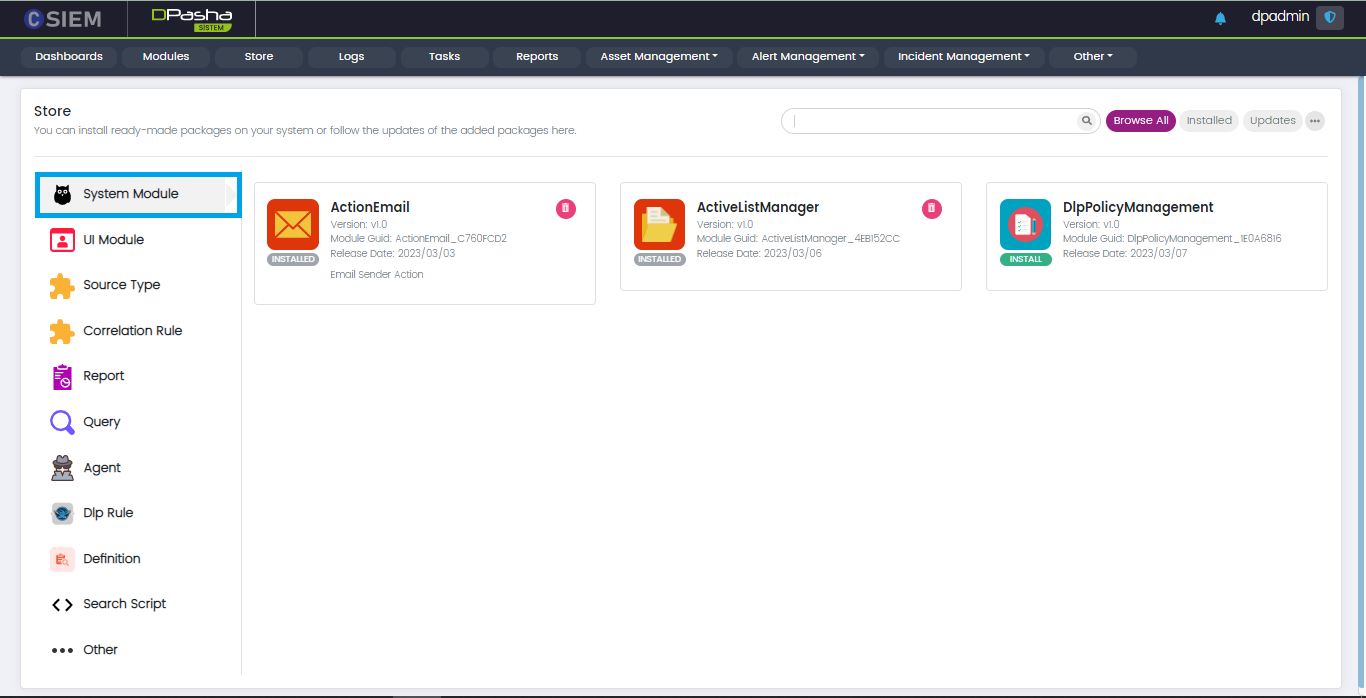
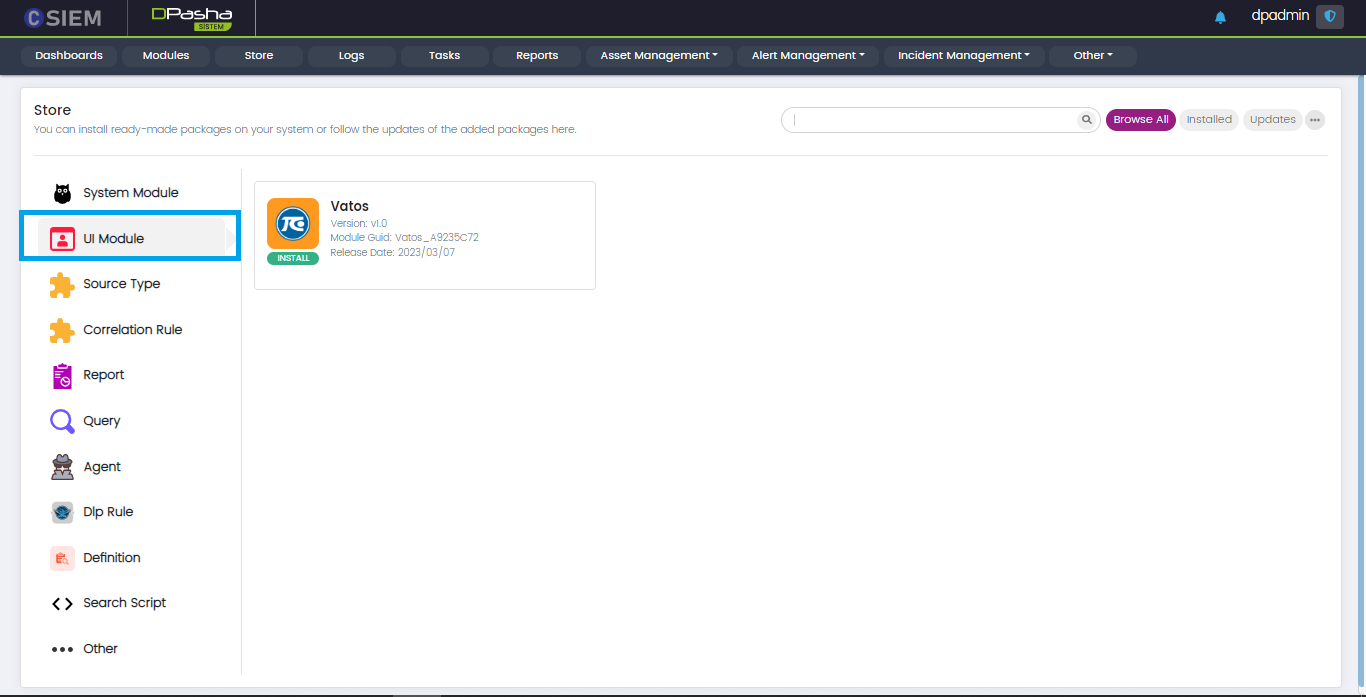
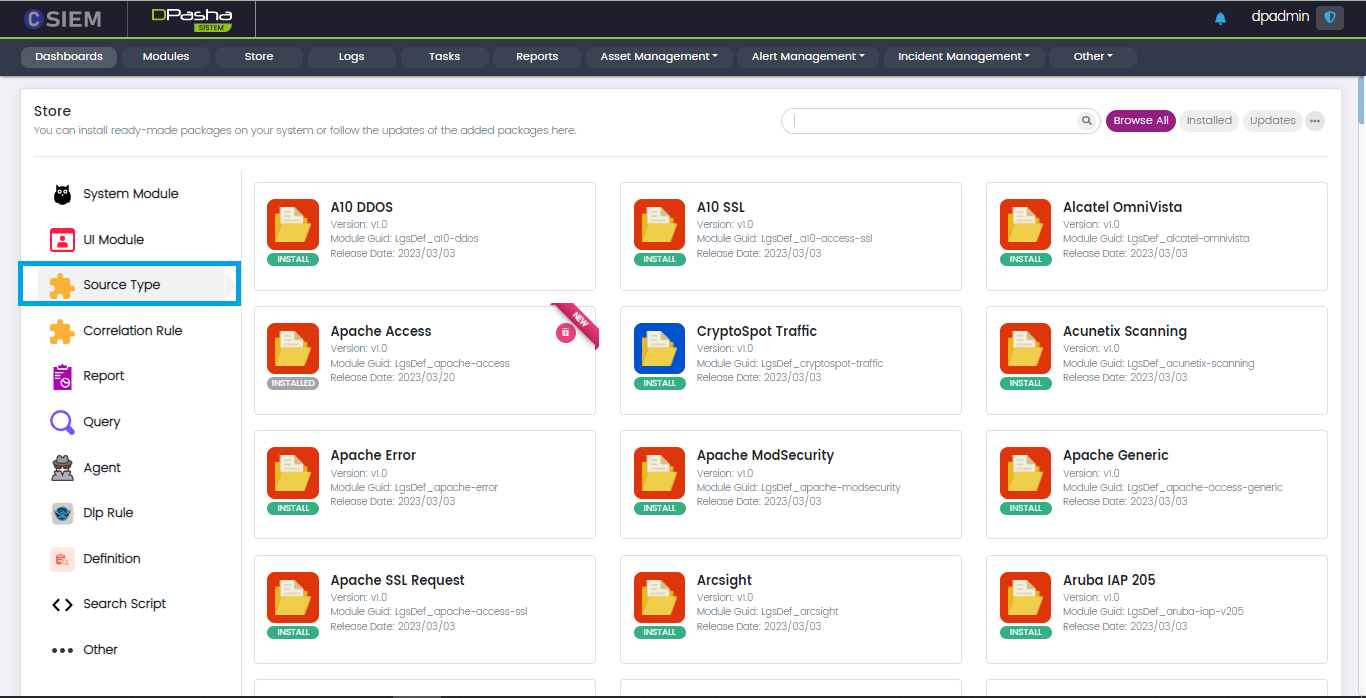
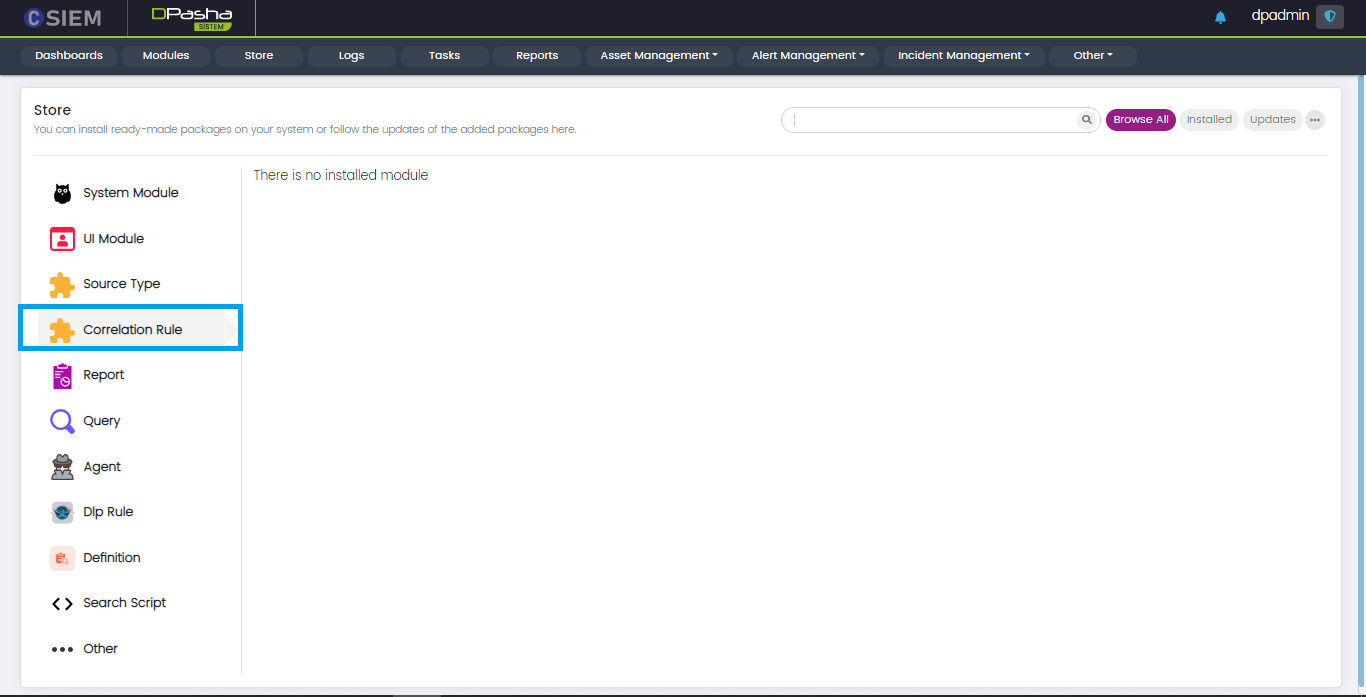
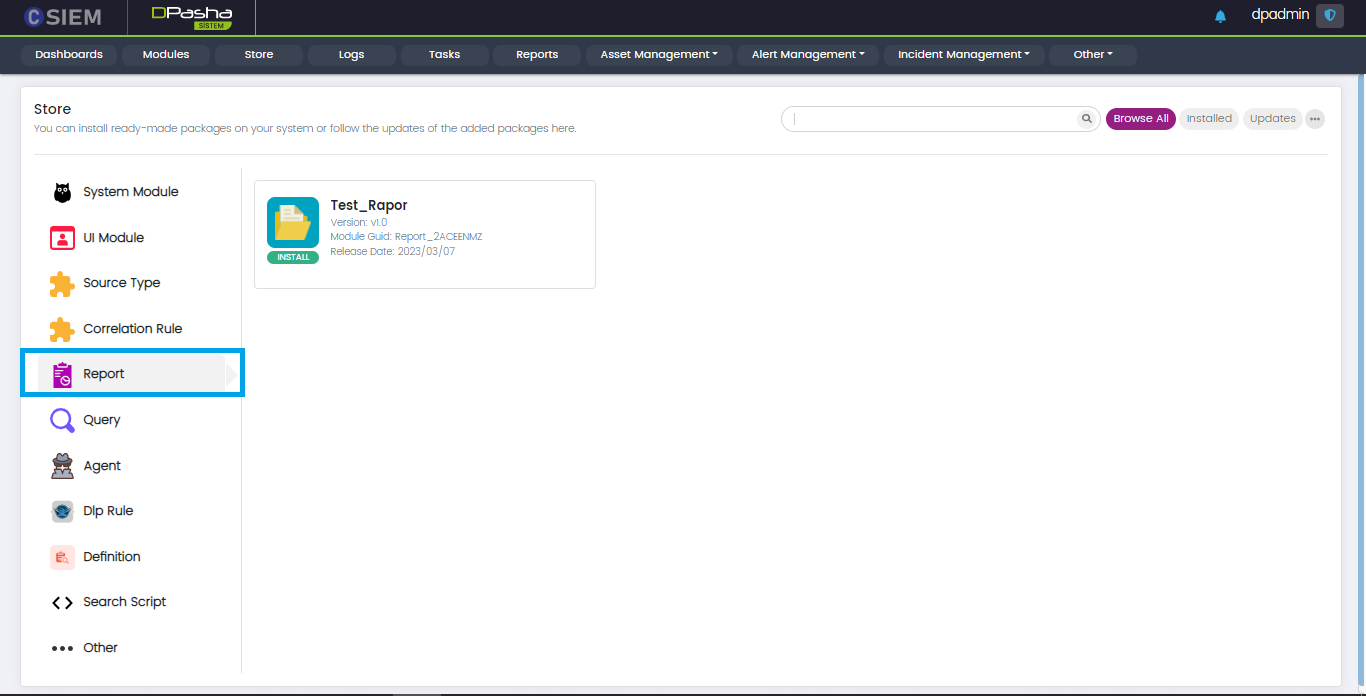
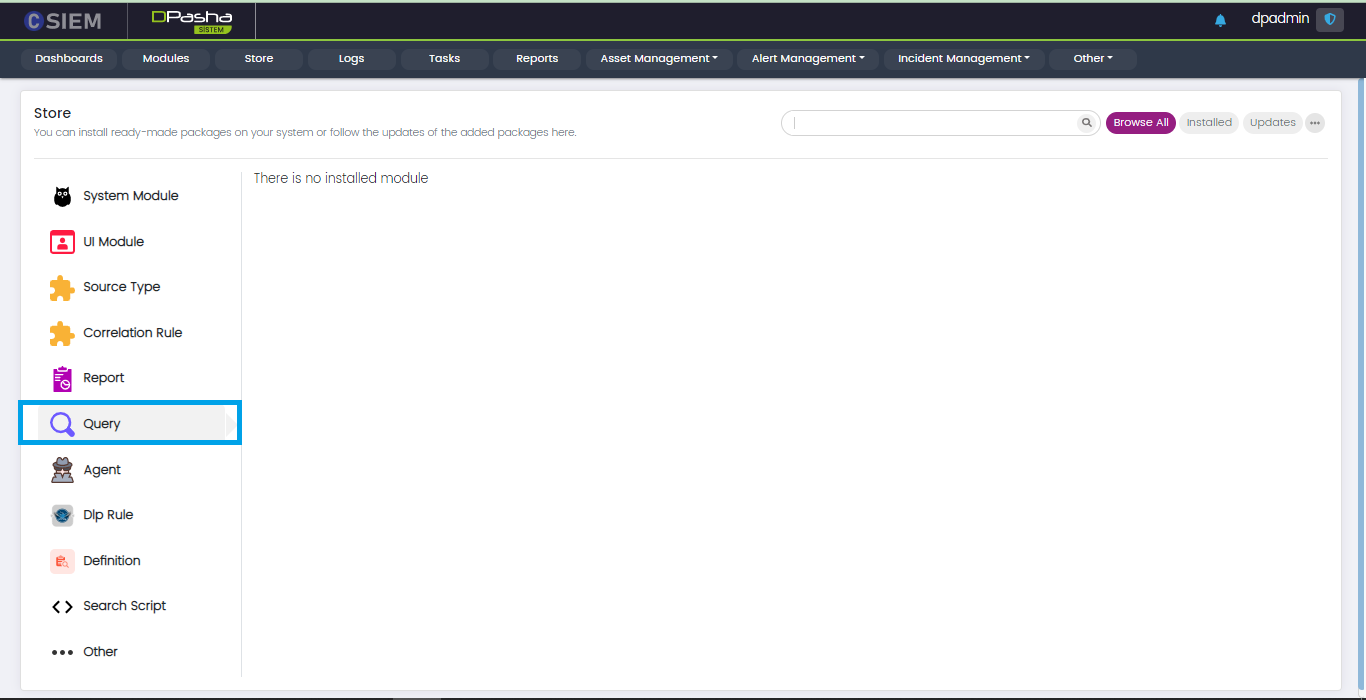
Store
The Store contains packages that can be integrated with the CSIEM platform. Administrators can install new packages or upgrade the existing packages.

Administrators can install the packages for the following modules.
- System Module
- UI Module
- Source Type
- Correlation Rule
- Report
- Query
- Agent
- Dlp Rule
- Definition
- Search Script
- Other
System Module
This panel contains the packages available for the platforms such as CSEIM, VATOS and SOAIR.
UI Module
This panel contains the packages related to the User Interface of the platforms such as CSIEM, VATOS and SOAIR.
Source Type
This panel contains the packages which are mostly used for the log parsers.
Correlation Rule
This panel contains packages related to correlation rules for the Cognitive SEIM
Report
This panel contains the report packages for all the platforms such as CSIEM, VATOS and SOAIR.
Query
This panel contains the Query samples for the Cognitive SEIM.
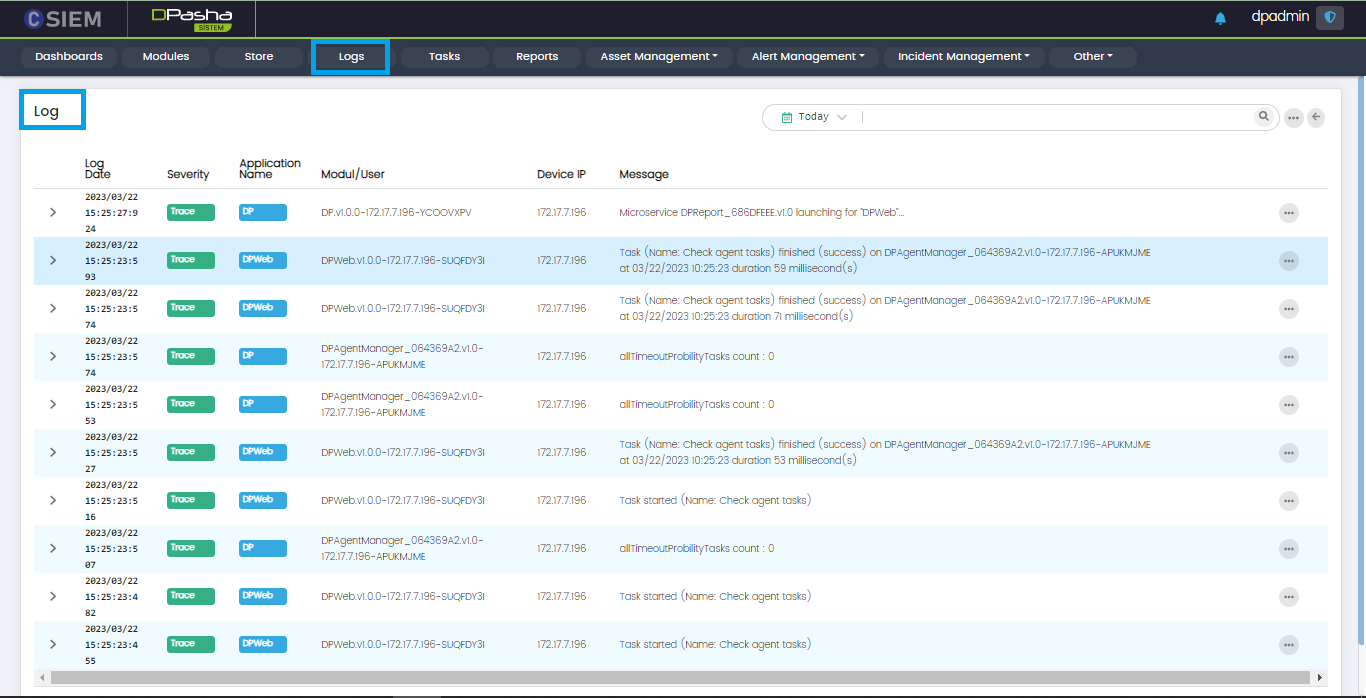
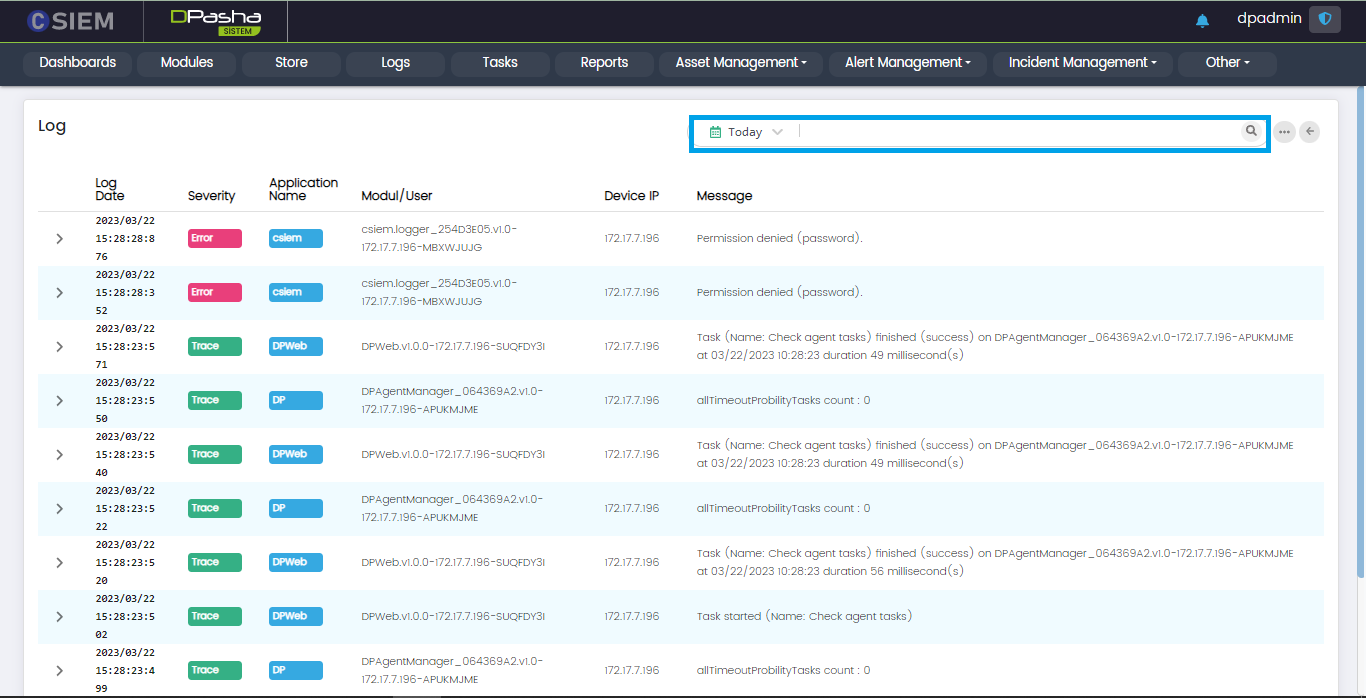
Logs
Administrators can use this page to view the logs coming from user activities, module activity, etc. These logs are generated by the actions performed by users such as the “dpadmin” and modules such as the management agent. The logs include login attempts by users, search queries processed by users, errors from different modules or services, etc.
Page Columns
The page has the following columns:
- Log Date
- Severity
- Application Name (DP, DP Web etc.)
- Module/User (Logs can be generated by the User or the Module activity)
- Device IP (The IP address of the module/user device)
- Message (This is the alert message or the display text for the log)
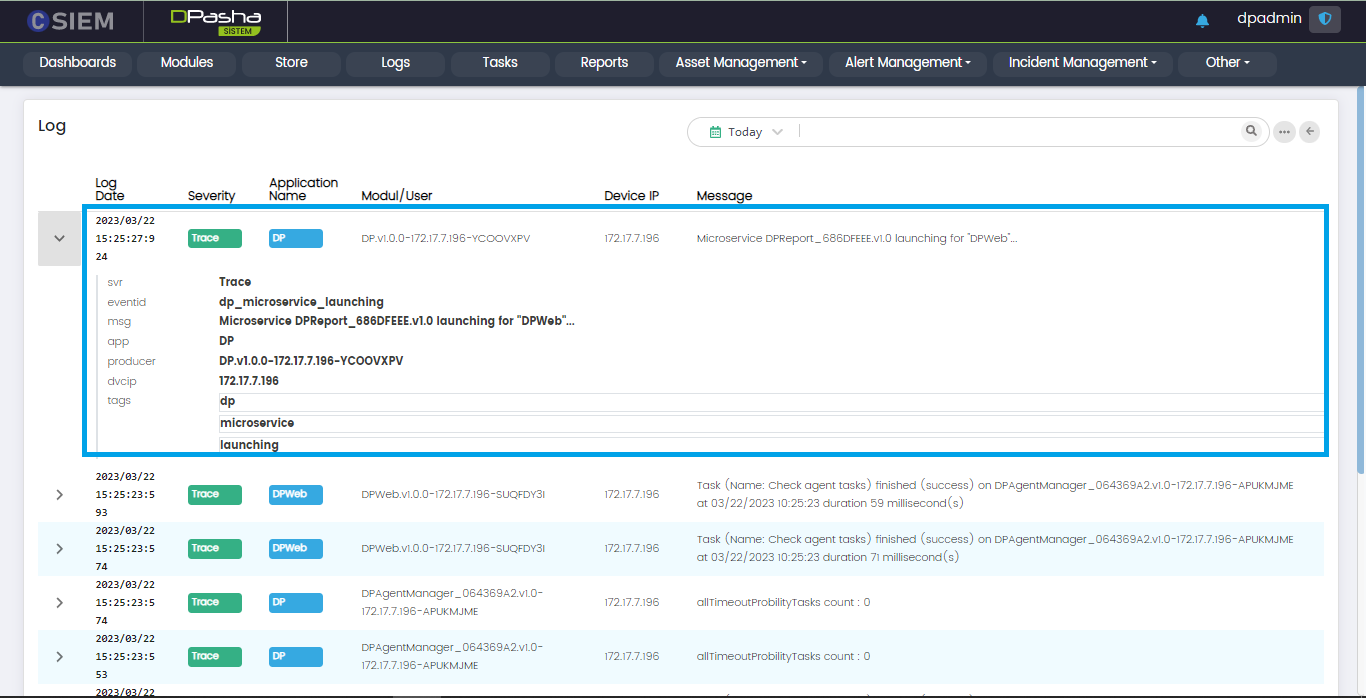
Log Details
The administrators can click on any log item and view the details related to that log as shown below. Administrators can also copy these items by using the “copy” icon that is visible when any line is hovered.
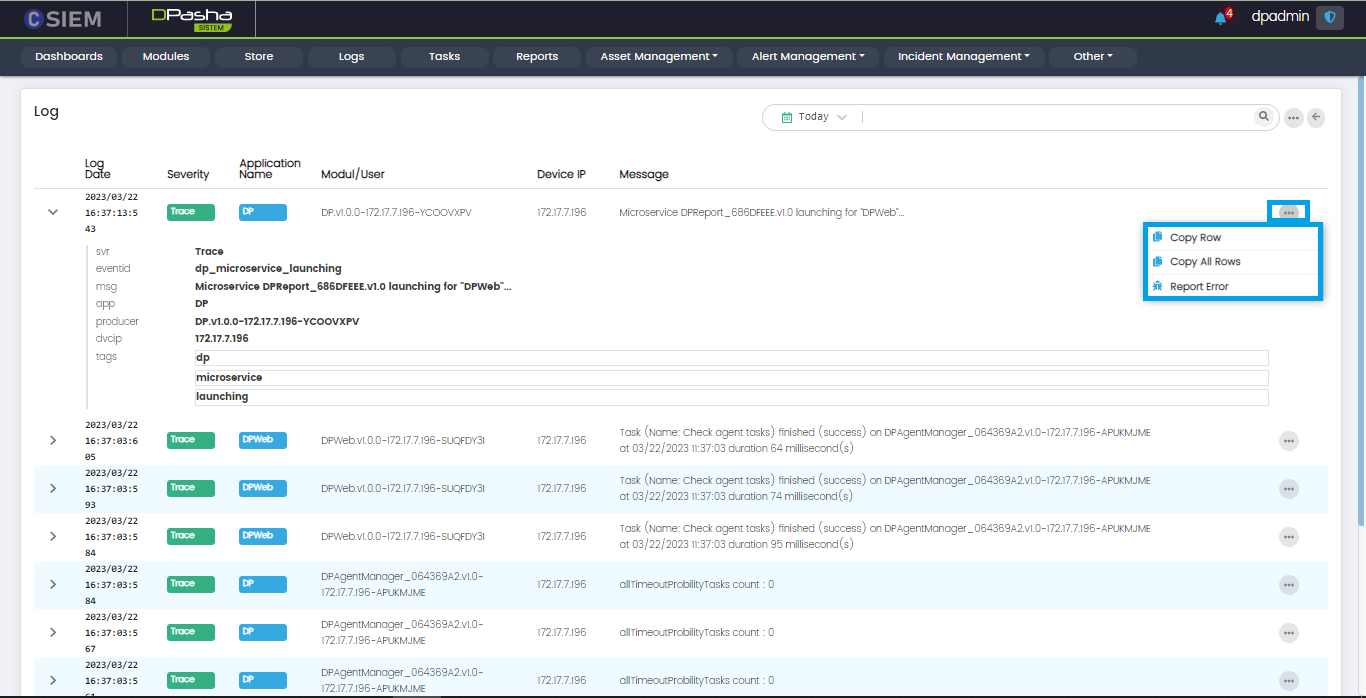
Log Item Options
Administrators can use this option to perform the following actions:
- Copy Row
- Copy All Rows
- Report Error
Search Bar
The search bar is used to search for any logs on the Log page. It returns filtered results against the given keyword(s).
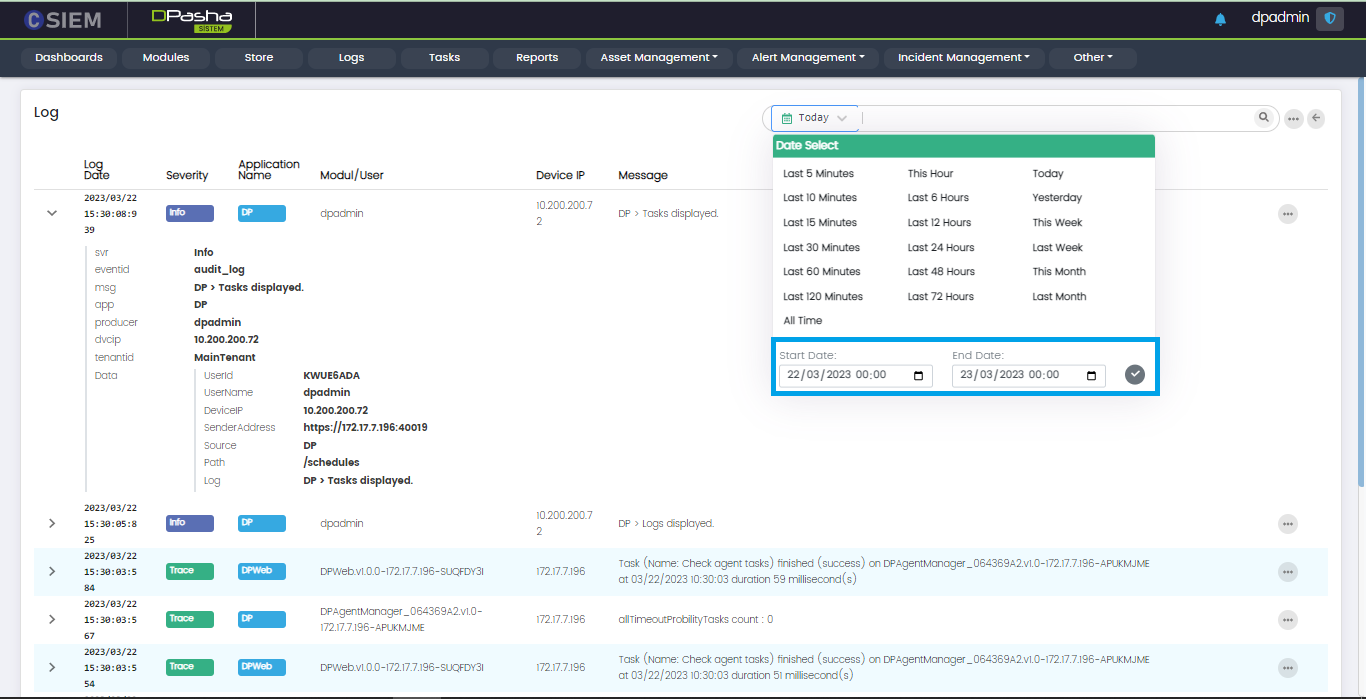
Search Time
Administrators can select date and time span for the specified searches as shown below.
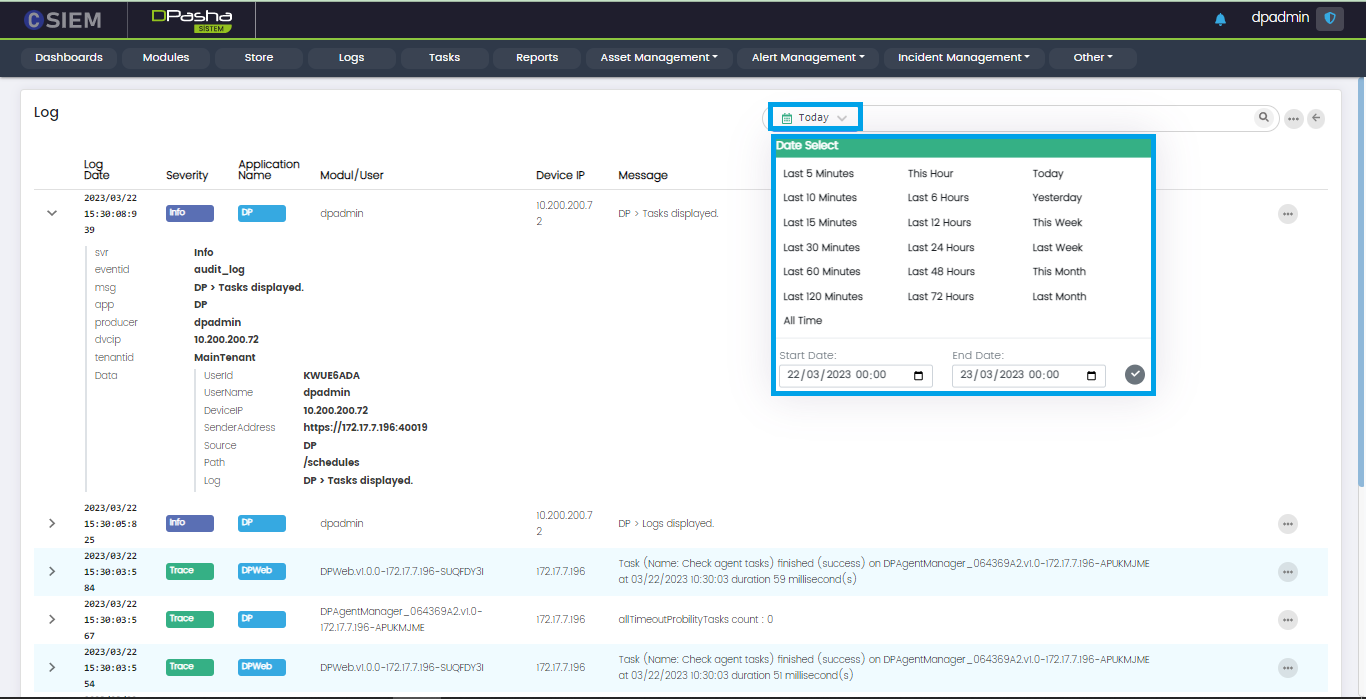
For dates, administrators can either select one of the predefined date ranges or specify a custom range of date, from date to date for their searches as shown below.
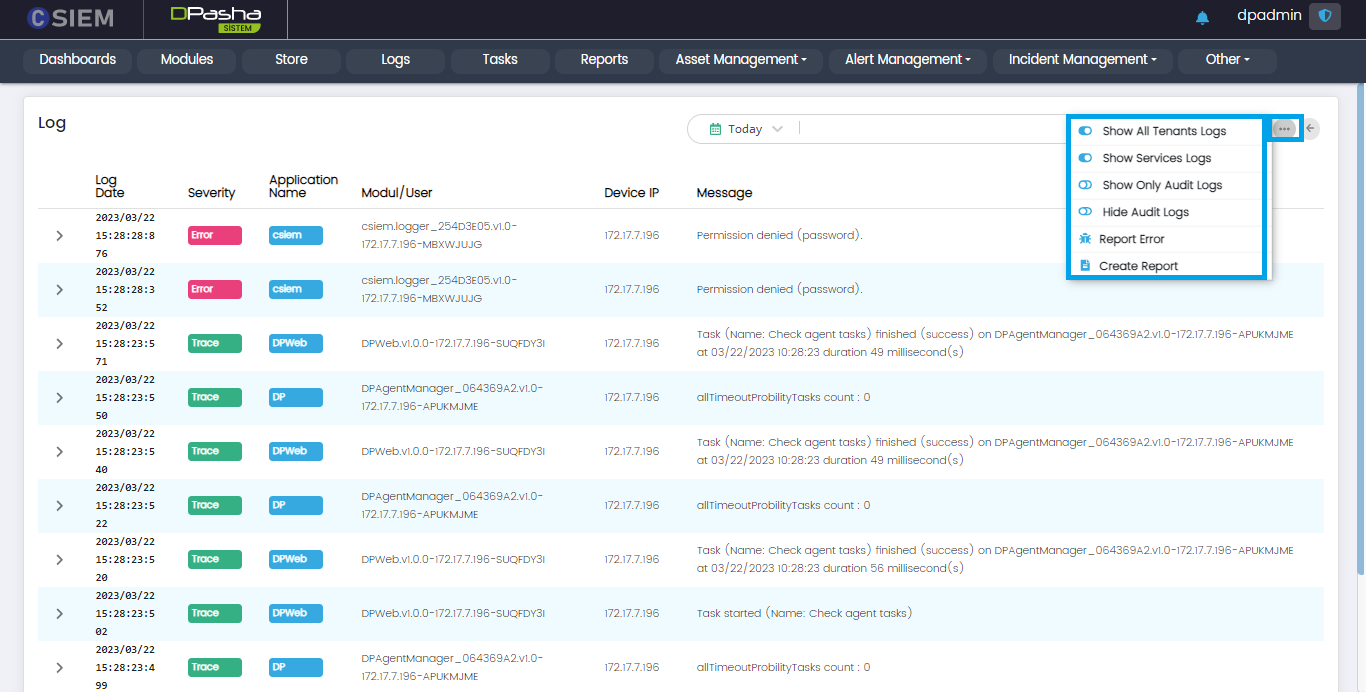
Log Page Options
Administrators can use this option to view or hide different types of logs. Options are given below.
- Show All Tenant Logs
- Show Services Logs
- Show Only Audit Logs
- Hide Audit Logs
- Report Error
- Create Report
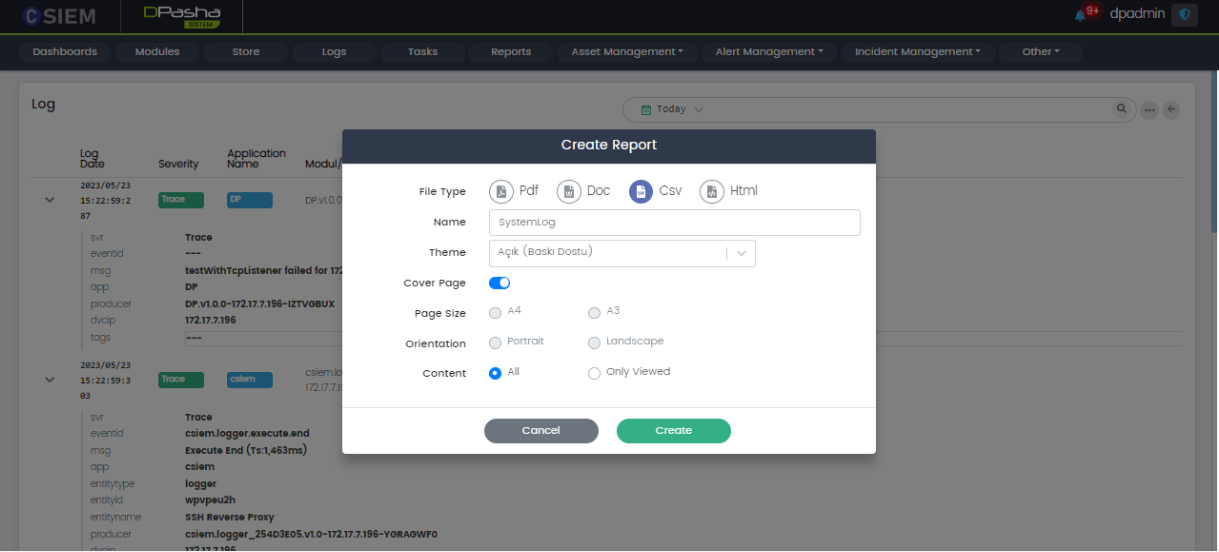
Create Report
Administrators can generate a report in different formats such as PDF, DOC, CSV, and HTML.
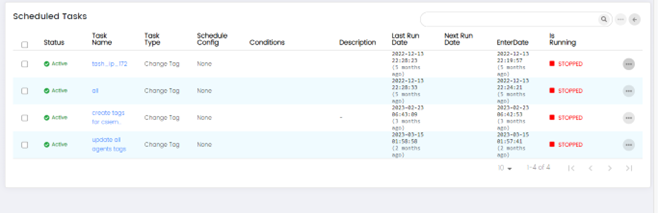
Tasks (Scheduled Tasks)
Tasks page allows administrators to view the status of scheduled tasks on the CSIEM system.
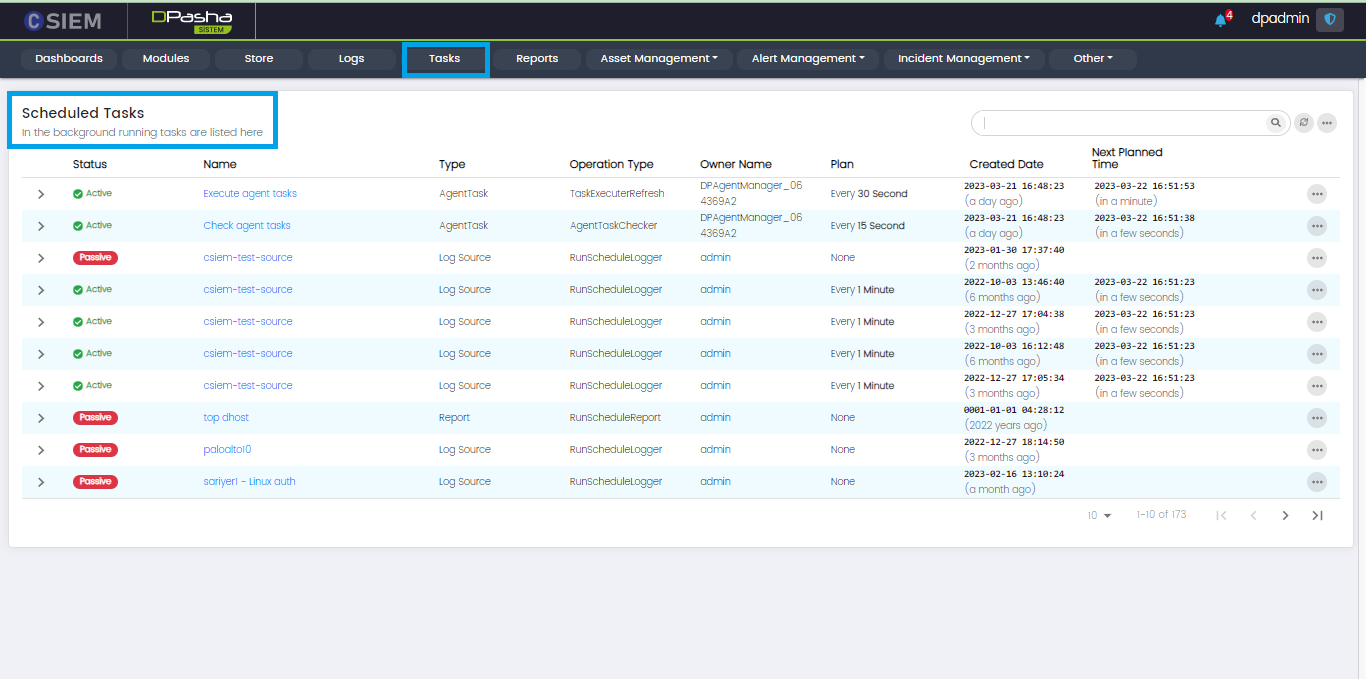
Tasks Page Items
The Tasks page has multiple row items, each of these rows is a task, more specifically a scheduled task.
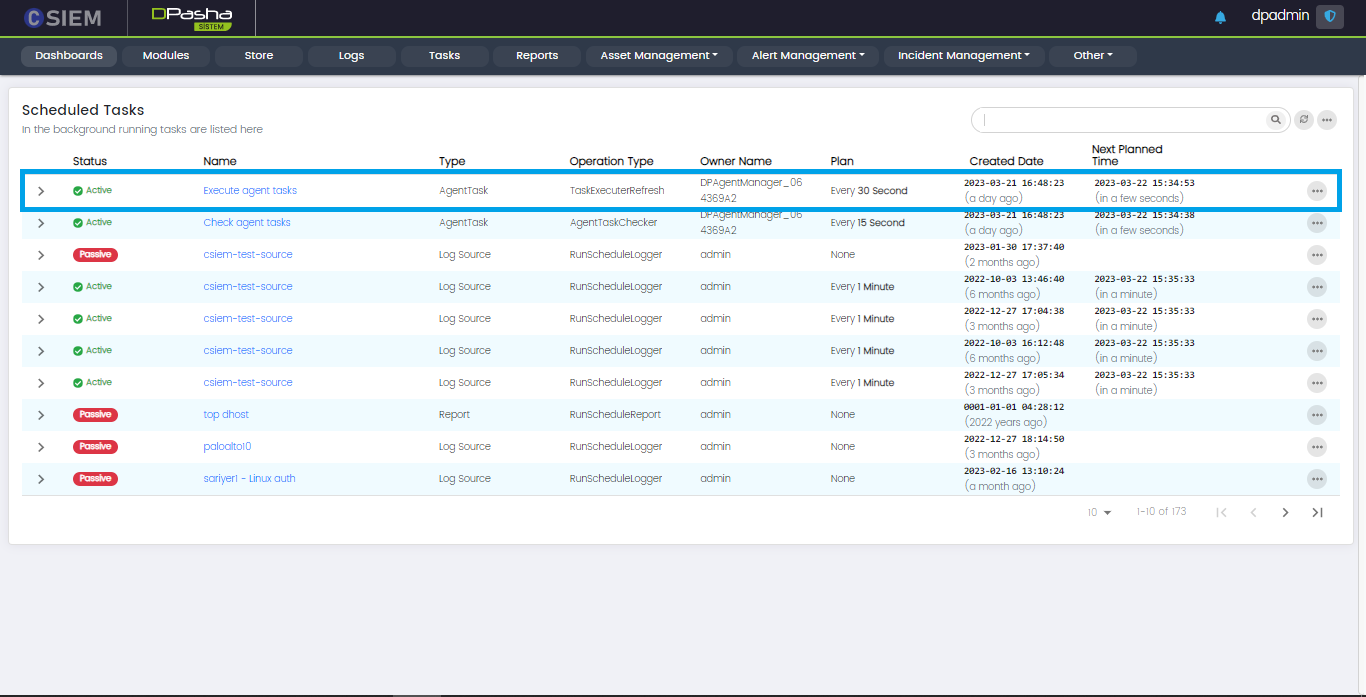
Page Columns
The Task page has the following columns:
- Status (Active or Passive)
- Name
- Type (Agent Task, Log Source, Report, etc.)
- Operation Type
- Owner Name (user creating this task)
- Plan (Shows the interval of repetition)
- Created Date
- Next Planned Time
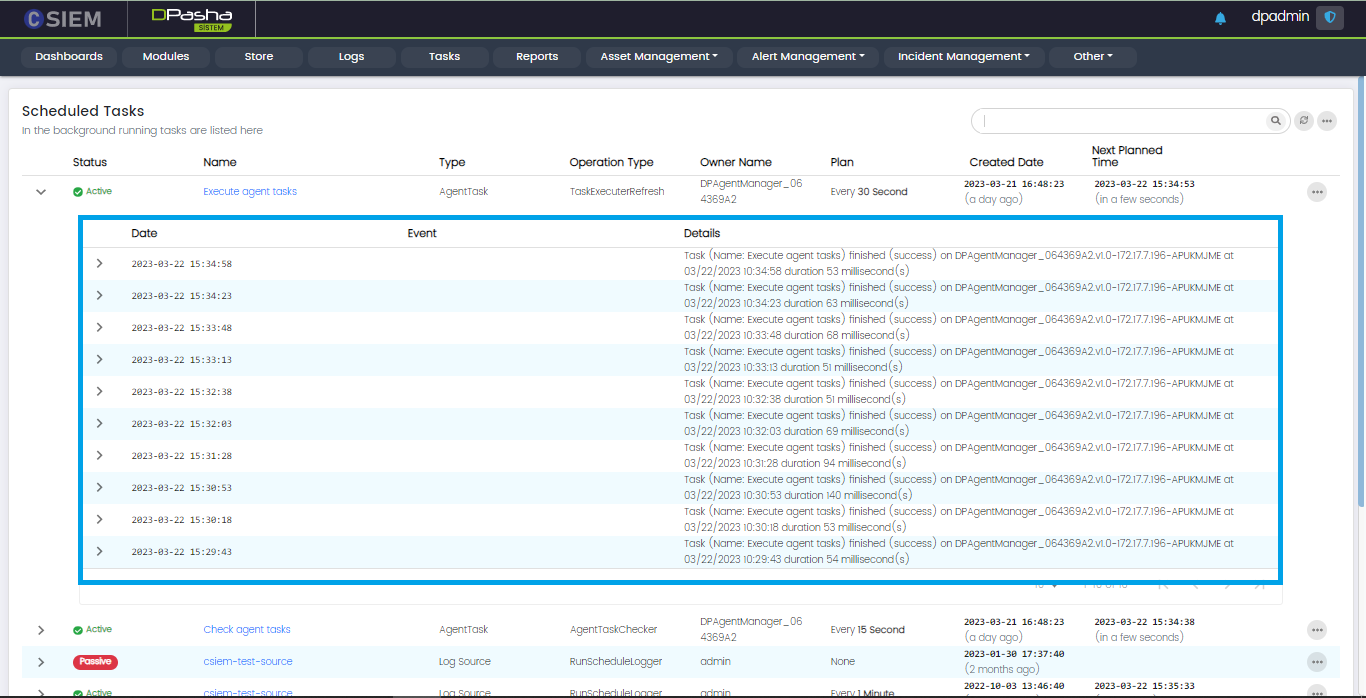
Task Details
Administrators can view details of any tasks by clicking on any of the tasks on the Tasks page.
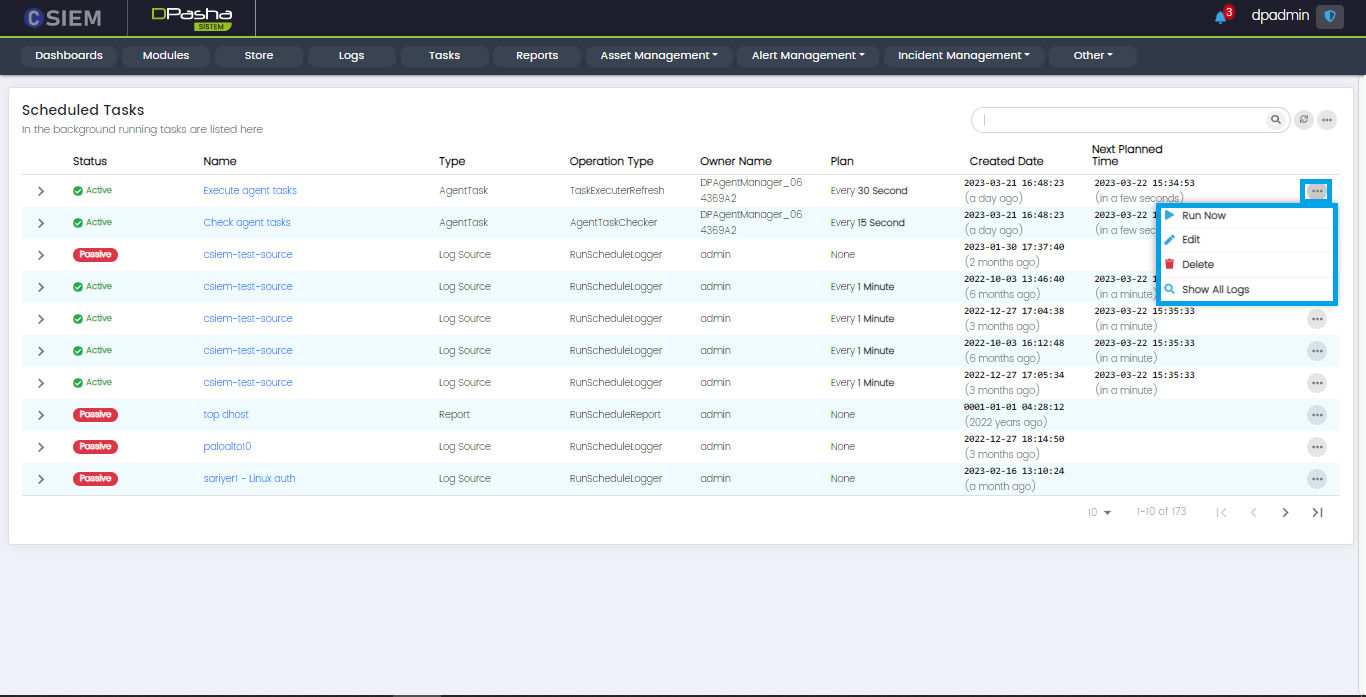
Task Options
There are multiple options for each of the scheduled tasks on this Task page.
- Run Now: Administrators can use this option to run the task at the present time.
- Edit: Administrators can use this option to edit the task.
- Delete: Administrators can use this option to delete the task.
- Show All Logs: This will show all the logs related to the task.
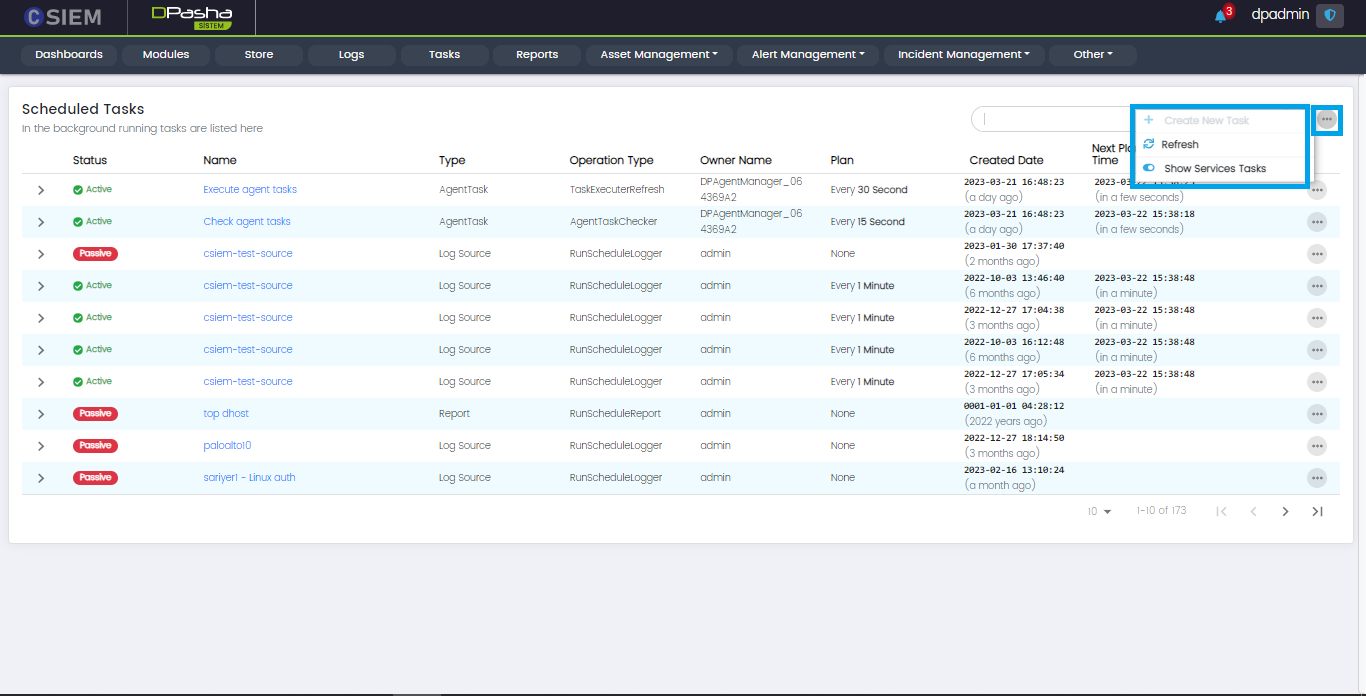
Search Options
This page provides search options for the administrators such as:
- Refresh: This option can be used to refresh the list of tasks on this page
- Show Services Tasks (Toggle Button): This option can be used to view or hide services related tasks.
Asset Management
Asset Management is used to manage all the assets in the CSIEM. Assets are resources or entities that need to be monitored and managed for security purposes. Assets can be physical devices such as servers, routers, and switches, or they can be virtual resources like databases, virtual machines, and cloud instances. CSIEM allows users to define assets based on various attributes such as IP address, hostname, MAC address, or subnet. Additionally, assets can be grouped together based on similar characteristics or attributes, making it easier to apply security policies and controls across multiple resources.
CSIEM Asset Management allows the admins to add, delete, edit, update, or manage these assets.
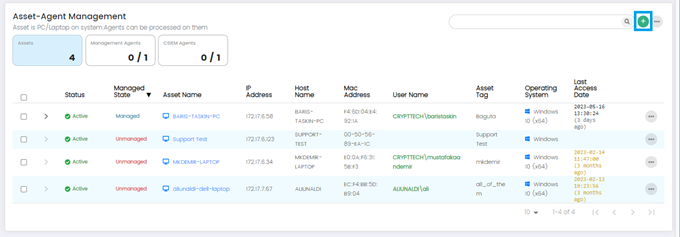
Asset-Agent Management
Asset-Agent Management Page is used to add and manage Agents & Assets. Agents are software components that are installed on endpoints such as servers, workstations, or network devices to collect and transmit security event data to the CSIEM. For details about Assets, please check Asset Management.
Administrators can go to the Asset-Agent Management page by clicking on Asset Management on the menu panel and click the Asset-Agent Management from the dropdown.

Administrators can see all the Assets by clicking on the Assets widget.
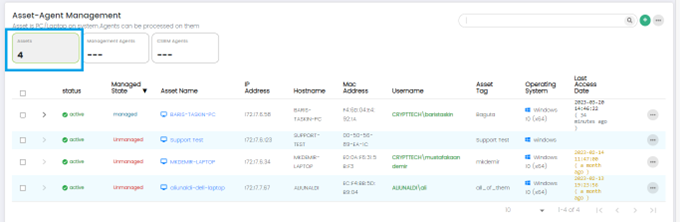
Columns on Asset –Agent Management Page: Assets Panel(default)
- Status: This column indicates the status of the asset, which could include information like online, offline, active, inactive.
- Managed State: The Managed State column shows whether the asset is actively being managed by the CSIEM system. It indicates if the asset is under monitoring and if the agent is properly connected and functioning.
- Asset Name: This column displays the name or identifier assigned to the asset being monitored.
- IP Address: The IP Address column shows the unique network address assigned to the asset.
- Hostname: This column displays the hostname associated with the asset.
- MAC Address: The MAC Address column shows the Media Access Control (MAC) address of the asset's network interface.
- Username: This column displays the username associated with the asset.
- Asset Tag: The Asset Tag column shows any specific tags or labels assigned to the asset. Asset tagging allows users to categorize and group assets based on various criteria, facilitating easier asset management.
- Operating System: This column indicates the operating system installed on the asset.
- Last Access Date: The Last Access Date column displays the date and time when the asset or agent was last accessed or communicated with the CSIEM system.
Management Agents
Administrators can see all the Assets which have Management Agents installed by clicking on the Management Agents widget.
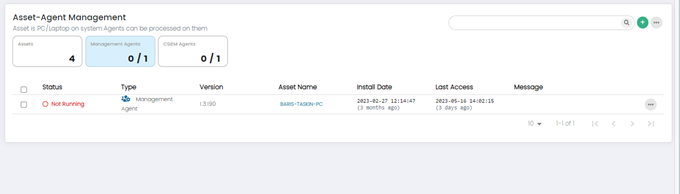
Management agents are responsible for collecting and forwarding security event data from various sources to the central CSIEM server. They act as intermediaries between data sources (network devices, security devices, etc.) and the CSIEM system. 0/1 means that 0 management agents are active out of 1.
Columns on Asset-Agent Management Page: Management Agents Panel
- Status: This column displays the status of the Asset Agent. It indicates whether the agent is running or not running.
- Type: This column indicates the type of agent whether it is Management Agent or CSIEM Agent.
- Version: This column shows the version number of the Agent software installed on the asset. It helps administrators track the software versions across their network, ensuring that all agents are up to date and running the latest software releases.
- Asset Name: This column displays the name or identifier of asset associated with the Agent. It provides a clear reference to the individual assets within the network.
- Install Date: This column shows the date when the Agent was initially installed on the asset. It provides administrators with information about the deployment timeline, enabling them to track and manage the lifecycle of agent.
- Last Access: This column indicates the date and time when the Asset Agent last communicated with the CSIEM system.
- Message: This column displays relevant messages or notifications related to the Agent or associated assets.
CSIEM Agents
Administrators can see all the Assets which have CSIEM Agents Installed by clicking on the CSIEM Agents widget.
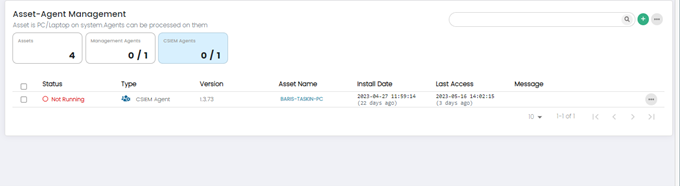
Purpose: CSIEM agents are installed on individual endpoints (servers, workstations) within the IT infrastructure. Function: They gather endpoint-specific information and facilitate real-time monitoring, analysis, and response capabilities. 0/1 means that 0 CSIEM agents are active out of 1.
Columns on Asset-Agent Management Page: CSIEM Agents Panel
- Status: This column displays the status of the Asset Agent. It indicates whether the agent is running or not running.
- Type: This column indicates the type of agent whether it is Management Agent or CSIEM Agent.
- Version: This column shows the version number of the Agent software installed on the asset. It helps administrators track the software versions across their network, ensuring that all agents are up to date and running the latest software releases.
- Asset Name: This column displays the name or identifier of asset associated with the Agent. It provides a clear reference to the individual assets within the network.
- Install Date: This column shows the date when the Agent was initially installed on the asset. It provides administrators with information about the deployment timeline, enabling them to track and manage the lifecycle of agent.
- Last Access: This column indicates the date and time when the Asset Agent last communicated with the CSIEM system.
- Message: This column displays relevant messages or notifications related to the Agent or associated assets.
Asset Agent Search
Administrators can search Assets from the search bar.
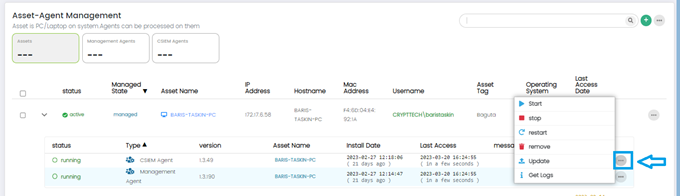
Asset-Agent Management Page: More Options
The Administrator can see further options on the Asset-Agent Management Page by clicking on the (...) button.
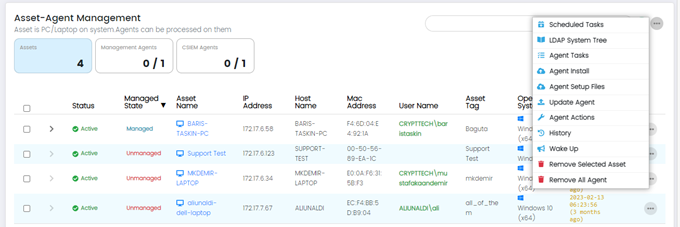
- Scheduled Tasks: This option allows administrators to schedule tasks to run automatically on selected assets.
- LDAP System Tree: This option provides access to the LDAP (Lightweight Directory Access Protocol) system tree, which is a hierarchical directory structure used for storing and organizing information about network resources, including user accounts and assets. Administrators can use this feature to manage and synchronize assets within the SIEM system with the LDAP directory.
- Agent Tasks: This option allows administrators to manage and configure the tasks that are performed by agents.
- Agent Install: This option allows administrators to install agents on selected assets.
- Update Agent: This option allows administrators to update the agents that are installed on assets.
- Agent Actions: This option allows administrators to perform actions on selected agents.
- History: This option displays a history of events related to the selected asset or agent.
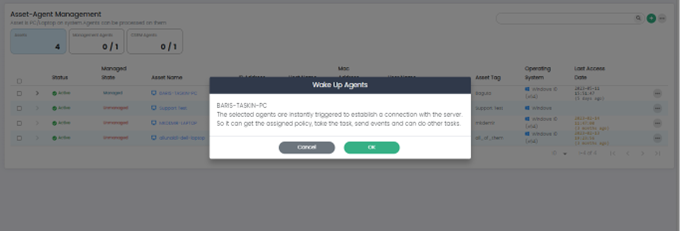
- Wake Up: This option sends a wake-up call to the selected asset.
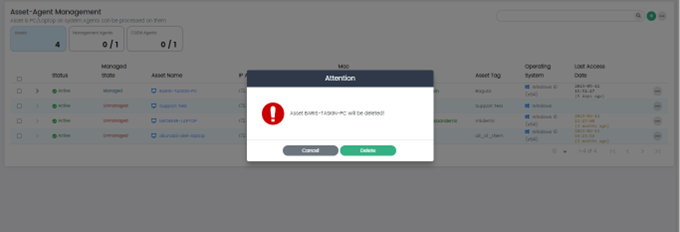
- Remove Selected Asset: This option removes the selected asset from the CSIEM system.
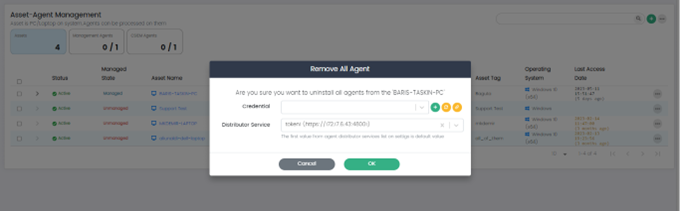
- Remove All Agents: This option removes all agents that are installed on the selected asset.
Add New Asset
The option allows Administrators to add a new Asset by clicking on the (+).
Add Asset Page
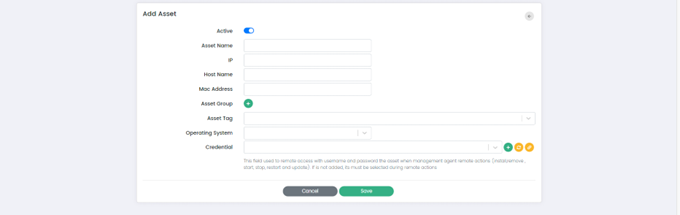
Add Asset Page has the following fields:
- Active: When the "Active" option is checked, it indicates that the asset is active and being monitored. Conversely, when the "Active" option is unchecked, it indicates that the asset is inactive and not being monitored by the system.
- Asset name: This field allows administrators to assign a name to the asset.
- IP: This field allows administrators to specify the IP address associated with the asset.
- Host Name: This field allows administrators to specify the host name associated with the asset.
- Mac Address: This field allows administrators to specify the MAC address associated with the asset.
- Asset Group: This option allows administrators to assign the assets to a specific group. Administrators can select Asset Group by clicking on the (+) button.


- Asset Tag: This field allows administrators to assign a tag to the asset. Administrators can add new tag by typing into the field or select a previously used tag.
- Operating System: This field allows administrators to specify the operating system running on the asset. Administrators can choose the operating system from the dropdown.
- Credential:
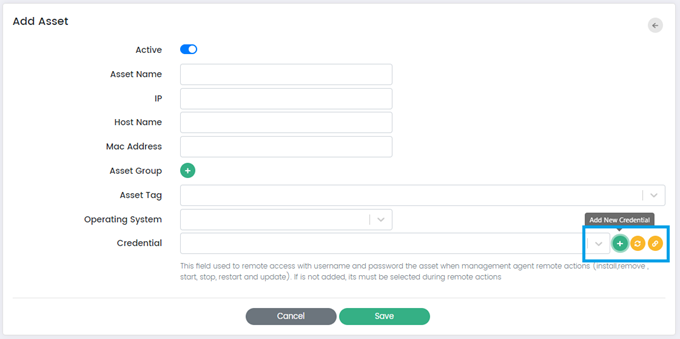
- Add New Credential: This button allows administrators to add new credentials or authentication information for accessing and managing the asset. When clicked, it prompts the administrator to the Create New Credential Page which is explained in the Credential Management Section of this document.
- Refresh Credential: This button triggers a refresh of the existing credentials associated with the asset. When clicked, it updates the stored credential information, ensuring that the CSIEM system uses the most up-to-date authentication details when connecting to the asset. This option is useful when there are changes or updates to the credentials, such as password changes or credential expiration.
- Connection Test: This button allows administrators to test the connectivity and authentication of the provided credentials against the asset. When clicked, the CSIEM system attempts to establish a connection using the specified credentials. The test connection functionality verifies whether the credentials are valid and whether the CSIEM system can successfully connect to the asset.
- Cancel or Save: These buttons allow administrators to cancel the asset creation process or save the asset configuration and add it to the CSIEM system.
Asset Options
The Administrator can see further options on each of the Assets separately by clicking on the (…) Options button for a specific Asset.
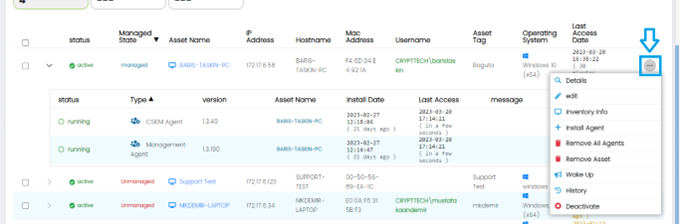
These Options are:
- Details
- Edit
- Inventory Info
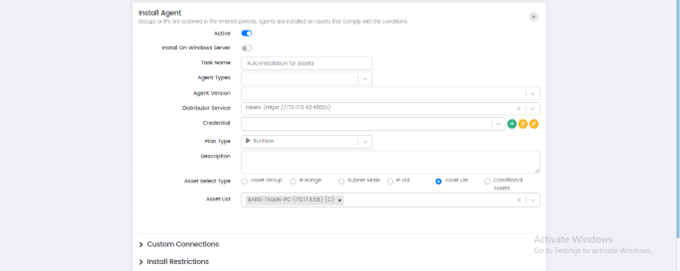
- Install Agent
- Remove All Agents
- Remove Asset
- Wake Up
- History
- Deactivate
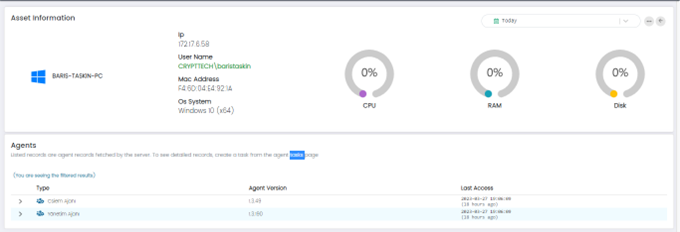
Details
This option provides information about the selected asset, such as IP address, MAC address, hostname, and operating system.
Edit
This option allows administrators to modify the details of an asset.
Edit Asset Page
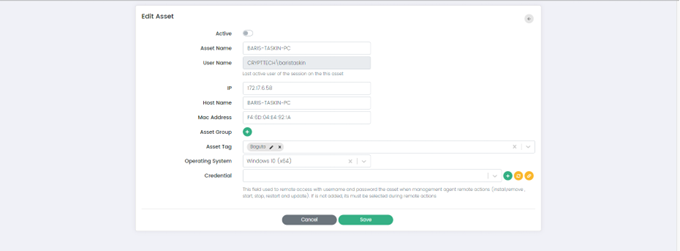
Edit Asset Page has following fields:
- Active: When the "Active" option is checked, it indicates that the asset is active and being monitored. Conversely, when the "Active" option is unchecked, it indicates that the asset is inactive and not being monitored by the system.
- Asset name: This field allows administrators to modify the name of the selected asset.
- User Name: This field allows administrators to specify the name of the user who is assigned to the selected asset.
- IP: This field allows administrators to modify the IP address of the selected asset.
- Host Name: This field allows administrators to modify the host name of the selected asset.
- Mac Address: This field allows administrators to modify the MAC address of the selected asset.
- Asset Group: This field allows administrators to assign the selected asset to a specific group within the CSIEM system.
- Asset Tag: This field allows administrators to assign a tag to the selected asset.
- Operating System: This field allows administrators to specify the operating system that is installed on the selected asset.
- Credential: This field allows administrators to specify the credentials that are required to access and monitor the selected asset.
- Cancel or Save: These buttons allow administrators to cancel any changes that have been made to the asset's properties or to save the changes and update the asset's configuration in the CSIEM system.
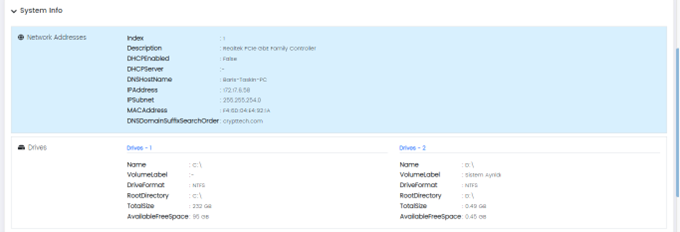
Inventory Info
This option provides a detailed inventory of the selected assets, including installed software and hardware components.

This Page has Three Panels:
- Asset Inventory and system info
- Inventory Info
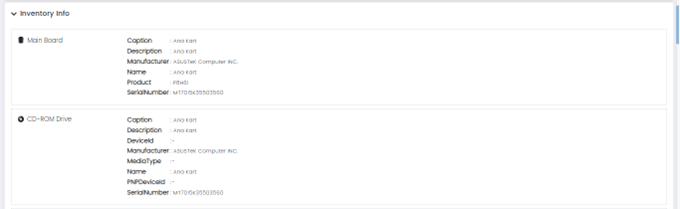
- System Info
Install Agents
This option is used to install agents on the selected asset. (NOT COVERED YET)
Remove All Agents
This option removes all agents installed on the selected asset.
Remove Asset
This option removes the selected asset.
Wake Up
This option sends a wake-up call to the selected asset.
History
This option displays a history of events related to the selected asset.
Deactivate
This option deactivates the selected asset.
Asset Details
The Administrator can see the installed Agents on an Asset by clicking on the drop-down Arrow button.
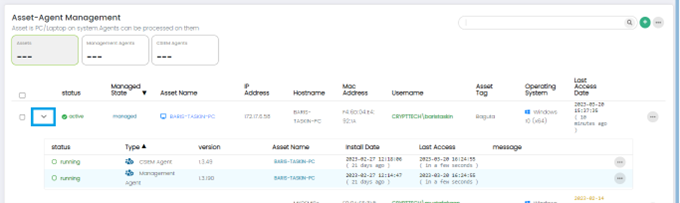
CSIEM Agent Options
For CSIEM agent in the list, the following options are available: Start, Stop, Restart, Remove, Update, and Get Logs. These options are displayed by clicking the Options button (...) at the right side of each row in the list.
- Start: This option starts the selected agent if it is not currently running.
- Stop: This option stops the selected agent if it is currently running.
- Restart: This option stops and then starts the selected agent to refresh its configuration or to troubleshoot any issues that it may be experiencing.
- Remove: This option removes the selected agent from the asset that it is installed on.
- Update: This option updates the selected agent to the latest version.
- Get Logs: This option retrieves the log files generated by the selected agent.
Case Management
Cases
Page Options
This page contains the following options:
- Auto Refresh
- Case Categories
- Add New Tag
- Delete Scheduled Case(s)
Add New Case
Administrators can use this page to add a new case.
The fields for this page are divided into sections as given below:
- Name
- Description
- Owner
- Assigned User
- Status
- Case type
- Case Category
- Parent Case
- State
- Severity
- Tags
- Source Type
- Reminder periods
- Data Settings
- Occurred Date
- Expected Finish Time
- Real Finish Time
External Settings
- Case Data
- Data
- Case Mappings
- Mappings
- Attachments
- Add attachment
- Select File(s)
- Cancel Button
- Administrators can use this button to cancel all changes and quit the "Add New Case" page.
- Save Button
- Administrators can use this button to save all changes and quit the "Add New Case" page.
Case Categories
Page Options
This page contains the following options:
- Add New Case Category
- Import Case Category
Add New Case Category
Administrators can use this page to add a new case category.
The page has the following fields:
- Name
- Description
- Case Type
- Tag
- Similarity Properties
- Similarity Duration as Min
- Expected Finish Day Count
- Authorization
- View User Groups
- Analyst User Groups
- Manager User Groups
- Mappings
- Cancel Button
- Administrators can use this button to cancel all changes and quit the "Add New Case Category" page.
- Save Button
- Administrators can use this button to save all changes and quit the "Add New Case Category" page.
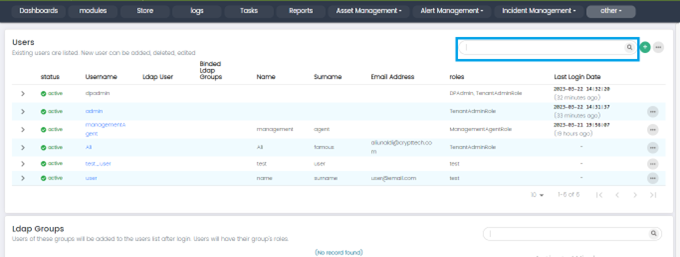
User Management
User Management is the page where Users on CSIEM can be created, edited, and deleted. Role management focuses on defining roles and associated permissions, while User management revolves around creating and managing user accounts and their respective roles within the CSIEM system.

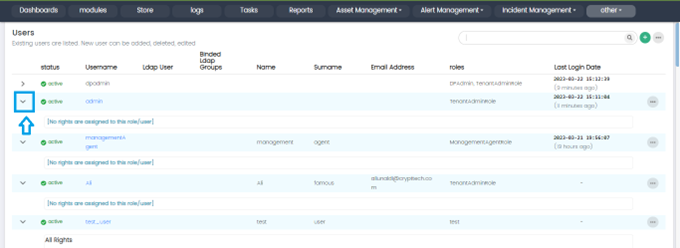
User Management Page: Columns
- Status: This column indicates the status of the user account, whether it is active or passive.
- Username: This column displays the unique username or login ID associated with each user.
- Ldap User: This column specifies whether the user is an LDAP (Lightweight Directory Access Protocol) user. It indicates if the user account is managed through an external LDAP directory.
- Binded Ldap Groups: This column shows the LDAP groups to which the user is assigned or associated.
- Name: This column displays the given name of the user.
- Surname: This column displays the surname of the user.
- Email Address: This column shows the email address associated with the user account.
- Roles: This column lists the roles assigned to each user.
- Last Login Date: This column displays the date and time of the user's most recent login to the CSIEM system.
Search Users
Administrators can search users through the search bar. It does not differentiate between lowercase or uppercase letters and only searches in text.
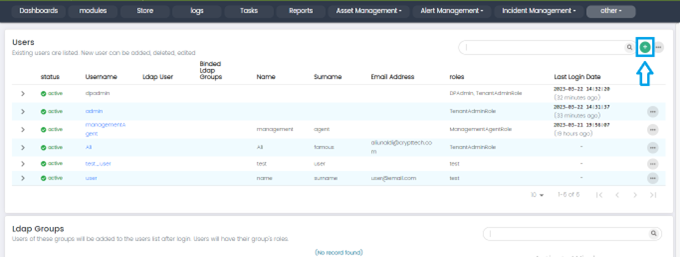
Add New User
Add User button: New User can be added by clicking the (+) button on this page.
Add New User Page
Administrators can add new users on this page.
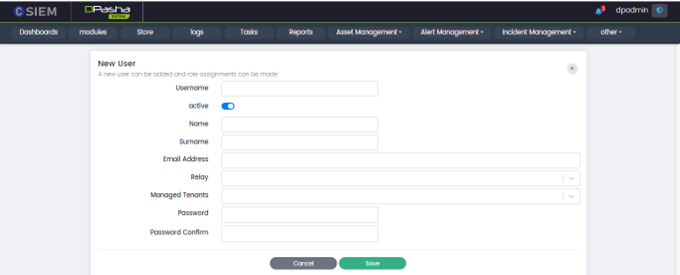
Add new user page has the following fields:
- Username: This field allows administrators to specify the username of the user account.
- Active: This field allows administrators to activate or deactivate the user account.
- Name: This field allows administrators to specify the first name of the user.
- Surname: This field allows administrators to specify the last name of the user.
- Email Address: This field allows administrators to specify the email address associated with the user account.
- Role: This field allows administrators to assign the role associated with the user account. Administrators can select multiple roles to assign.
- Managed Tenants: This field allows administrators to specify which tenants the user has access to within the CSIEM system.
- Password: This field allows administrators to specify the user's password.
- Password Confirm: This field allows administrators to confirm the new password that has been set for the user.
Users Management Page Options
Administrator can view more option by clicking (…) button on this page.
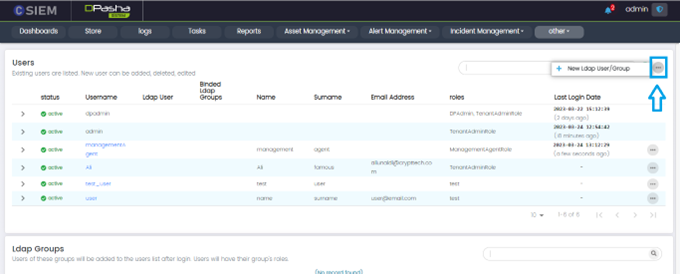
New LDAP User/Group:

User List Details
The Administrator can see details of each User in the list by clicking on the Down Arrow button on this page. These details show what rights are given to this user and their associated role.
User List Options
The Administrator can see options for each user by clicking on the (...) button on the Users List.
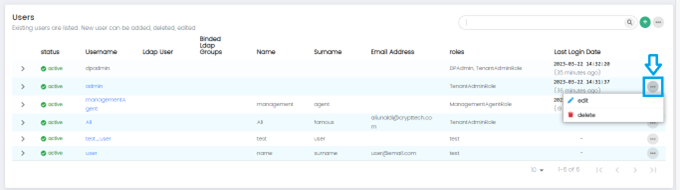
These Options are:
- Edit: to edit the existing user in the list.
- Delete: to delete the existing user in the list.
Edit User
An existing user can be edited by clicking on the Edit option.
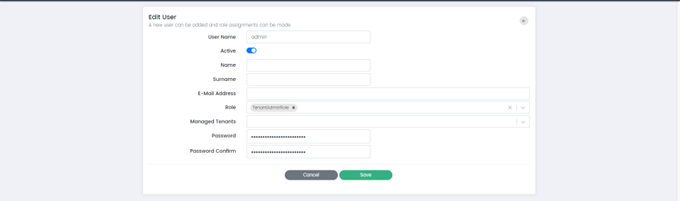
Edit User page has the following fields:
- Username: This field allows administrators to change the username of the user account.
- Active: This field allows administrators to activate or deactivate the user account.
- Name: This field allows administrators to change the first name of the user.
- Surname: This field allows administrators to change the last name of the user.
- Email Address: This field allows administrators to change the email address associated with the user account.
- Role: This field allows administrators to change the role associated with the user account.
- Managed Tenants: This field allows administrators to modify which tenants the user has access to within the CSIEM system.
- Password: This field allows administrators to change the user's password.
- Password Confirm: This field allows administrators to confirm the new password that has been set for the user.
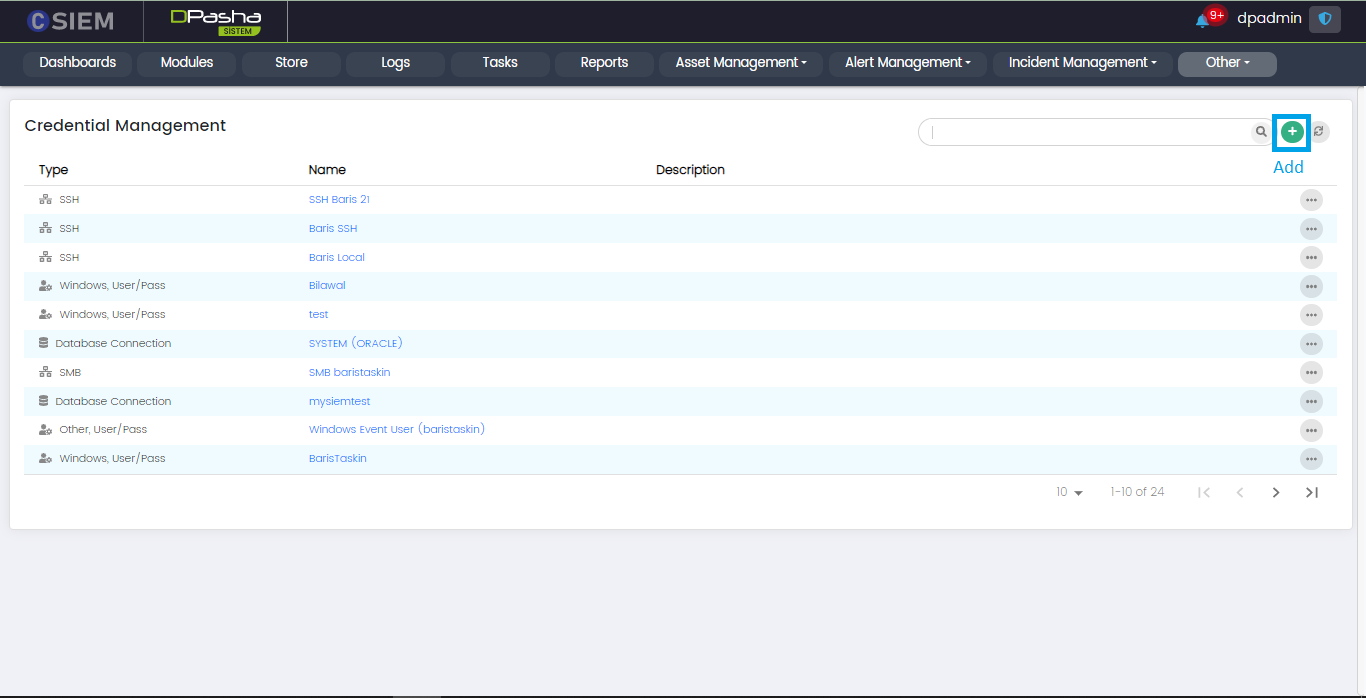
Credential Management
This page allows the administrators to manage the credentials of the assets that will be integrated into the CSIEM. Assets include computers, software applications, and services. A credential is a collection of key-value pairs that are used to get access to a device, software application (both desktop and web), or service.
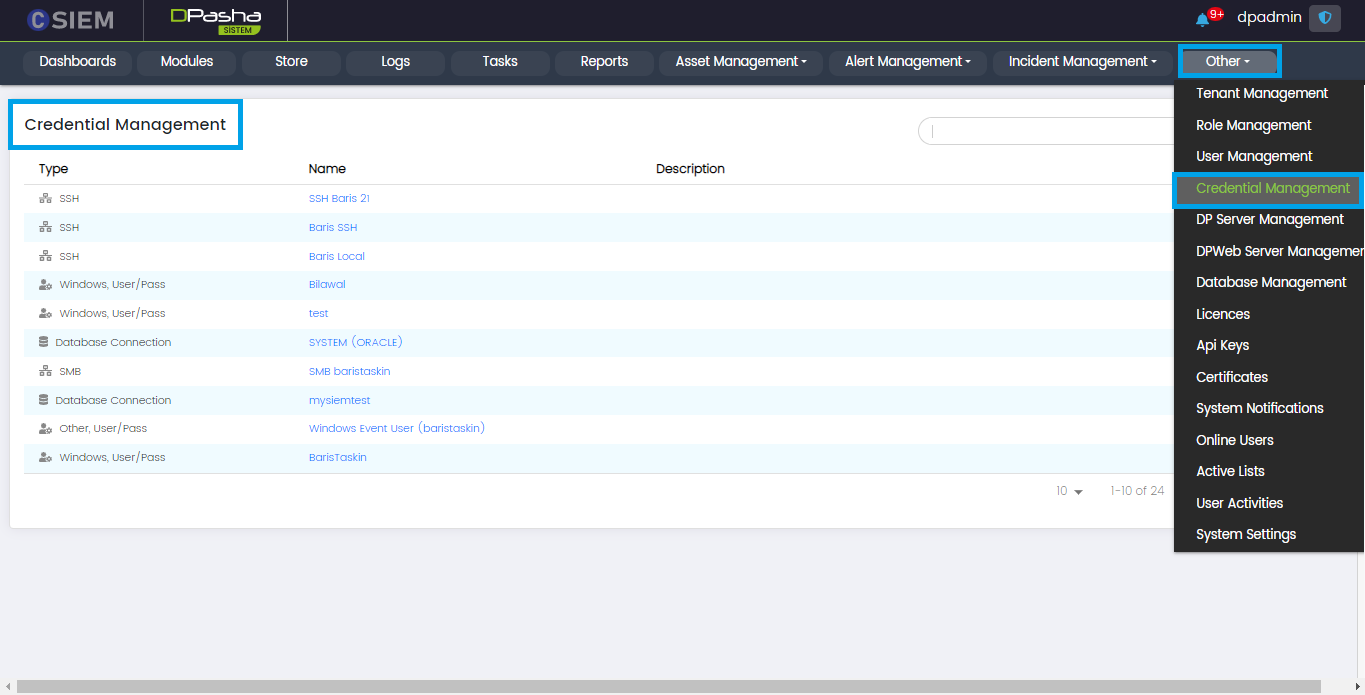
Page Columns
The Credential Management page consists of the following columns.
- Type: This column shows the method used to establish a connection with the asset. For example, SSH, FTP, SMB, REST API, Kafka, Database Connection, Elastic/Open Search, Windows User/Pass, Other User/Pass and Custom Credential.
- Name: This column shows the name given to the credential. It will be used during the integration of the asset with the CSIEM.
- Description: This column shows the description given to the credential.
Add Button
Administrators can use the (+) button on the top right, to create a new credential.
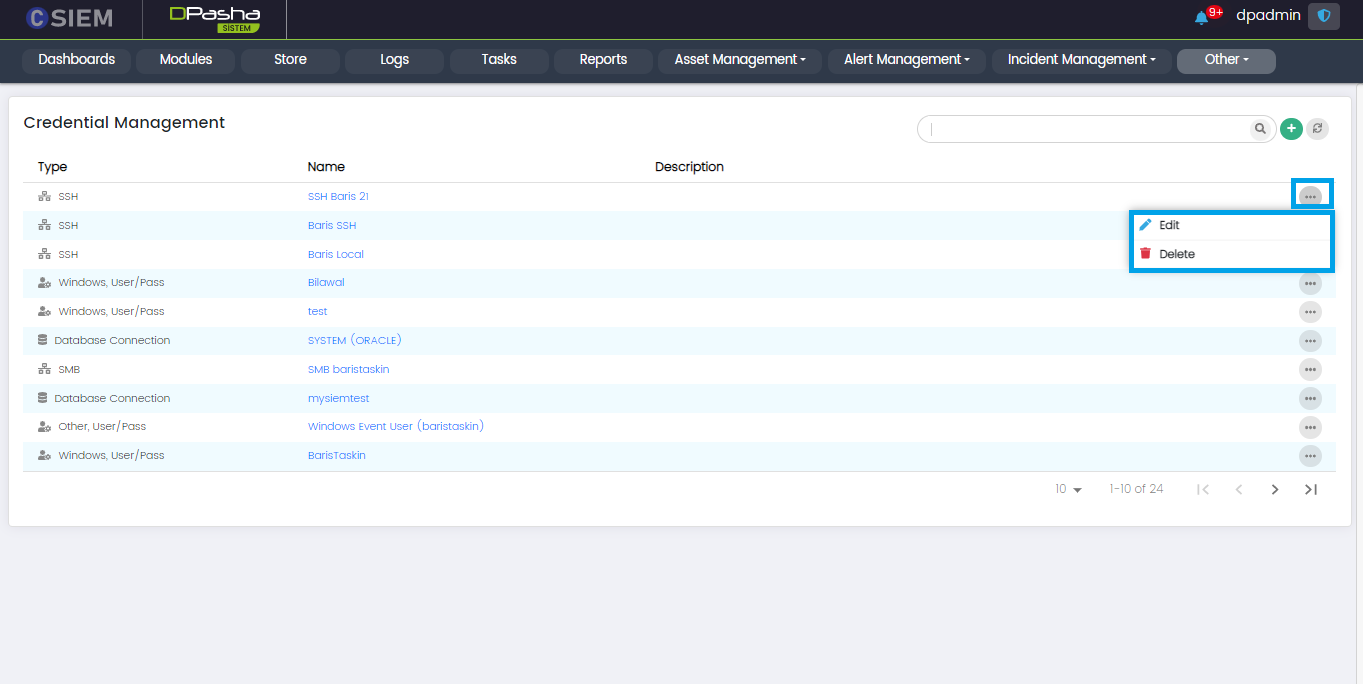
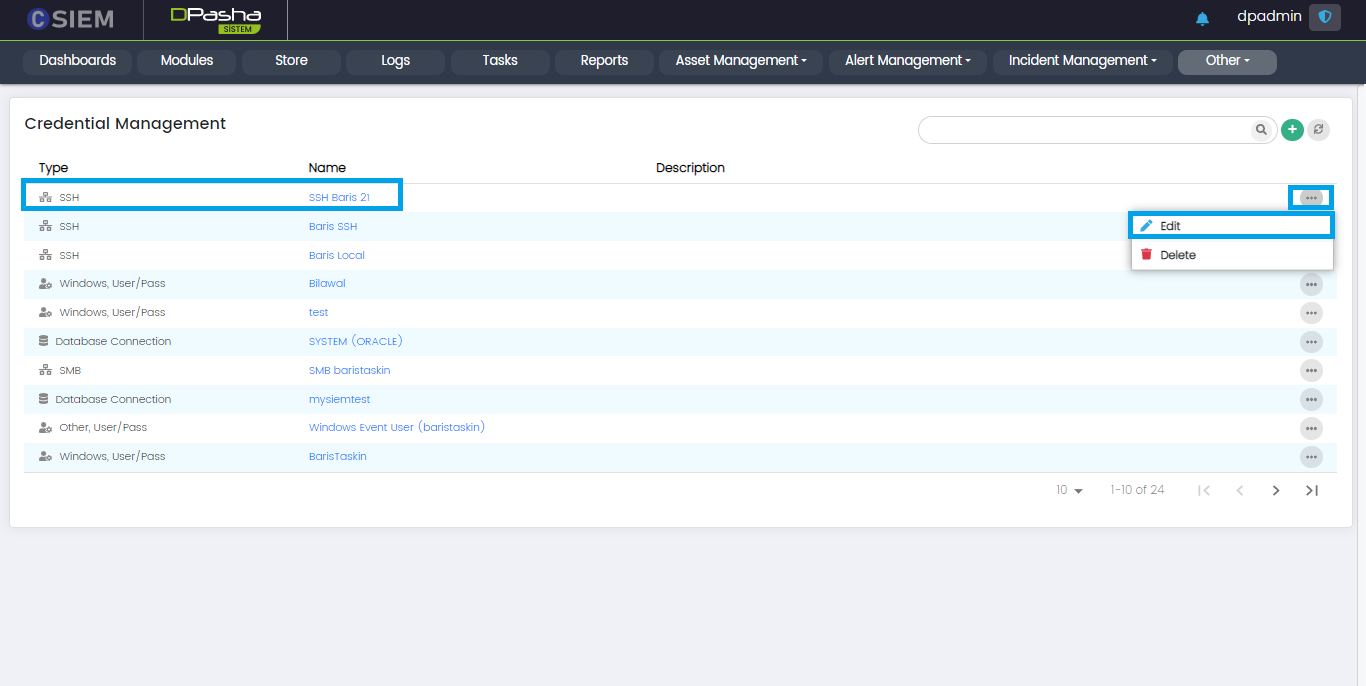
Credential Options
Every credential on the credential page has two options I.e., Edit and Delete.
- Edit: Administrators can edit the credential by clicking this option.
- Delete: Administrators can delete the existing credential by clicking this option.
Create New Credential
This page allows the administrators to create a new credential.
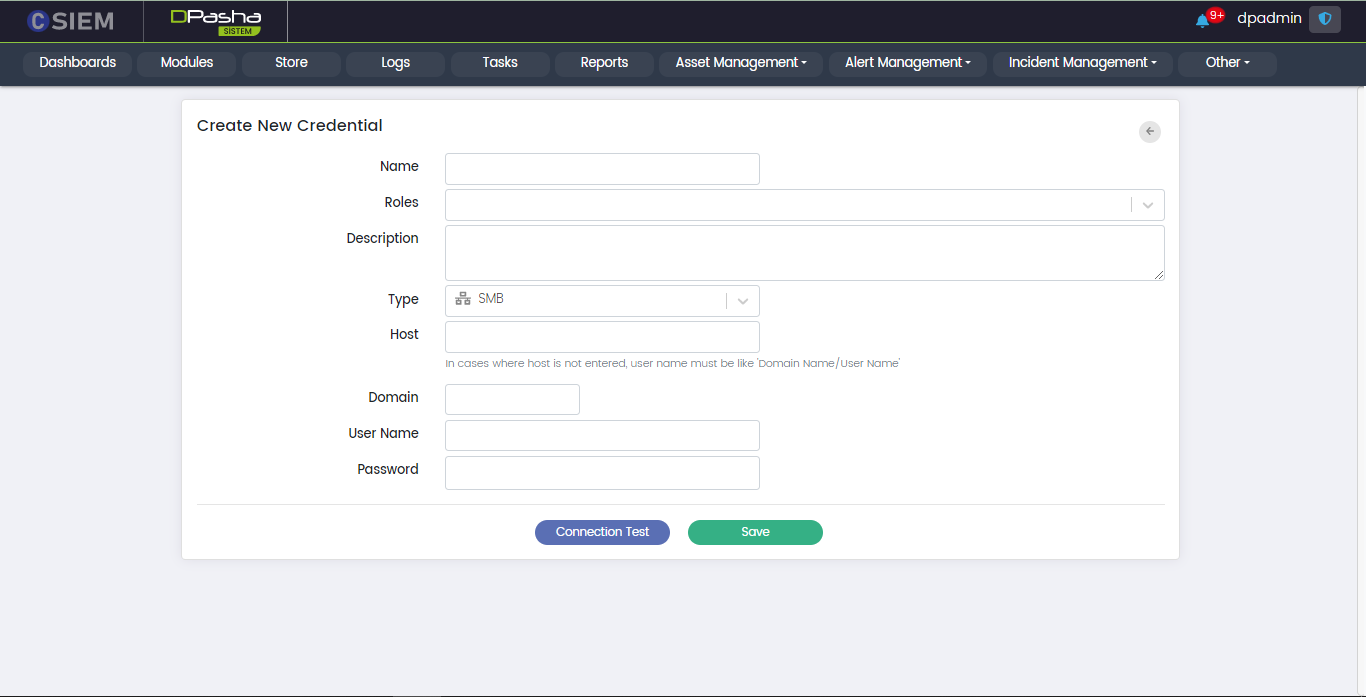
Create New Credential page has the following fields:
Name
Administrators can write the name for the new credential in this field.
Roles
This field allows the administrators to select roles for the new credentials.
Description
This field allows the administrators to write some details about the new credential.
Type
This field allows the administrators to select different types of methods to establish a connection with the assets. Further fields in the Create New Credential page depend upon the selection of the Type field. Details for each of the Types are given below.
Type > SSH
This allows the administrators to create the credentials for SSH (Secure Shell) connection method.
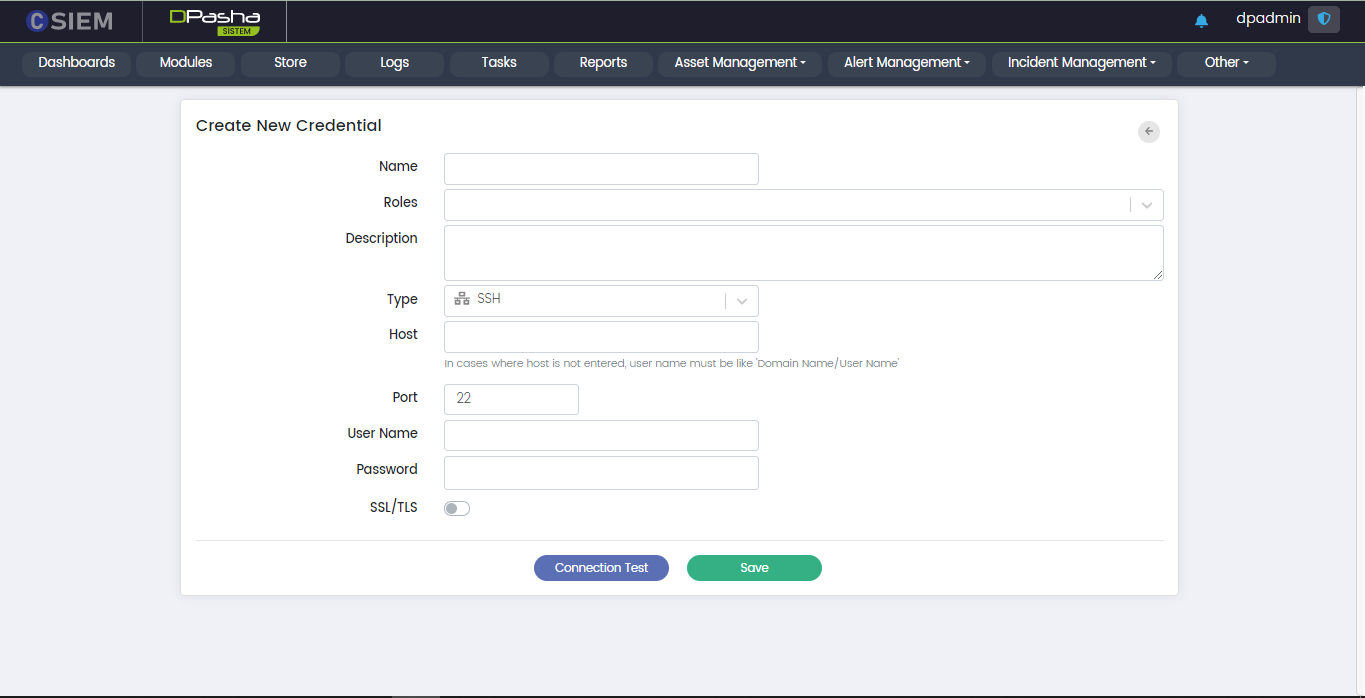
Respective fields for this connection type are:
- Host: This field requires the administrators to provide the IP address.
- Port: The standard port number for this method is 22.
- User Name: This field requires the administrators to provide the username.
- Password: This field requires the administrators to provide the password against the username.
Type > FTP
This allows the administrators to create the credentials for FTP (File Transfer Protocol) connection method.
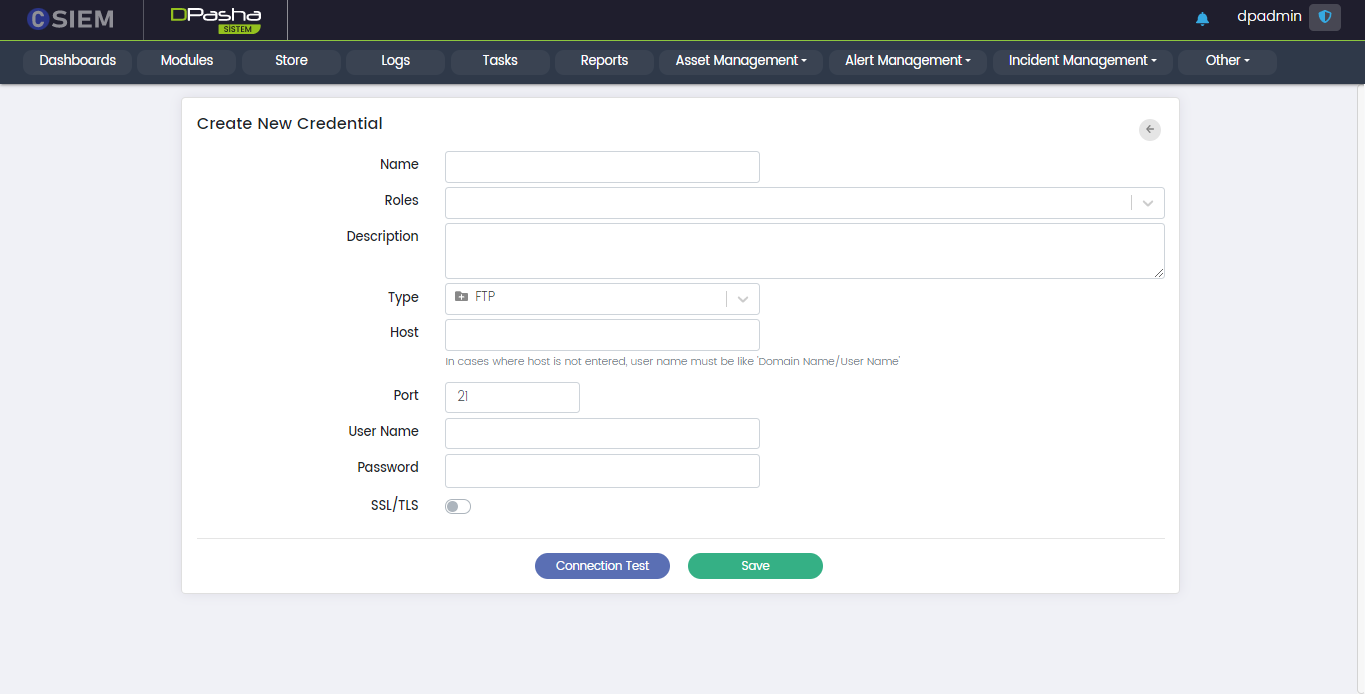
Respective fields against this selection are:
- Host: This field requires the administrators to provide the IP address.
- Port: The standard port number for this method is 21.
- User Name
- Password
Type > SMB
This allows the administrators to create the credentials for the SMB (Server Message Block) connection method.
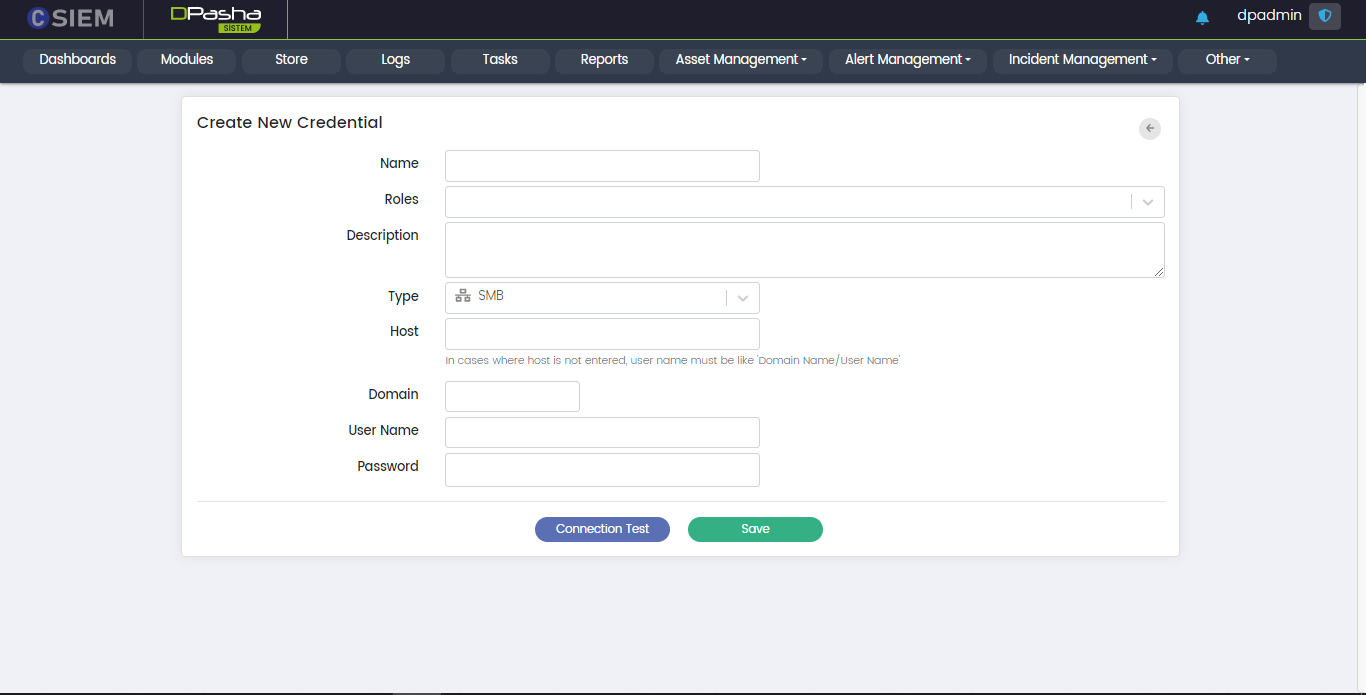 Respective fields for this connection type are:
- Host
- Domain: It requires the administrators to provide the network domain on which the device is present.
- User Name
- Password
Type > Kafka
This option allows the administrators to create the credentials for Kafka (distributed event store and stream-processing platform)
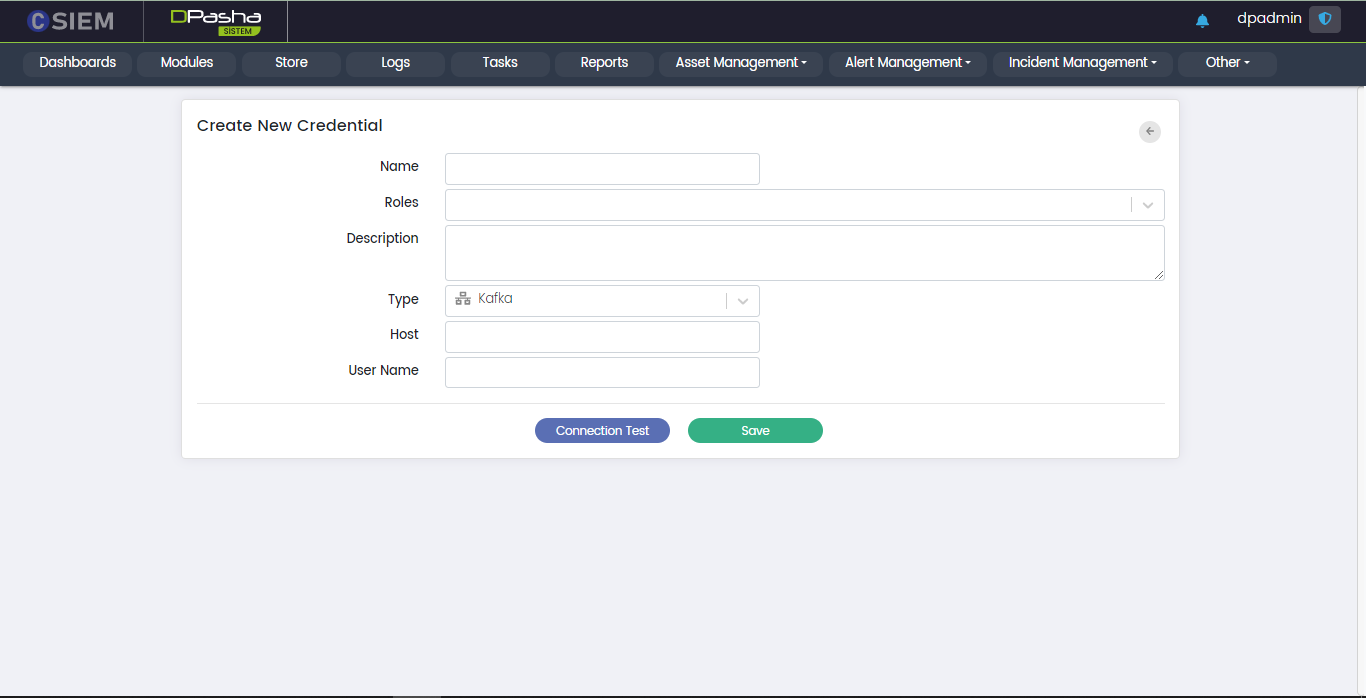 Respective fields against this selection are:
- Host
- User Name
Type > Elastic/Open Search
This option allows the administrators to create the credentials for Elasticsearch/OpenSearch.
Respective fields against this selection are:
- Service Type: This field requires the administrators to select between Elasticsearch/OpenSearch.
- Elasticsearch selected as the Service Type
- OpenSearch selected as the Service Type
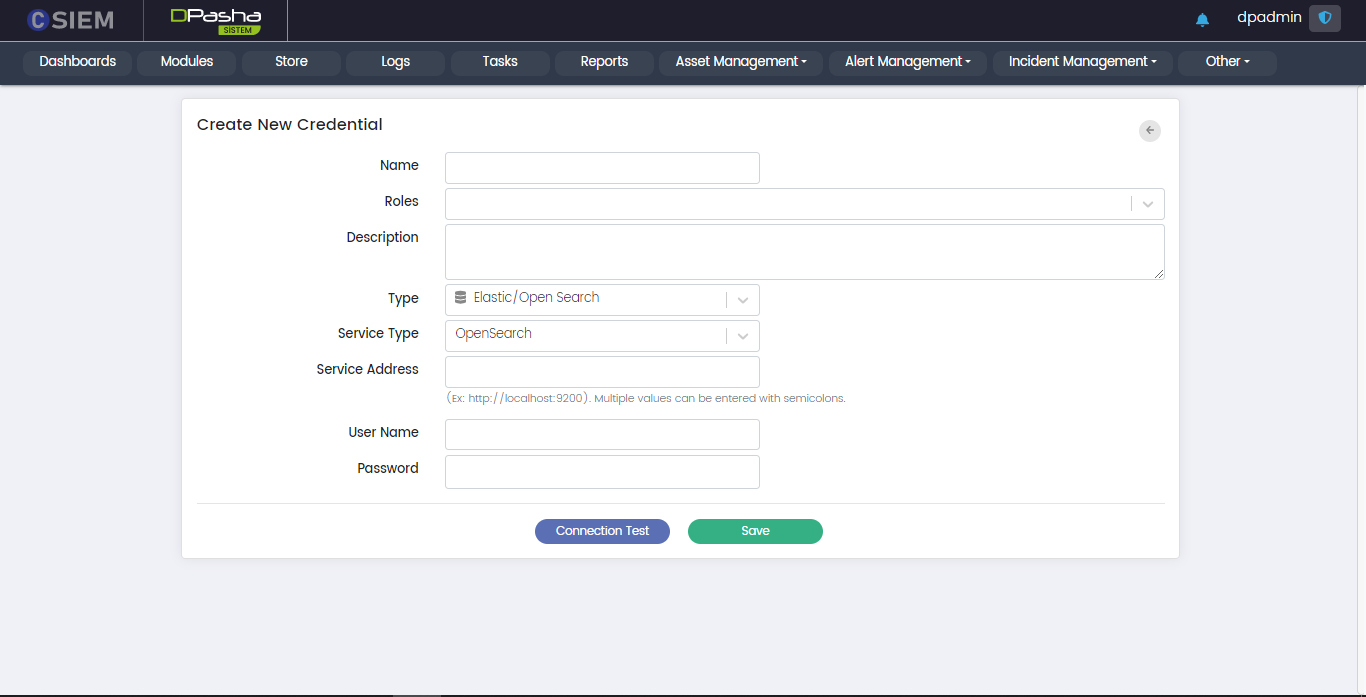 Both of the above options require exactly the same fields, as mentioned below.
- Service Address: This field requires the administrators to provide the URL for the service.
- User Name
- Password

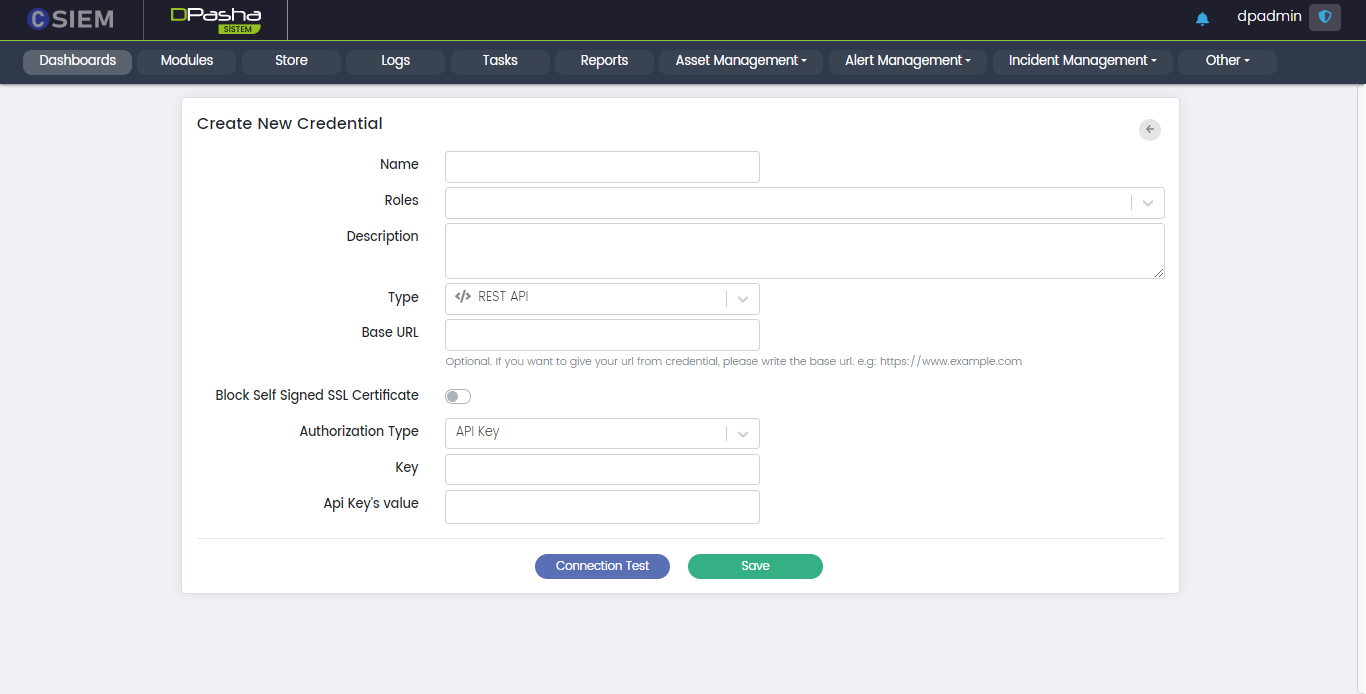
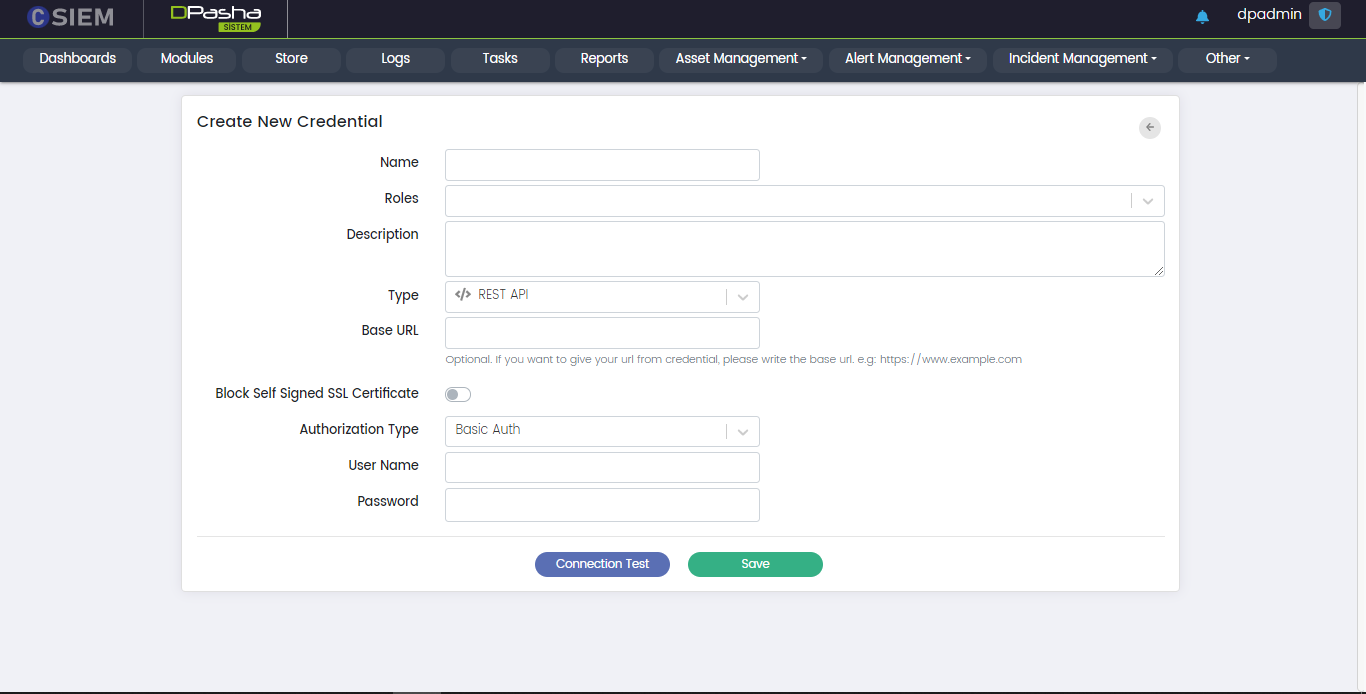
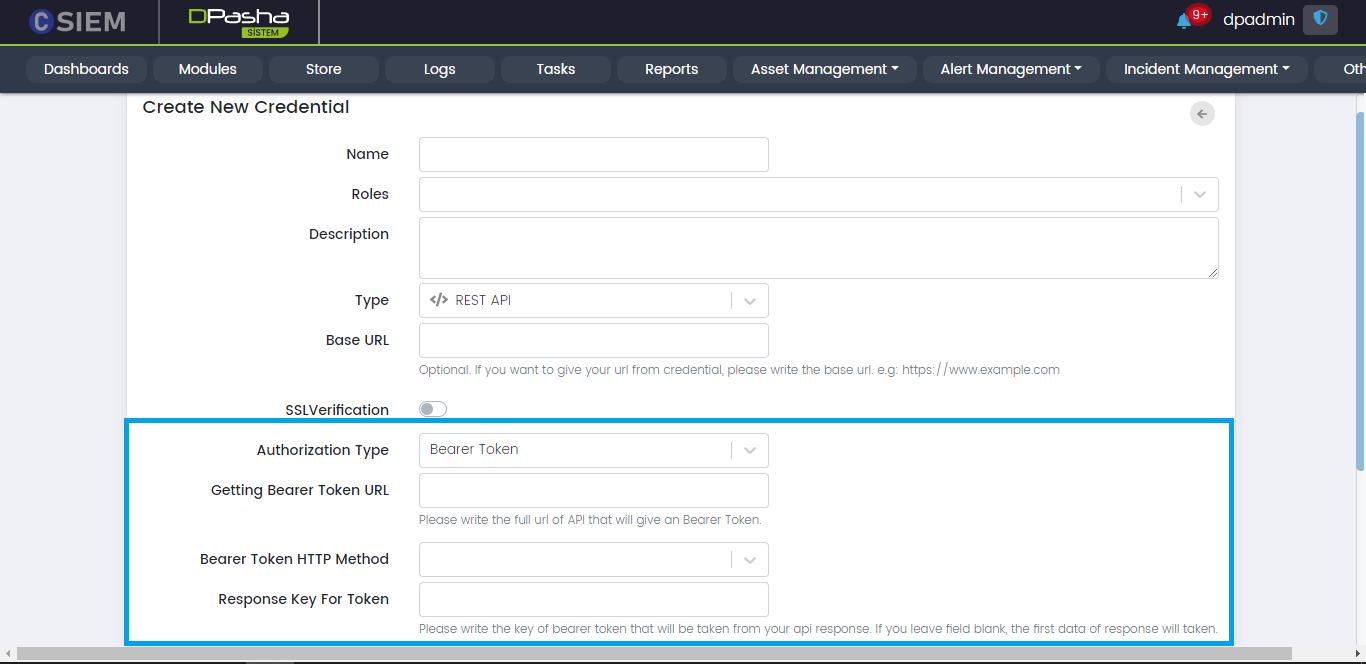
Type > REST API
This option allows the administrators to create the credentials, in order to access a platform using its REST API. Respective fields against this selection are:
Base URL: This field requires the administrators to provide the URL of the platform they want to access.
Authorization Type: Administrators can select different authorization types as given below:
API Key: The API key has a name and value.
- Key: This field requires the administrators to provide the name of the API key.
- API Key’s value: This field requires the administrators to provide an API key.
Basic Auth: Respective fields against this selection are as follows:
- Host: This field requires the administrators to provide the IP address.
- User Name
Bearer Token: A Bearer Token is a type of access token. It can be a string of hexadecimal characters or structured tokens.Respective fields for this selection are as follows:
- Getting Bearer Token URL: The URL address containing the bearer token.
- Bearer Token HTTP Method: It includes GET, POST or PUT method.
- Response Key for Token: Server sends back the response in the form of key-value pairs. This field requires the key that contains the token value. If no key is given then, by default, the value of the first key will be selected.
Bearer API Parameters: In this section, the administrators need to provide the credentials for accessing the Bearer Token. The parameters can be attached to different parts of the message as given by the following option
- Add Parameters to
- Headers
- URL Parameters
- Body (JSON)
- Body (Form)
- Administrators need to select from the dropdown or provide value for following fields:
- Key (dropdown)
- User
- Password
- AuthKey
- JWT
- Api_key
- grant_type
- Value Type (dropdown)
- Text
- Password
- Number
- Value
- Key (dropdown)
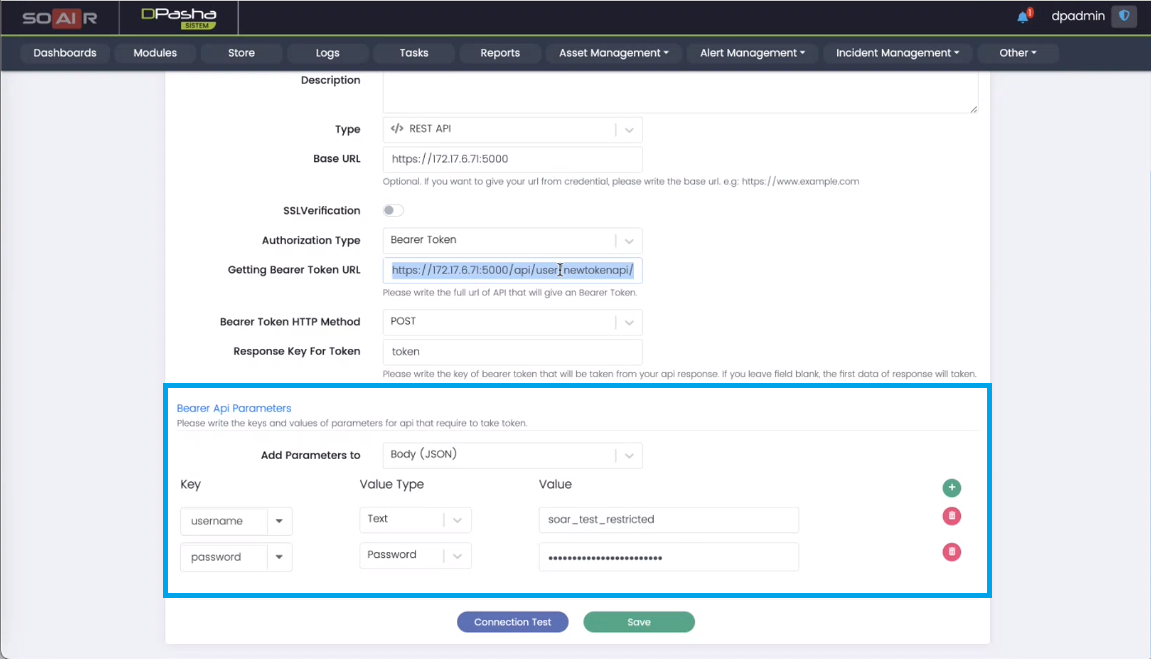
- Add Parameters to
Type > Database Connection: Microsoft SQL Server
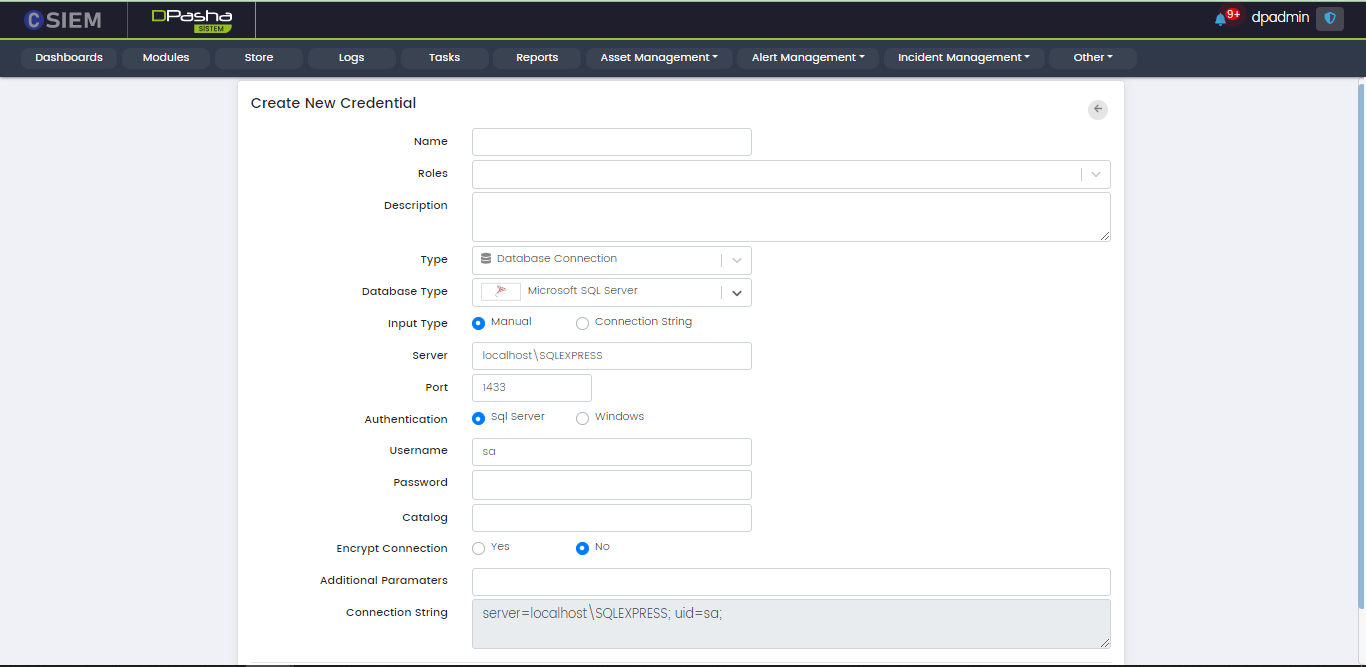
There are two methods to specify the credential. The first is “Manual” and the other one is “Connection String”. If we choose the Input Type as Manual, then we get the following fields:
- Server (the URL where the database is hosted)
- Port
- Authentication
- Sql Server
- Windows
- User Name
- Password (disabled, when Authentication is selected as Windows)
- Encrypt Connection
- Yes
- No
- Additional Parameters
- Connection String (disabled)
The second method is Connection String. It is an expression that contains the parameters required for the applications to connect to a database server. If we choose the Input type as Connection String, then we get the following fields.
- Password
- Connection String
Type > Database Connection: MySQL

There are two methods to specify the credential. The first is “Manual” and the other one is “Connection String”. If we choose the Input Type as Manual, then we get the following fields:
- Server
- Port
- Username
- Password
- Database
- SSL Mode
- Other Settings
- Connection String (disabled)
The second method is Connection String. It is an expression that contains the parameters required for the applications to connect to a database server. If we choose the Input type as Connection String, then we get the following fields.
- Password
- Connection String
Type > Database Connection: Oracle
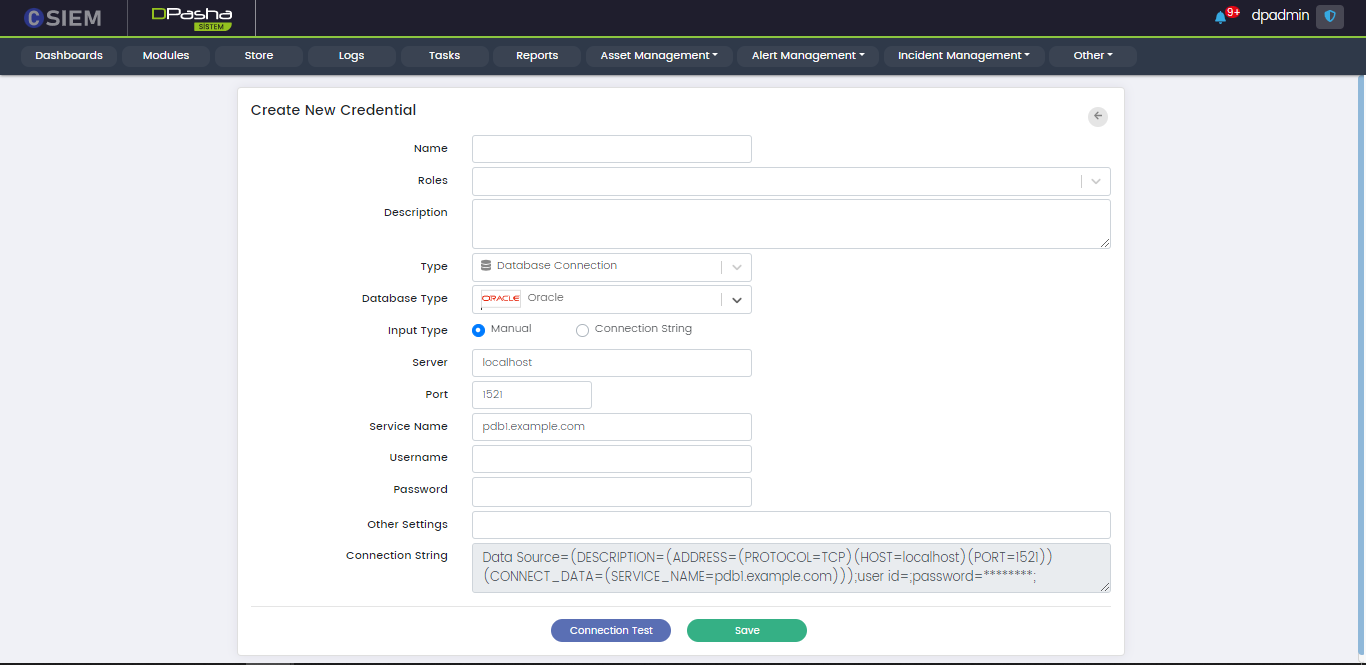
There are two methods to specify the credential. The first is “Manual” and the other one is “Connection String”. If we choose the Input Type as Manual, then we get the following fields:
- Server
- Port
- Service Name
- Username
- Password
- Other Settings
- Connection String (disabled)
The second method is Connection String. It is an expression that contains the parameters required for the applications to connect to a database server. If we choose the Input type as Connection String, then we get the following fields.
- Password
- Connection String
Type > Database Connection: PostgreSQL
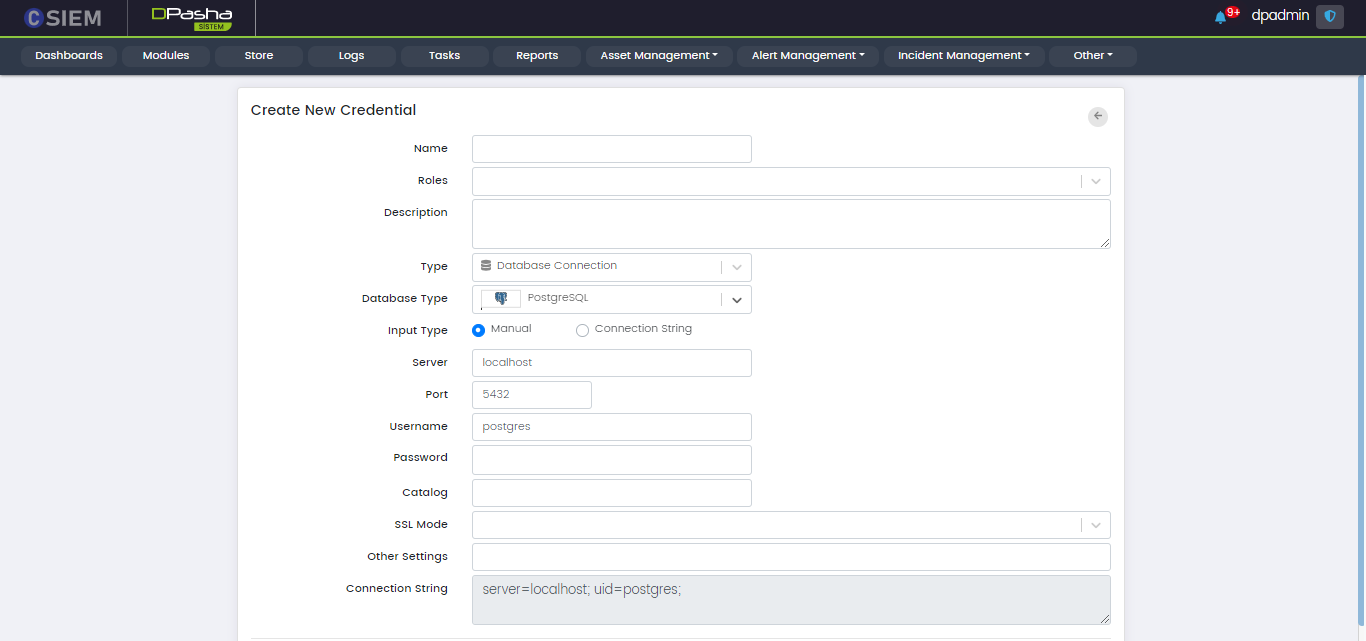
There are two methods to specify the credential. The first is “Manual” and the other one is “Connection String”. If we choose the Input Type as Manual, then we get the following fields:
- Server
- Port
- Username
- Password
- Catalog
- SSL Mode
- Other Settings
- Connection String (disabled)
The second method is Connection String. It is an expression that contains the parameters required for the applications to connect to a database server. If we choose the Input type as Connection String, then we get the following fields.
- Password
- Connection String
Type > Database Connection: SQLite
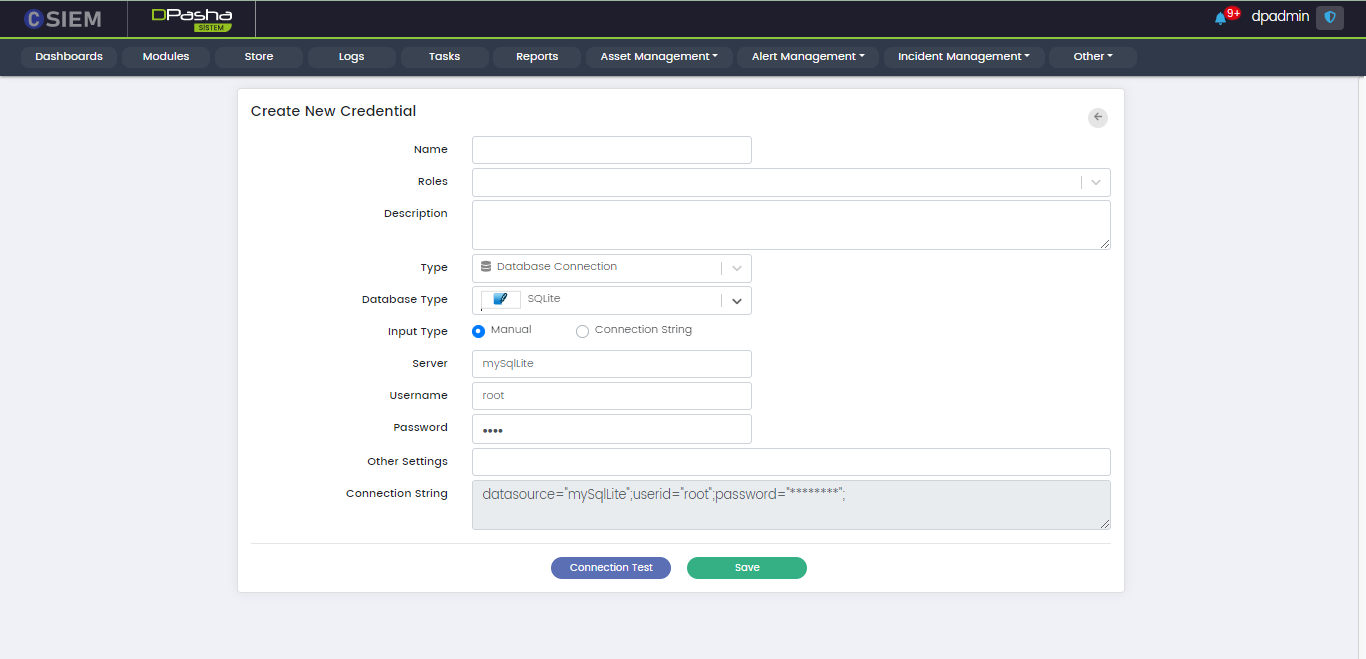
There are two methods to specify the credential. The first is “Manual” and the other one is “Connection String”. If we choose the Input Type as Manual, then we get the following fields:
- Server
- Port
- Username
- Password
- Other Settings
- Connection String (disabled)
The second method is Connection String. It is an expression that contains the parameters required for the applications to connect to a database server. If we choose the Input type as Connection String, then we get the following fields.
- Server (disabled)
- Port (disabled)
- Username (disabled)
- Password (disabled)
- Other Settings (disabled)
- Connection String
Type > Database Connection: OleDB
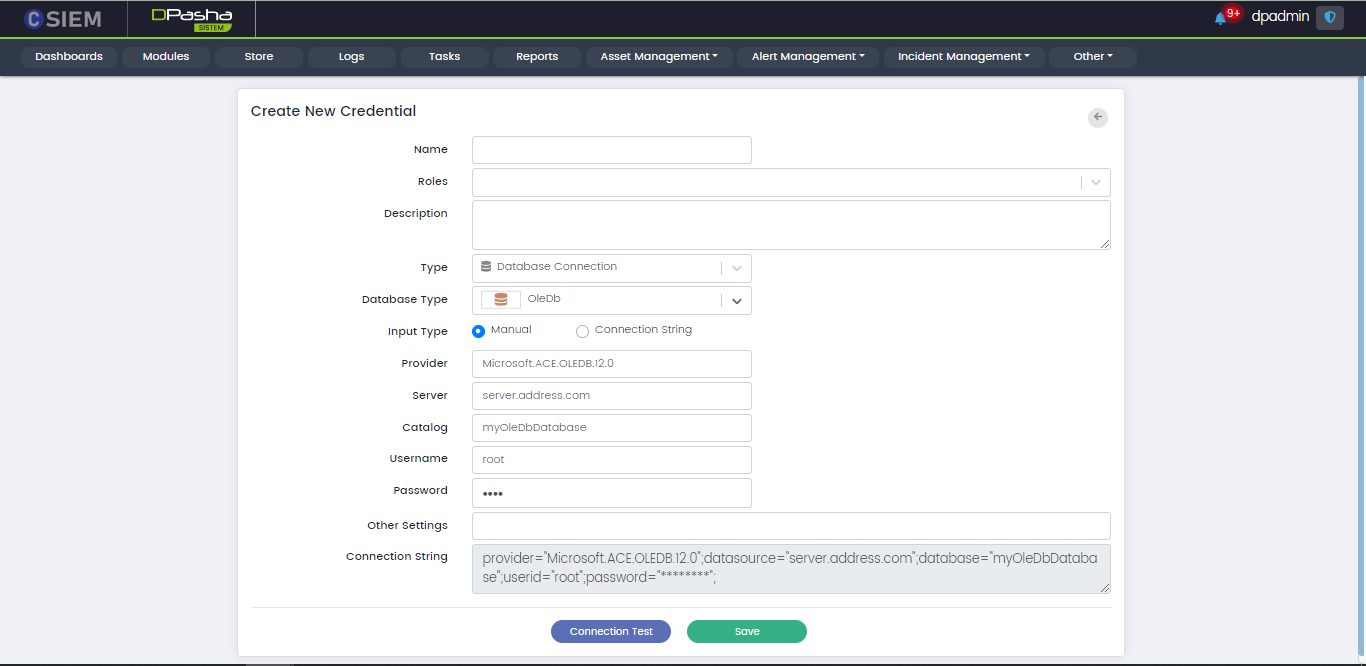
There are two methods to specify the credential. The first is “Manual” and the other one is “Connection String”. If we choose the Input Type as Manual, then we get the following fields:
- Provider
- Server
- Catalog
- Username
- Password
- Other Settings
- Connection String (disabled)
The second method is Connection String. It is an expression that contains the parameters required for the applications to connect to a database server. If we choose the Input type as Connection String, then we get the following fields.
- Provider (disabled)
- Server (disabled)
- Catalog (disabled)
- Username (disabled)
- Password (disabled)
- Other Settings (disabled)
- Connection String
Type > Database Connection: ODBC
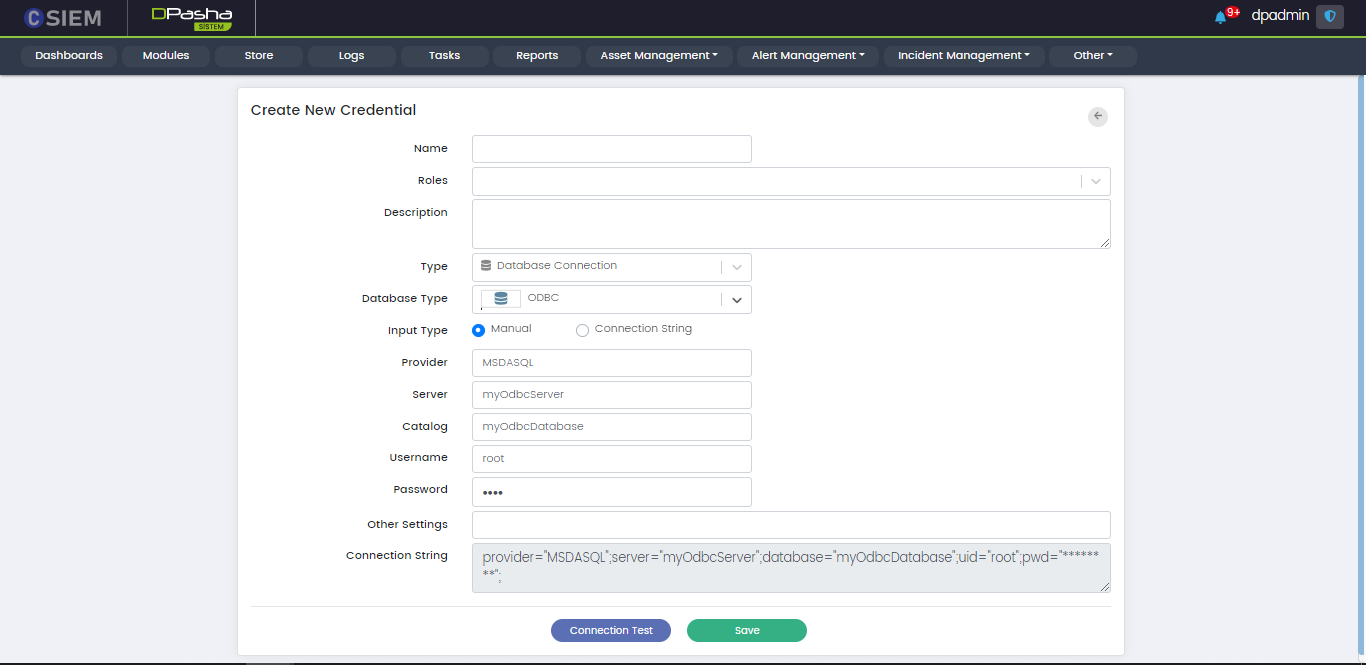
There are two methods to specify the credential. The first is “Manual” and the other one is “Connection String”. If we choose the Input Type as Manual, then we get the following fields:
- Provider
- Server
- Catalog
- Username
- Password
- Other Settings
- Connection String (disabled)
The second method is Connection String. It is an expression that contains the parameters required for the applications to connect to a database server. If we choose the Input type as Connection String, then we get the following fields.
- Provider (disabled)
- Server (disabled)
- Catalog (disabled)
- Username (disabled)
- Password (disabled)
- Other Settings (disabled)
- Connection String
Type > Proxy
This option allows the administrators to create credentials, in order to access a platform using the proxy method.
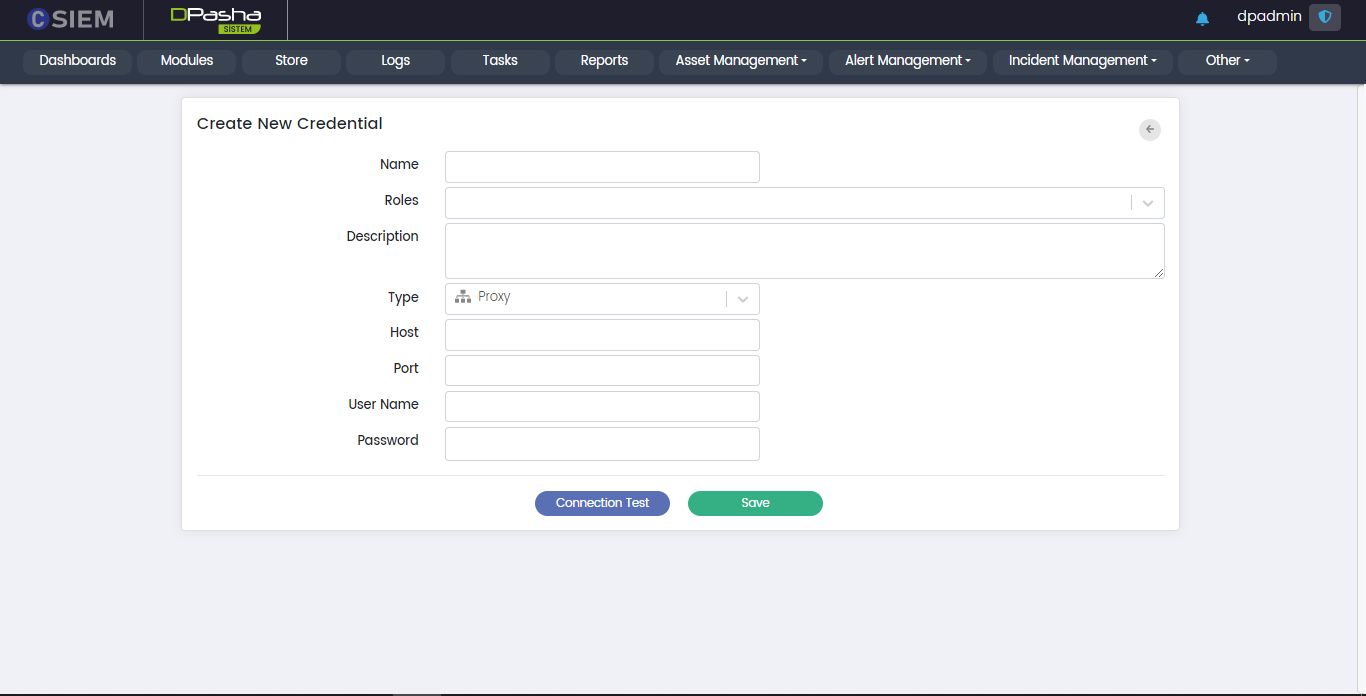
Respective fields against this selection are:
- Host: This field requires the administrators to provide the IP address.
- Port: This field requires the administrators to provide the port number.
- User Name
- Password
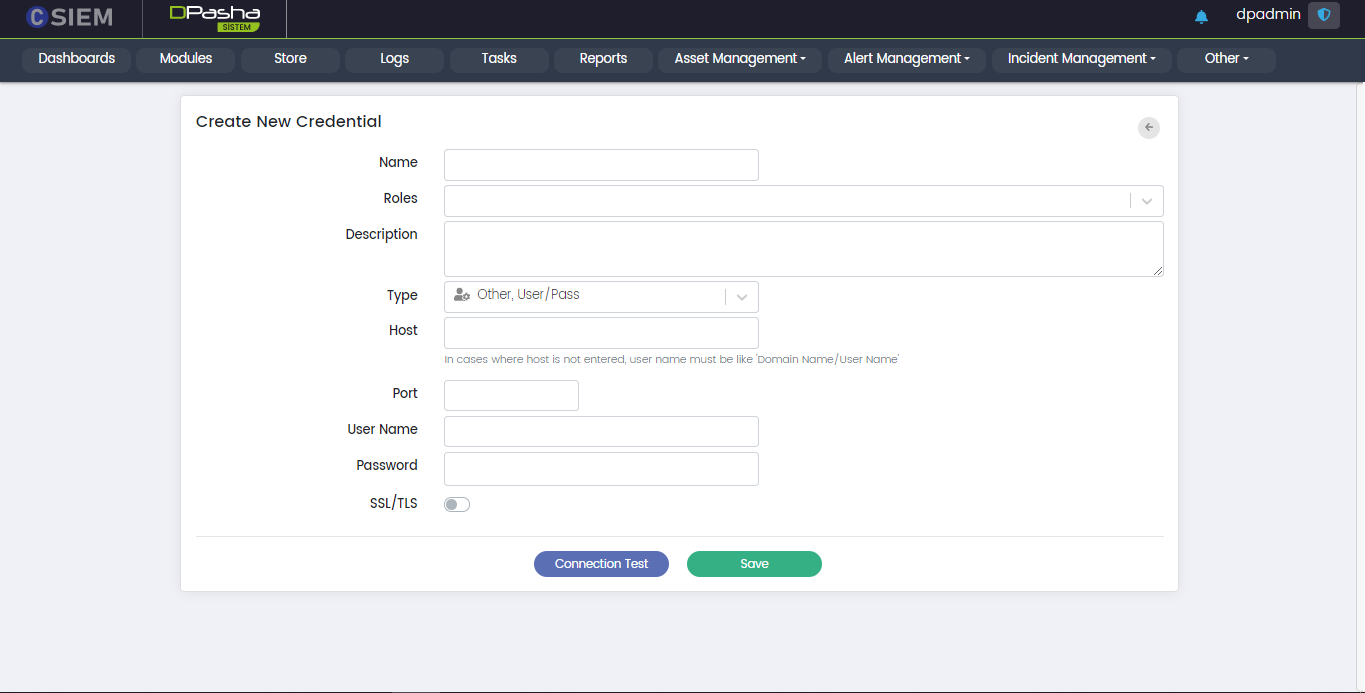
Type > Windows, User/Pass
This option allows the administrators to create the credentials for a Windows system
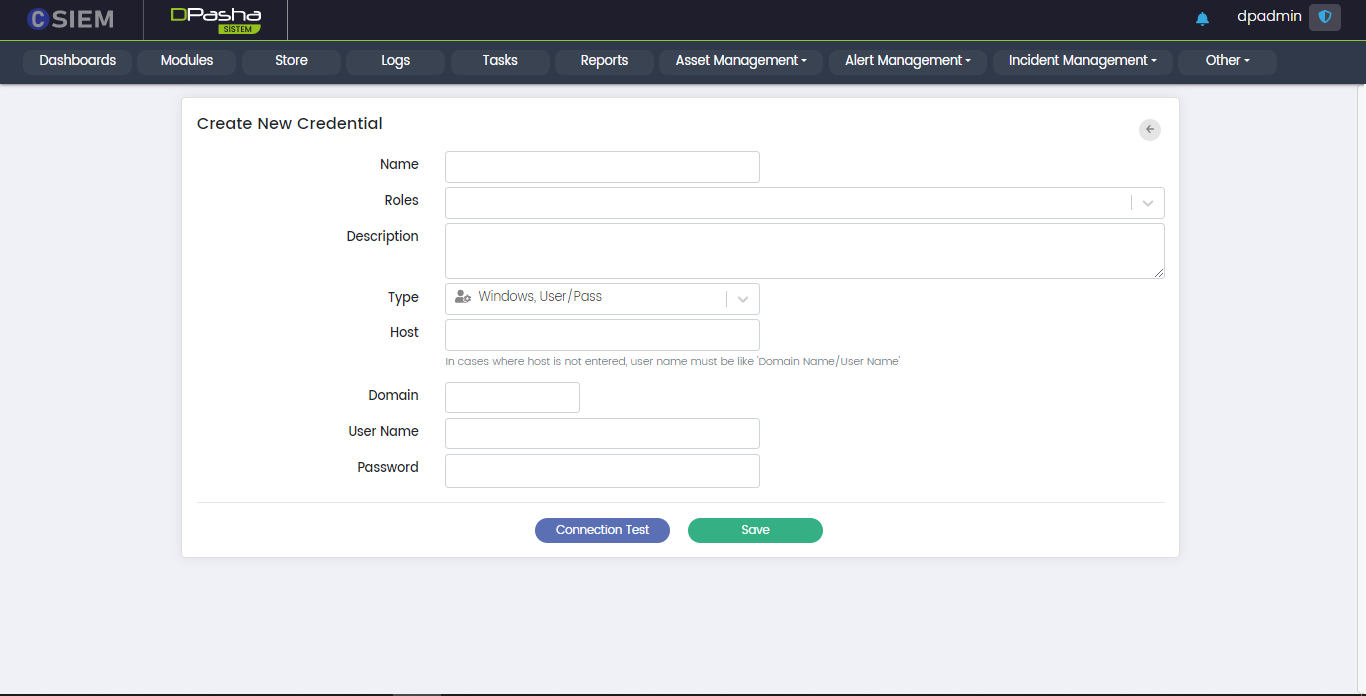
Respective fields against this selection are:
- Host: It can be a windows username along with its domain name. Further information is given in the description of field.
- Domain: It requires the administrators to provide the network domain on which the device is present.
- User Name
- Password
Type > Other, User/Pass
This option allows the administrators to create the credentials for other operating systems.
Respective fields against this selection are:
- Host: It can be a windows username along with its domain name. Further information is given in the description of field.
- Domain: It requires the administrators to provide the network domain on which the device is present.
- User Name
- Password
Type > Custom Credential
This option allows the administrators to create credentials with the fields particular to their choice.
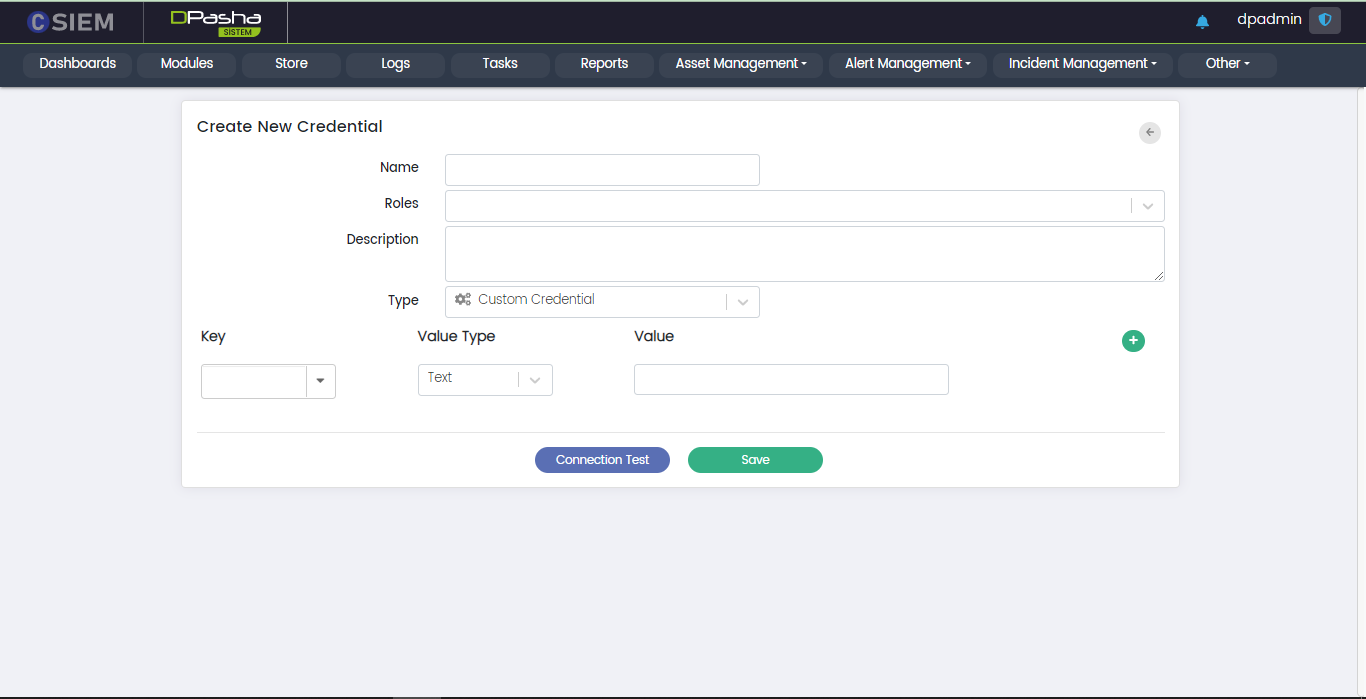
Respective fields against this selection are:
- Key
- Value Type
- Value
Edit Credential Option
Administrators can edit any of the credentials by clicking the Edit option as shown below.
Edit Credential Page
Administrators can make the required changes on this page to update the credential.
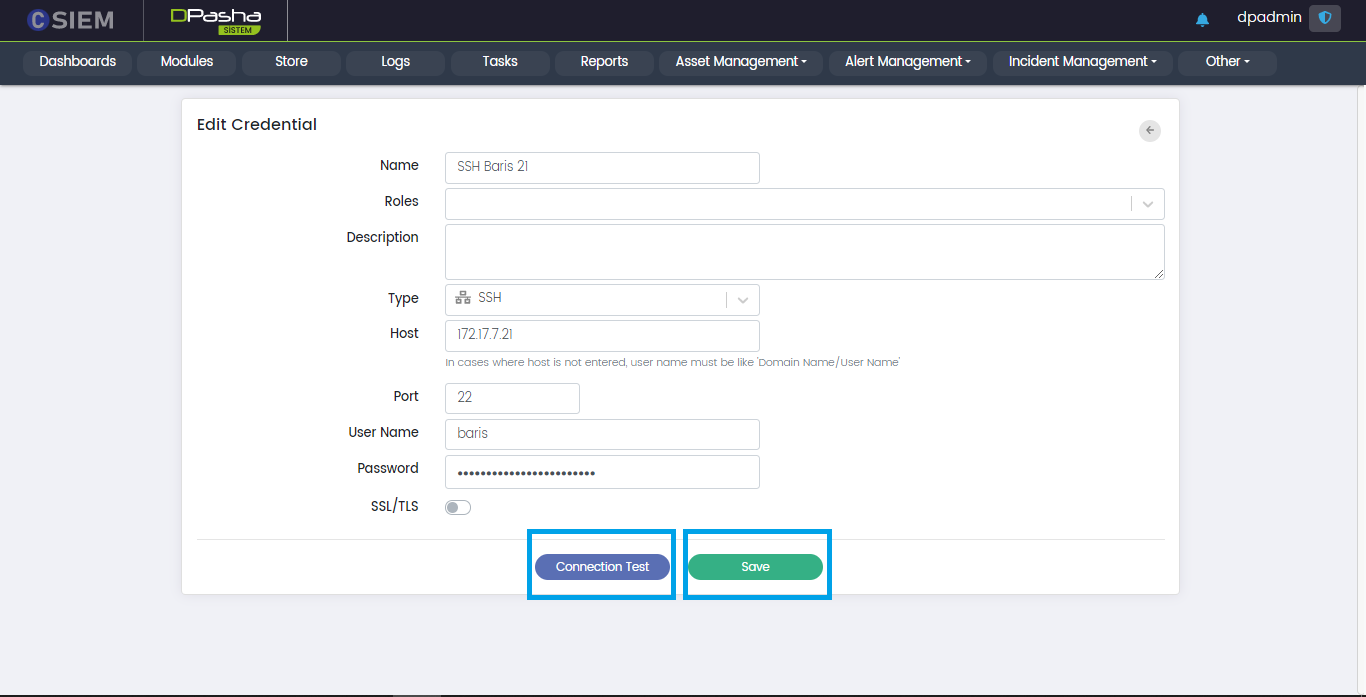
Connection Test
Administrators can use this button to verify that the credential is working correctly.
Save Credential
Administrators can use this button to save a credential.
Tag Management
Administrators can view and manage the registered tags in the system from this page.
Page Options
This page contains the following options:
- Add New Tag
Add New Tag
Administrators can use this page to add a new tag.
This page contains the following fields:
- Status (toggle button)
- Name
- Category
- View Groups
- Edit Groups
Cancel Button: Administrators can use this button to cancel all changes and quit the page.
Save Button: Administrators can use this button to save all changes and quit the page.
DP Server Management
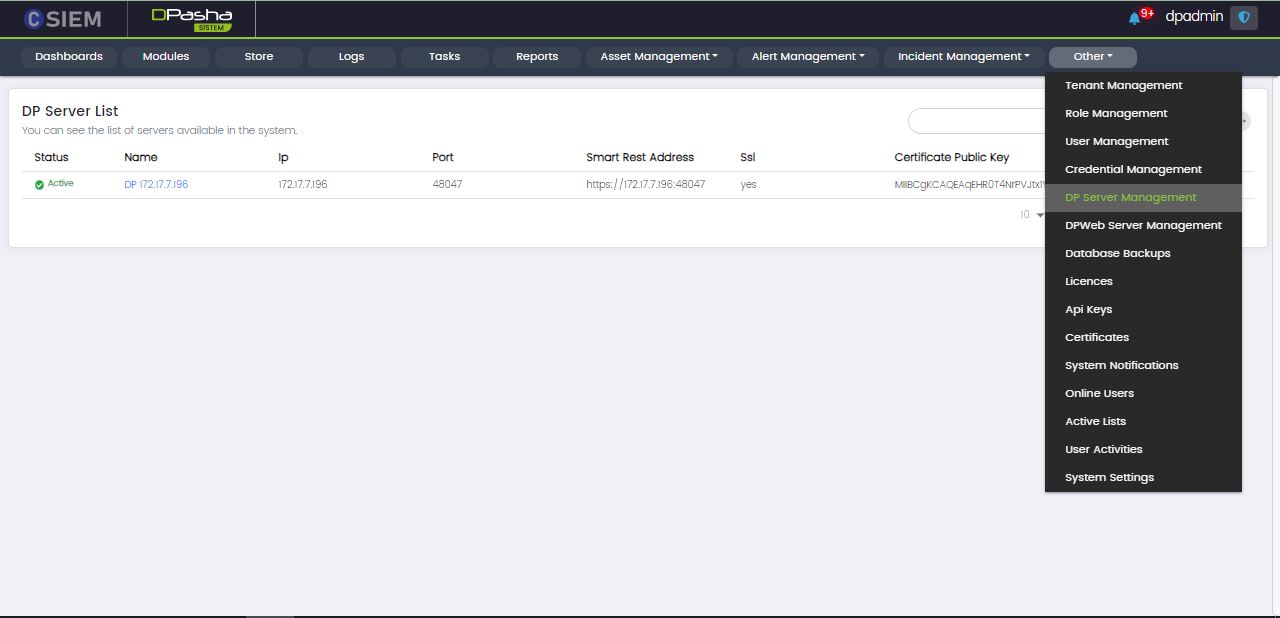
Page Columns
The DP Server Management page contains DP Server List with the following columns:
- Status (Active or Passive)
- Name
- IP
- Port
- Smart Rest Address
- SSL
- Certificate Public Key
Search Bar
The search bar is used to search for any notification on the System Notifications page. It returns filtered results against the given keyword(s).
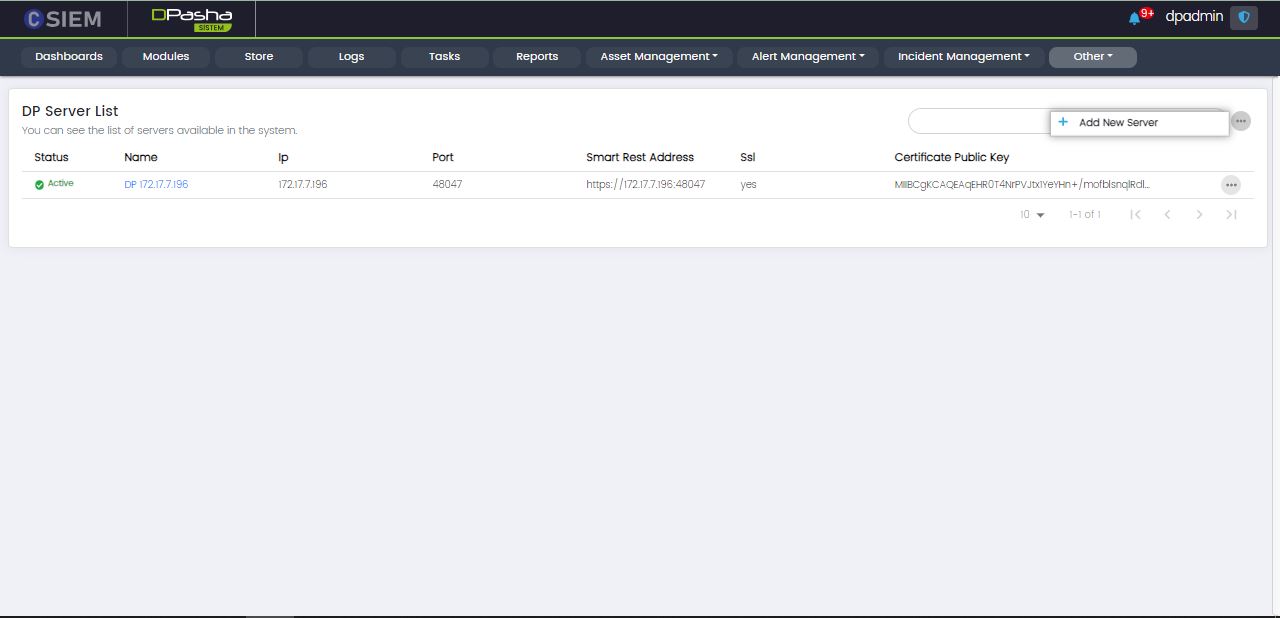
Page Options
The Dp Server Management page has the following options:
- Add New Server (This option leads to the page where admins can input data to add a new server)
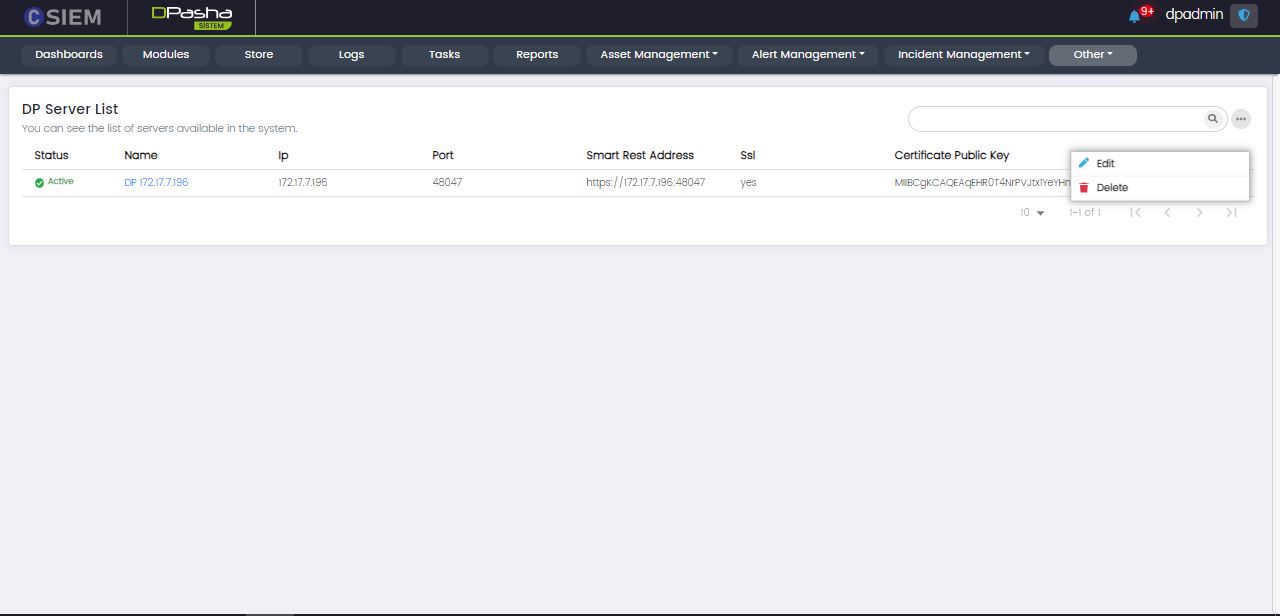
Server Options
Each of the servers listed on the page has the following options:
- Edit
- Delete
Add New Server
This page contains the following fields:
- Status
- Name
- IP
- Port
- SSL
- Certificate Public Key
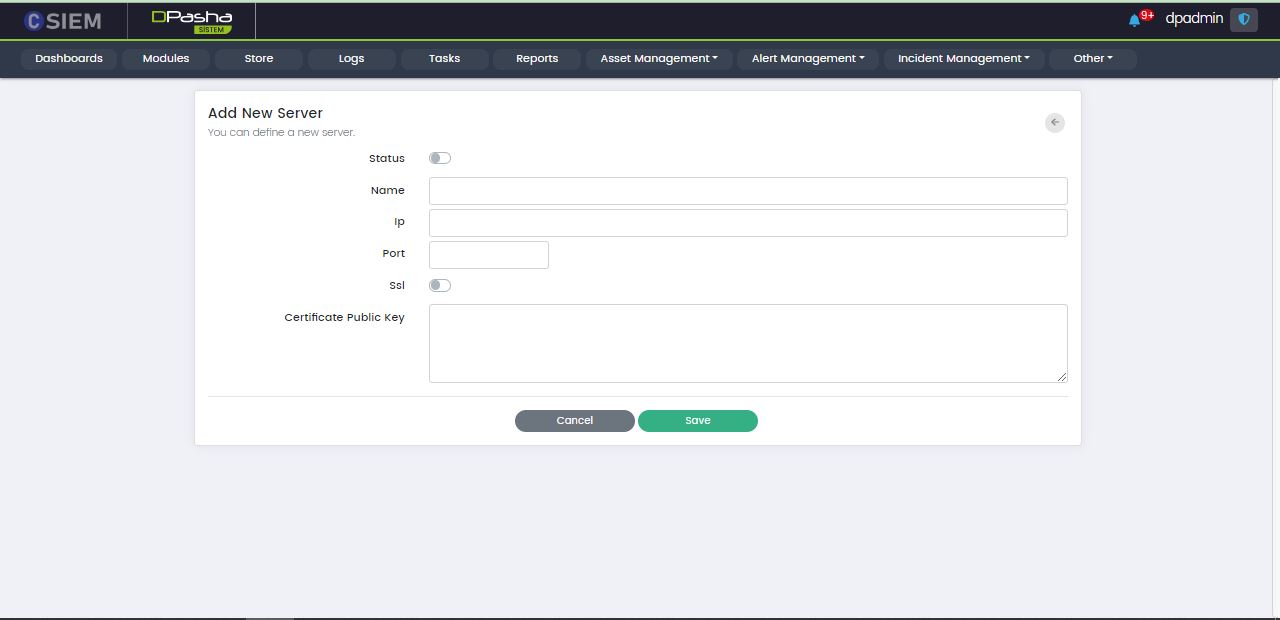
Save Button
Administrators can click the Save button to save the settings for the new server.
Cancel Button
Administrators can click the Cancel button to leave the Add New Server page.
DPWeb Server Management
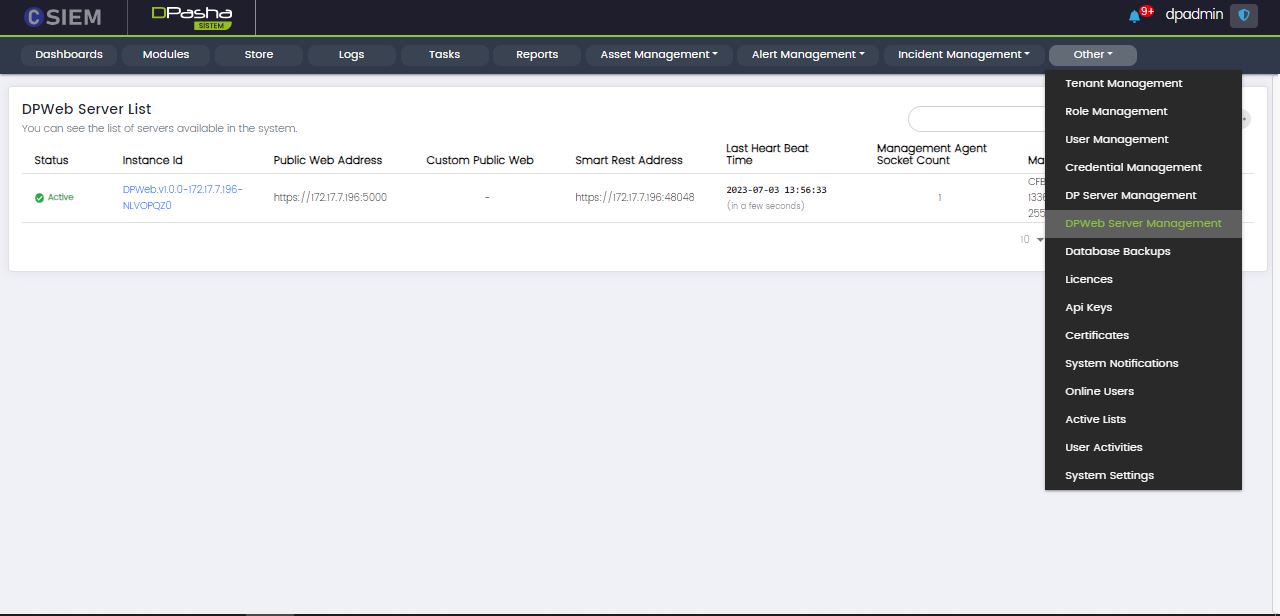
Page Columns
The DP Web Server Management page contains DP Server List with the following columns:
- Status (Active or Passive)
- Instance Id
- Public Web Address
- Custom Public Web
- Smart Rest Address
- Last Heart Beat Time
- Management Agent Socket Count
- Machine Key
Search Bar
The search bar is used to search for any notification on the System Notifications page. It returns filtered results against the given keyword(s).
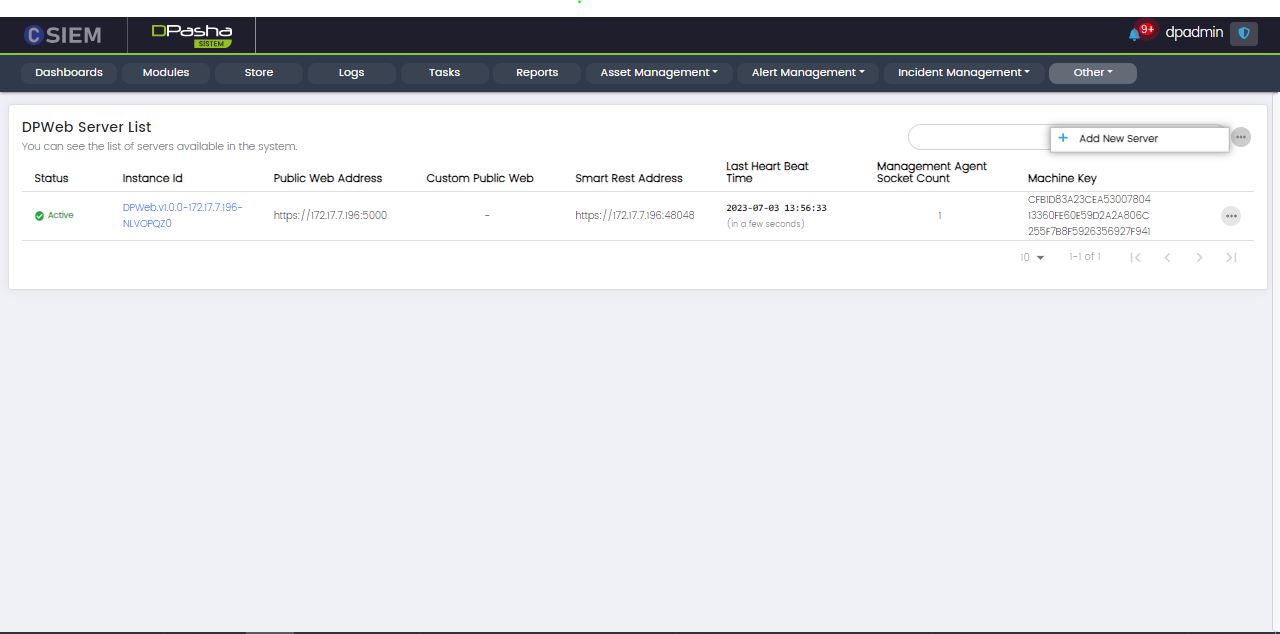
Page Options
The page contains the following option:
- Add New Server
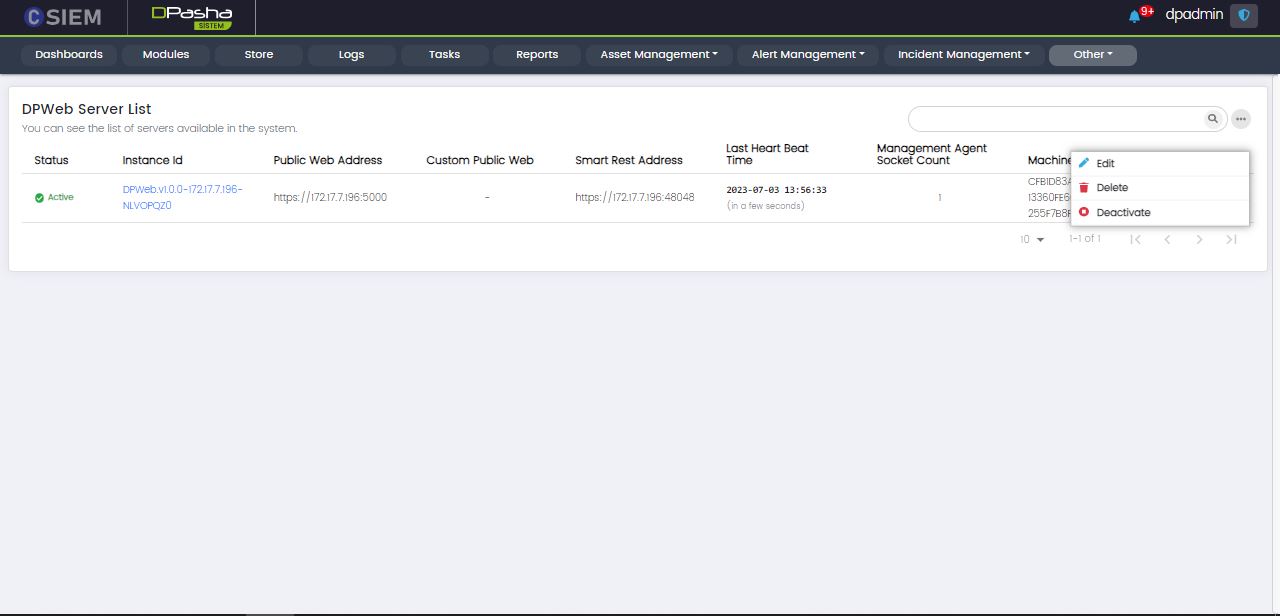
Web Server Options
Each of the Web Servers contains the following options:
- Edit (This page is the same as “Add New Server” which is described in the proceeding section)
- Delete
- Deactivate
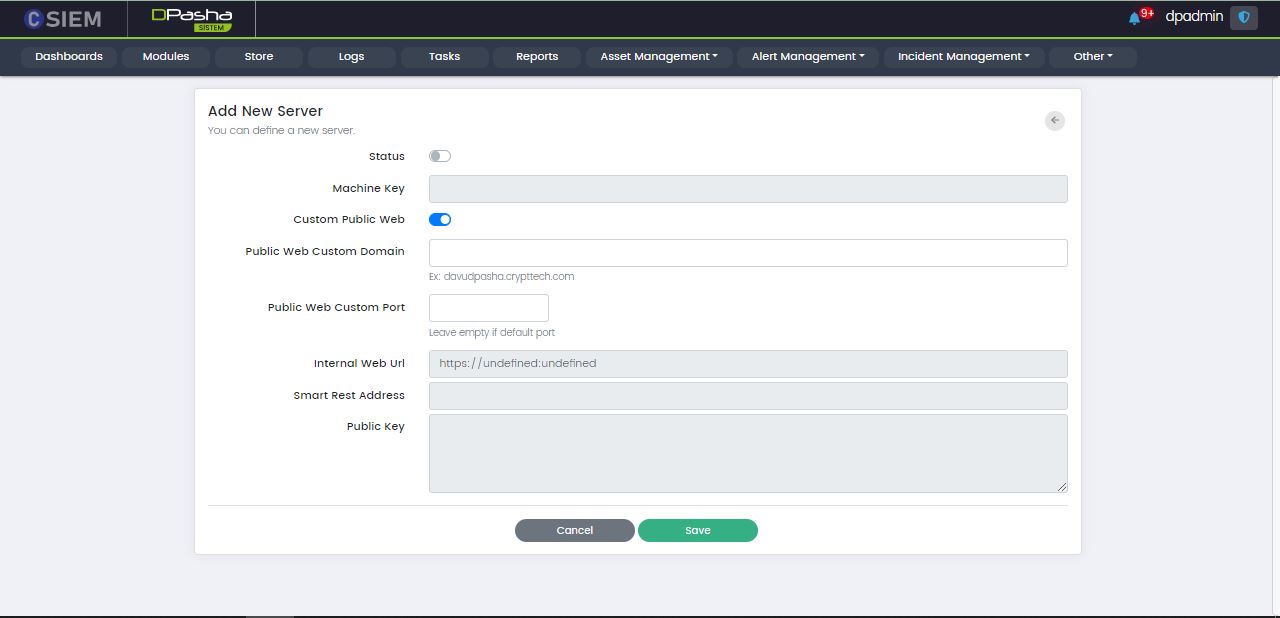
Add New Server
This page allows the administrators to input the data for adding a new web server.
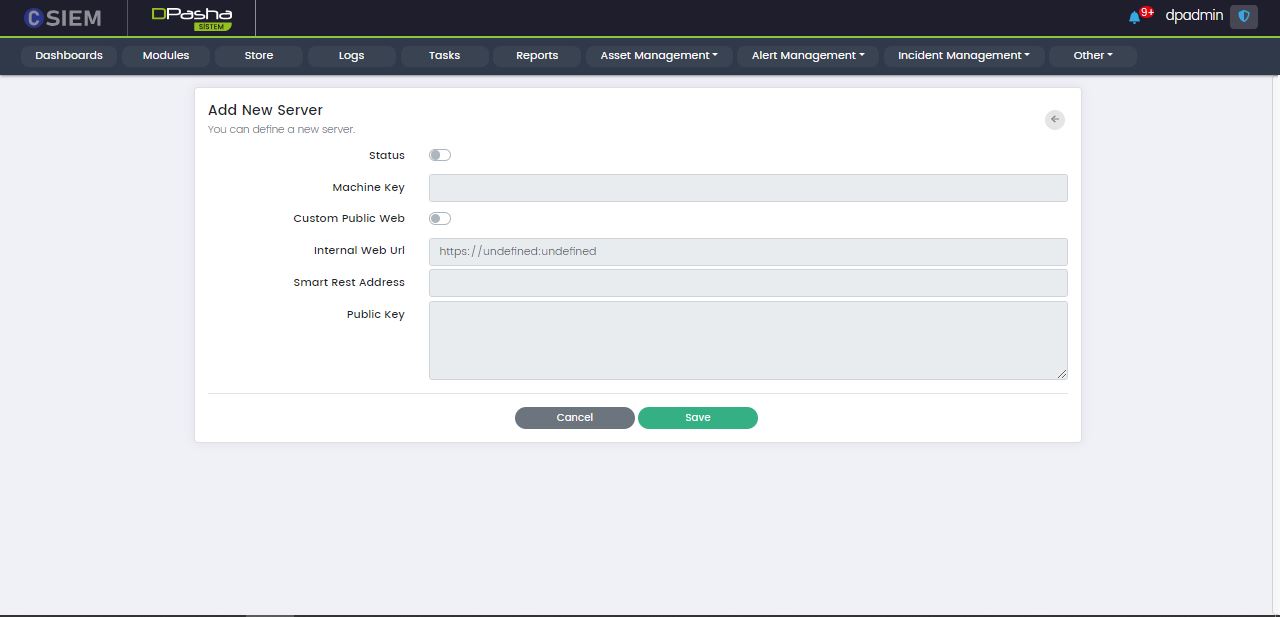
The Add New Server page contains the following fields:
- Status
- Machine Key
- Custom Public Address
- Internal Web URL
- Smart Rest Address
- Public Key
Custom Public Web
When this option is selected, the page has additional fields as given below:
- Public Web Custom Domain
- Public Web Custom Port
Save Button
Administrators can click the Save button to save the settings for the new server.
Cancel Button
Administrators can click the Cancel button to leave the Add New Server page.
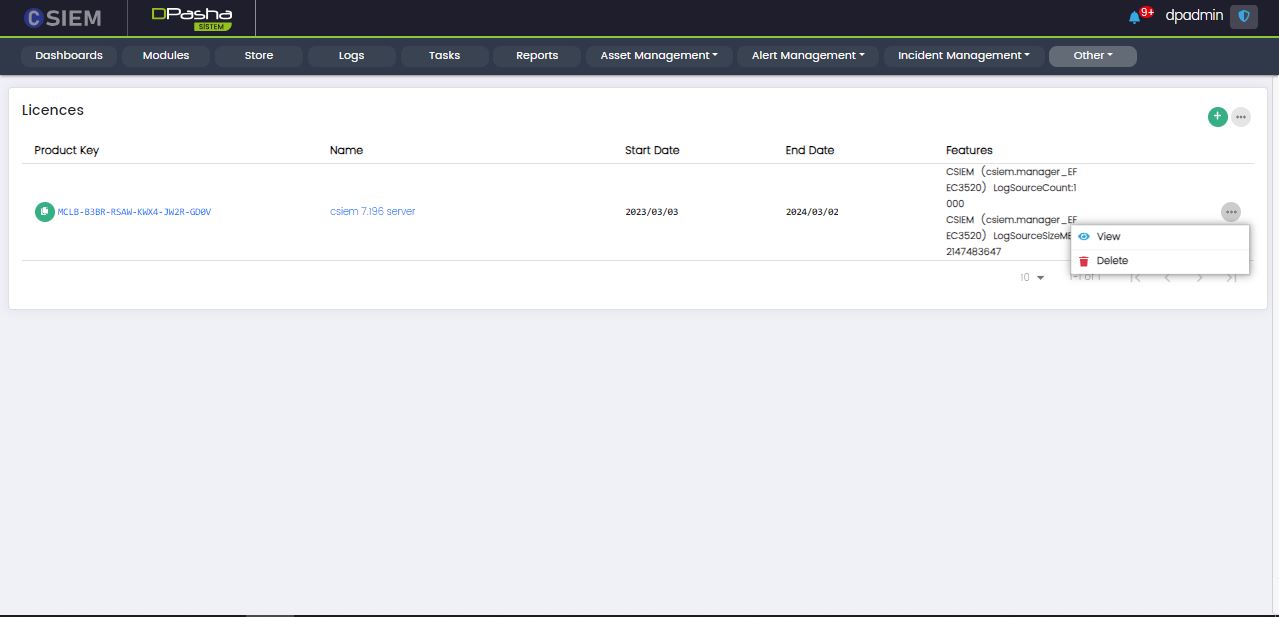
Licences
Administrators can view or add licenses for the CSIEM platform from this page.
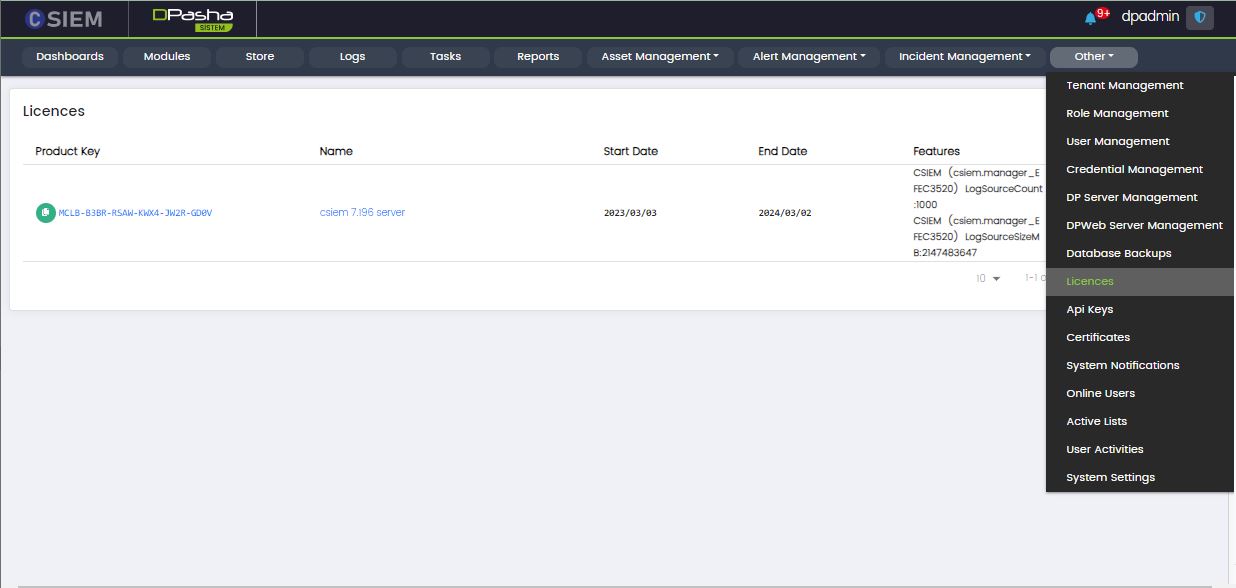
Page Columns
The Licences page has the following columns:
- Product Key
- Name
- Start Date
- End Date
- Features
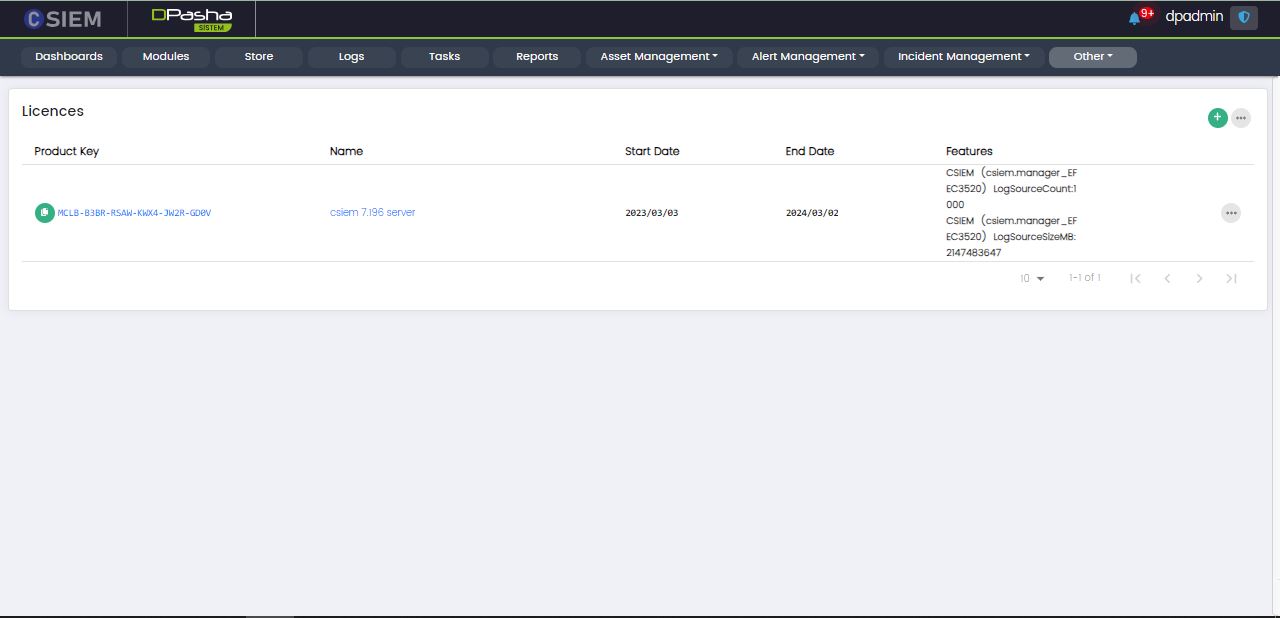
Page Options
The Licences page has the following option:
- Issuers
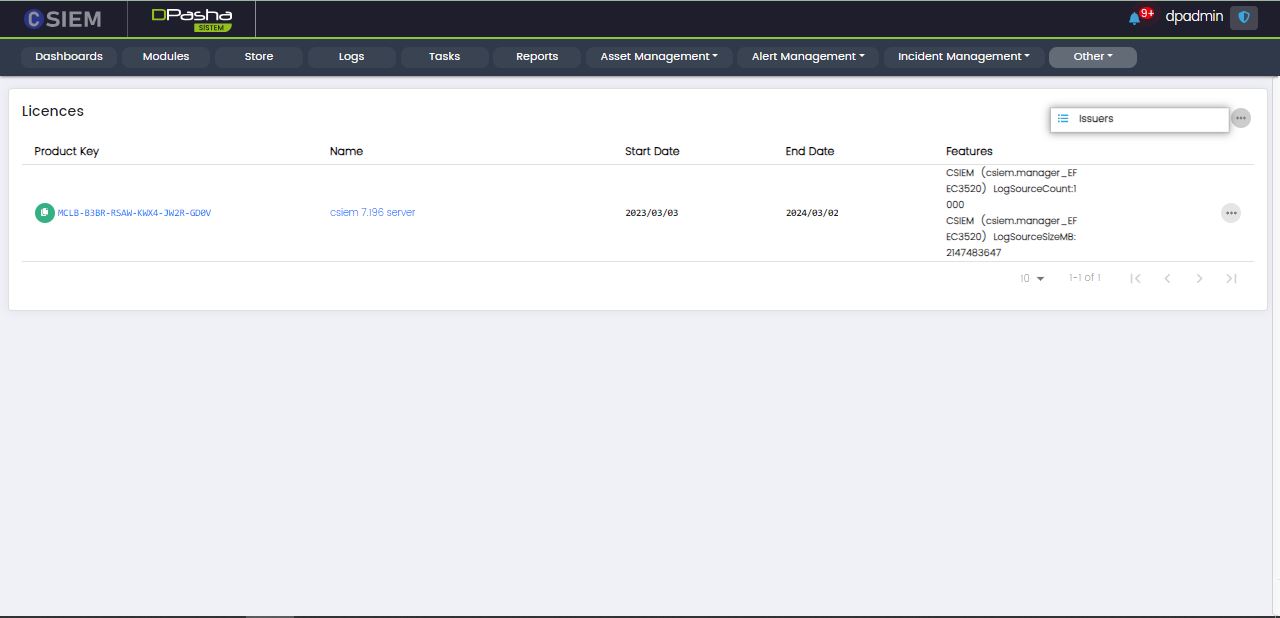
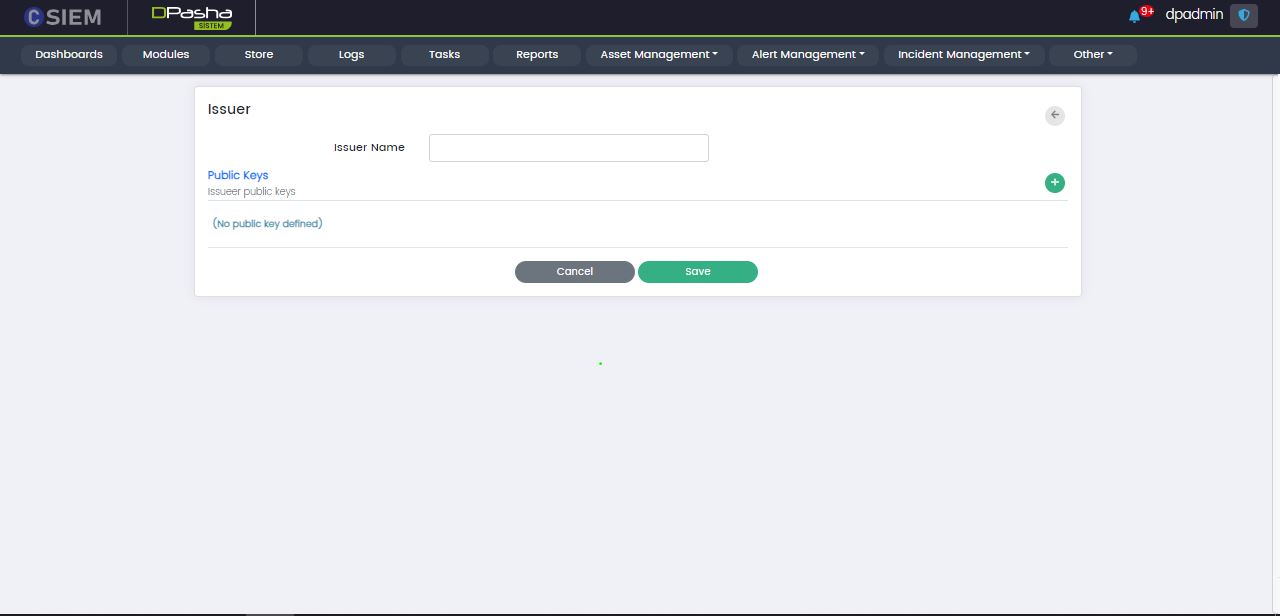
Issuers
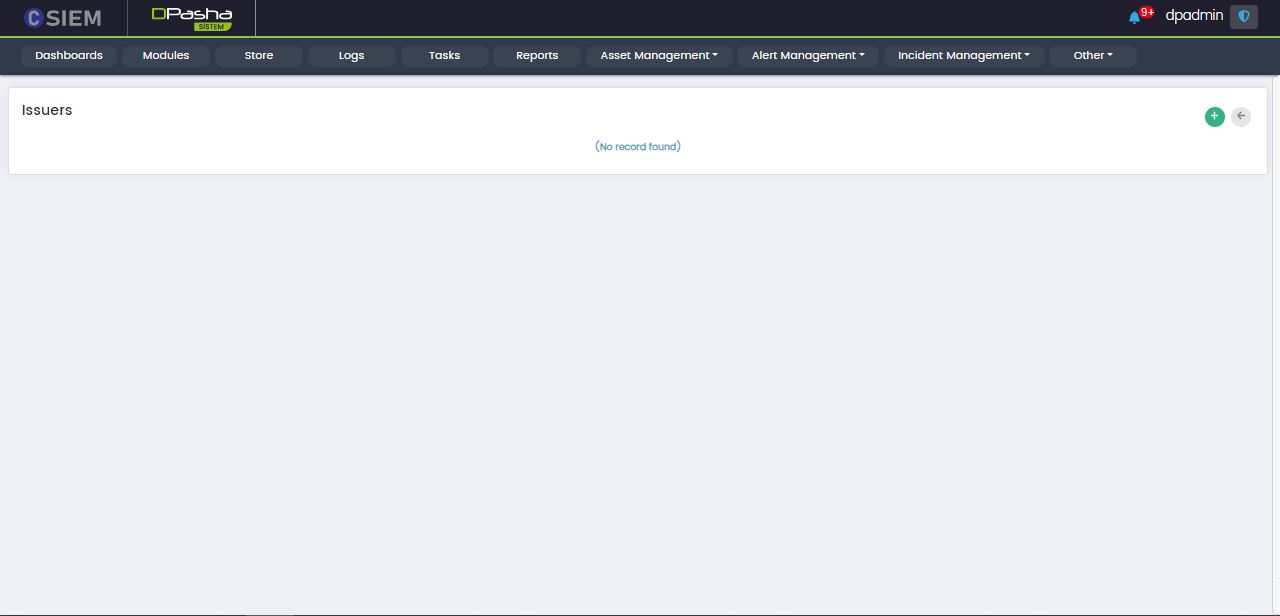
Add Issuer
Add Licence
Administrators can add a new licence in two ways:
- Online from store
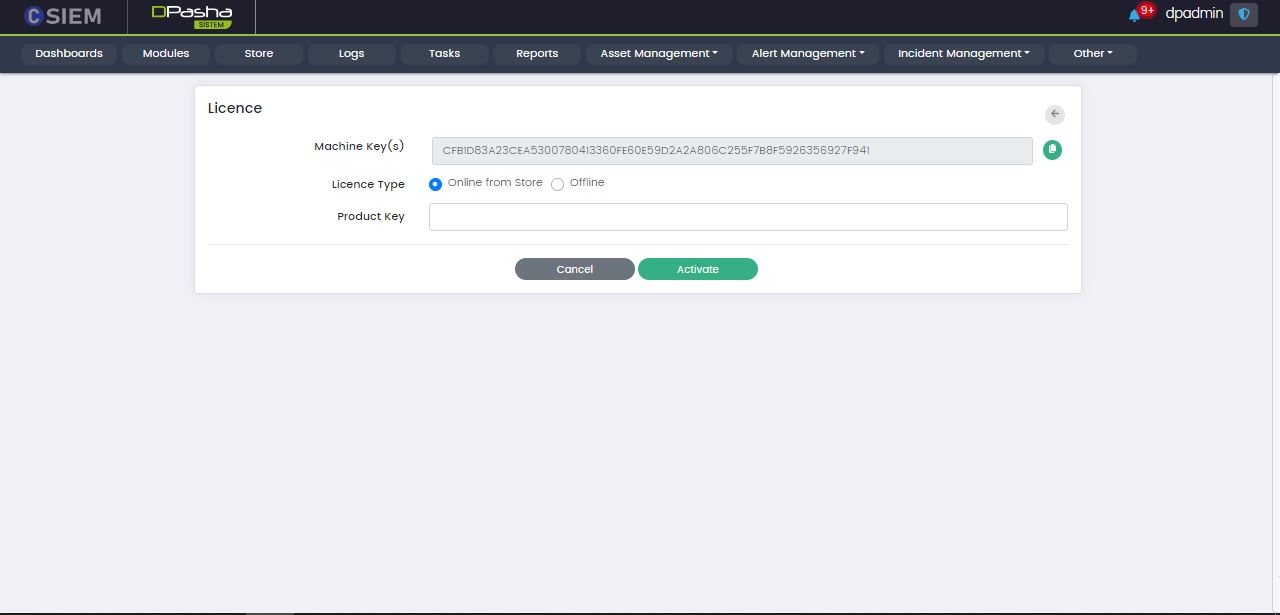
- Offline from a file
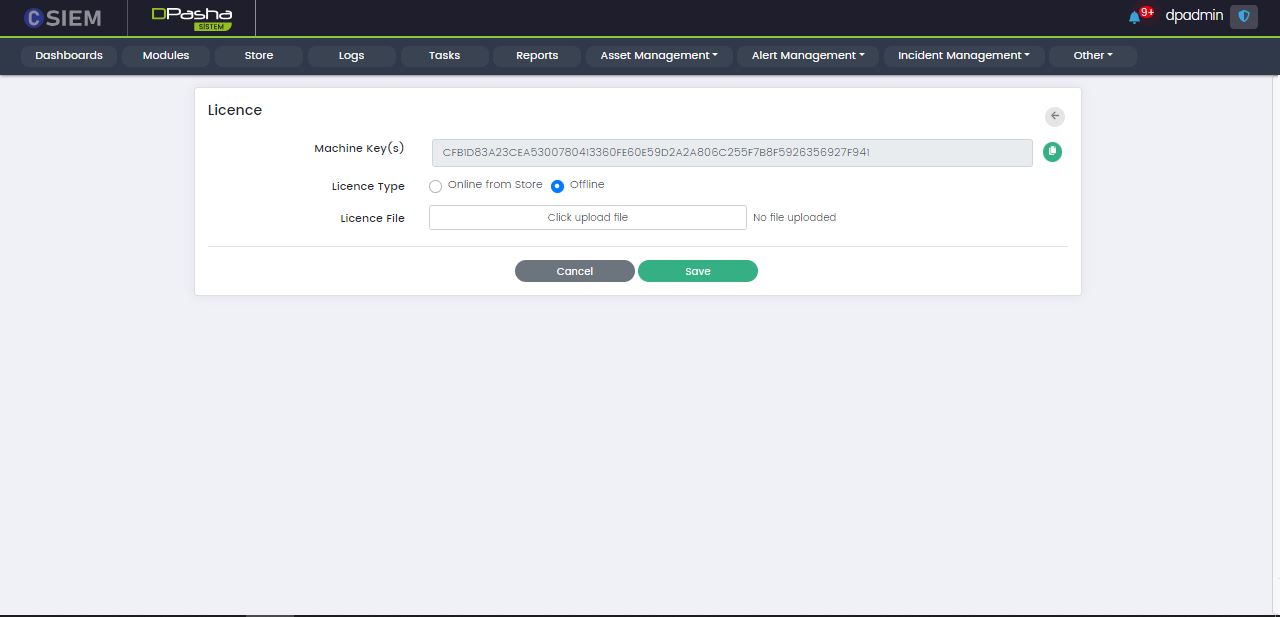
Administrators can use the Save button to save the License.
Administrators can use the Cancel button to undo all the changes and go back to the Licenses page.
Licence Item
The Licences page has items in the form of rows. Each Licence item has the following options:
- View (This page is the same as Add Licence)
- Delete
Certificates
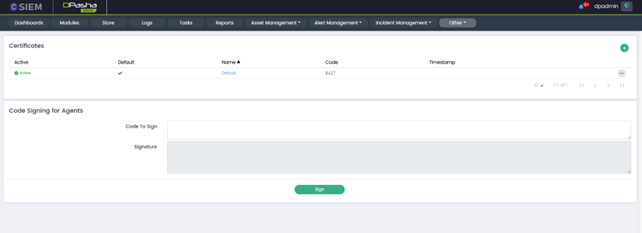
Certificate Details
- Active: The "Active" column indicates whether the certificate is currently active (enabled) or passive (disabled) within the CSIEM system.
- Default: The "Default" column indicates whether a particular certificate is set as the default certificate in the CSIEM system.
- Name: The "Name" column displays the name or identifier assigned to the certificate. It helps administrators quickly identify and differentiate between different certificates, especially when managing a large number of certificates.
- Code: The "Code" column shows a unique code or identifier associated with the certificate.
- Timestamp: The "Timestamp" column displays the timestamp or date and time when the certificate was issued or last modified. This information helps administrators track the timeline of certificate management activities, such as issuing, renewing, or updating certificates.
Code Signing for Agents
- Code to sign: This field allows administrators to specify the code that needs to be signed. It could be executable files, scripts, or any other code that agents within the SIEM system will execute.
- Signature: The "Signature" field displays the digital signature generated for the code specified in the "Code to sign" field. The digital signature is a cryptographic hash-based value that verifies the integrity of the code and identifies the signer.
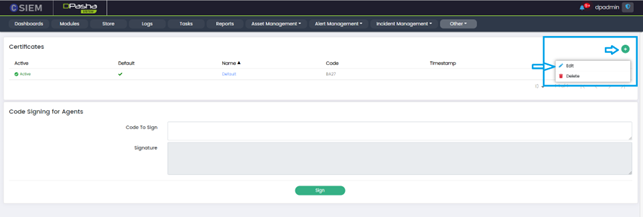
Certificate Management Options
Each certificate listed on the "Certificates" page in the CSIEM system has a three-dotted button next to it, providing options for managing the certificates.
- Edit: The "Edit" option allows administrators to modify the settings or properties of a specific certificate. Clicking on the "Edit" button opens a form or dialog where users can update information associated with the certificate, such as its name, code, or public key.
- Delete: The "Delete" option allows administrators to remove a certificate from the CSIEM system. Clicking on the "Delete" button prompts a confirmation dialog to ensure that the deletion is intentional. Deleting a certificate permanently removes it from the system.
Add Certificate
The "Add Certificate" page allows administrators to add a new certificate to the system.
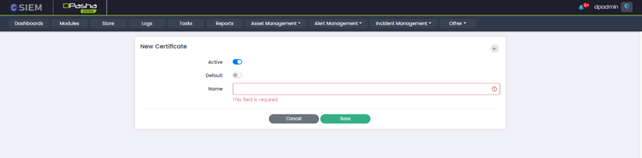
- Active (Toggle Button): The Active toggle button allows administrators to activate or deactivate the newly added certificate. When toggled on (active), the certificate is enabled and available for use within the SIEM system. Toggling it off (inactive) disables the certificate and prevents it from being utilized for secure communication or other purposes.
- Default (Toggle Button): The "Default" toggle button allows users to designate the newly added certificate as the default certificate in the CSIEM system. When toggled on, it sets the added certificate as the default option for secure connections.
- Name: This field is where Administrators can enter a descriptive name or identifier for the certificate being added.
- Save or Cancel: The "Save" button allows users to save the details and configuration of the newly added certificate. Conversely, the "Cancel" button allows users to discard any changes made on the "Edit Certificate" page without saving them.
Edit Certificate
The "Edit Certificate" page in the CSIEM system allows administrators to modify the settings and properties of a specific certificate.
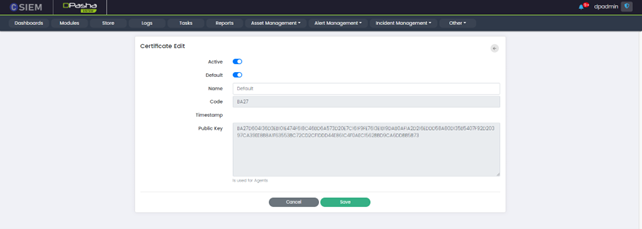
- Active: The Active toggle button allows administrators to activate or deactivate the newly added certificate.
- Default: The "Default" toggle button allows users to designate the edited certificate as the default certificate.
- Name: This field displays the current name or identifier assigned to the certificate. Administrators can modify this field to update or change the name associated with the certificate.
- Code: This field presents a unique code or identifier associated with the certificate. This code is typically a non-editable value that serves as a reference for the certificate.
- Timestamp: This field displays the date and time when the certificate was issued or last modified. It provides information about the certificate's creation or modification timeline and is not editable.
- Public Key: This field shows the public key associated with the certificate. The public key is a cryptographic key used for validating the authenticity of the certificate. It is read-only and cannot be modified on the Edit Certificate page.
- Save or Cancel: The "Save" button allows users to save the details and configuration of the newly added certificate. Conversely, the "Cancel" button allows users to discard any changes made on the "Edit Certificate" page without saving them.
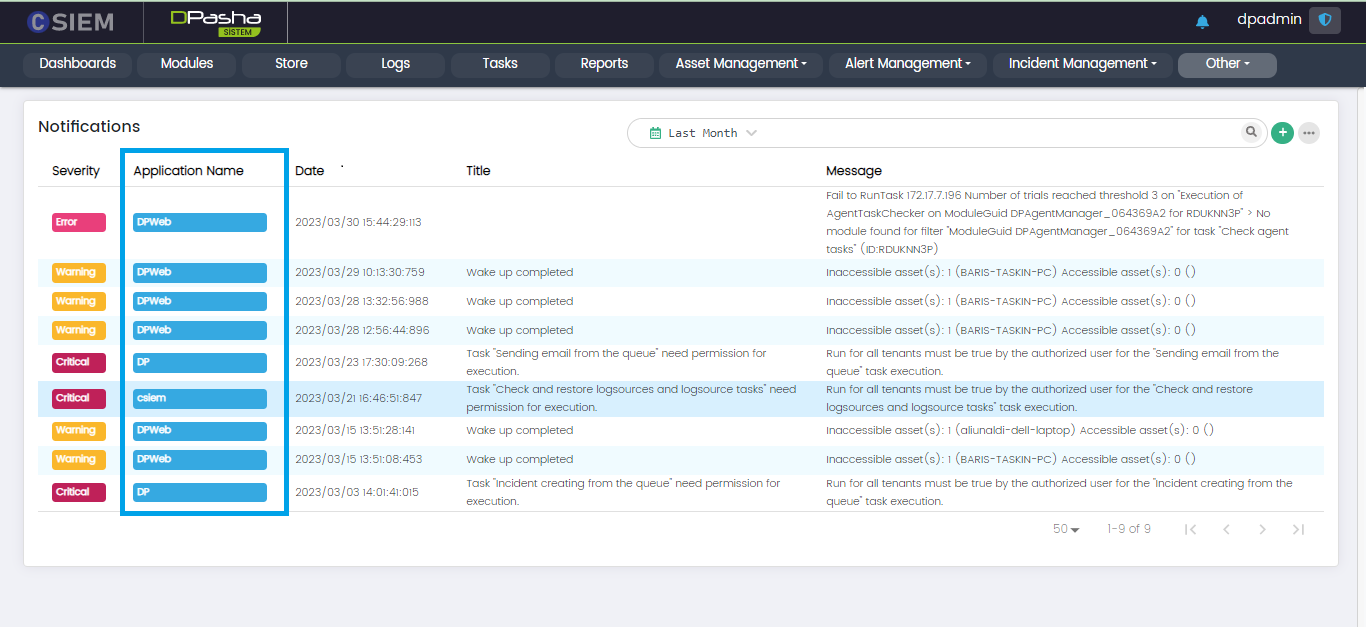
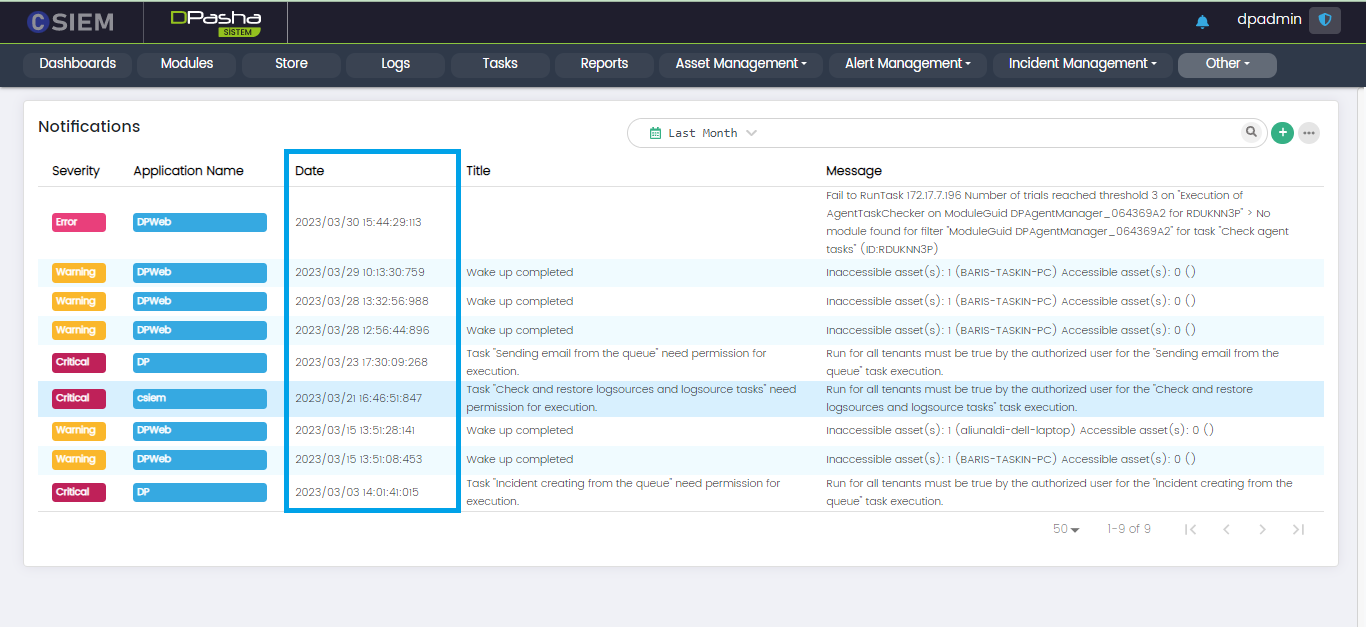
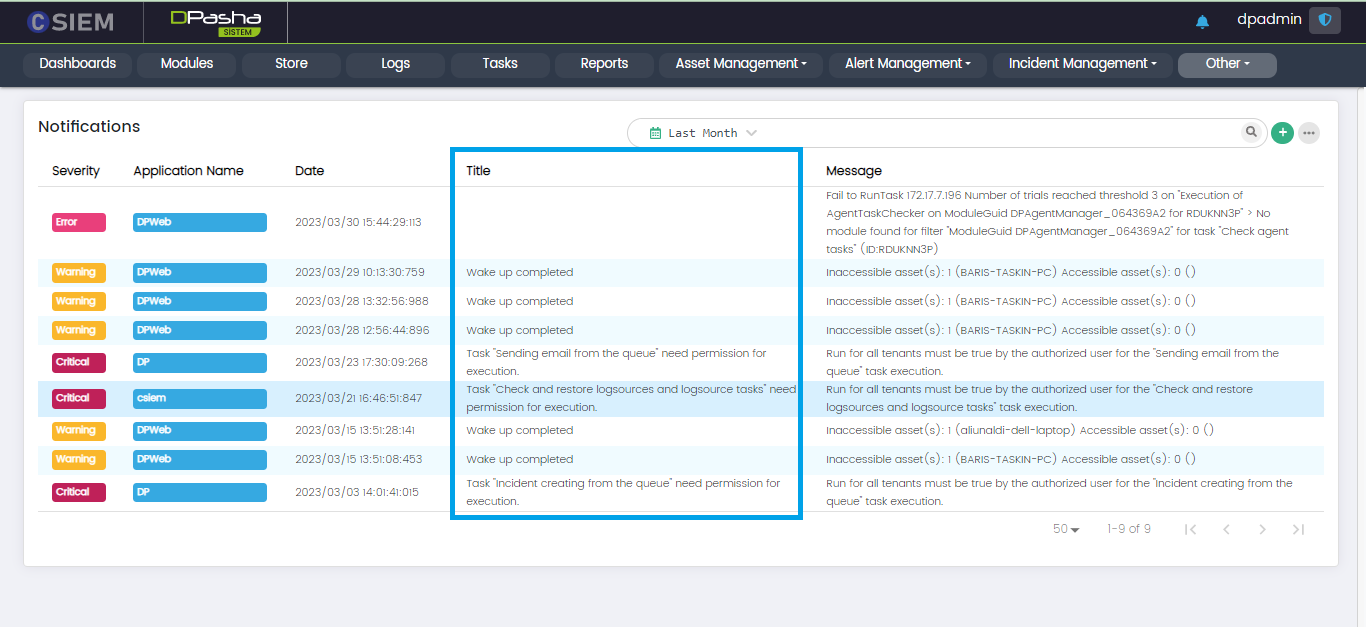
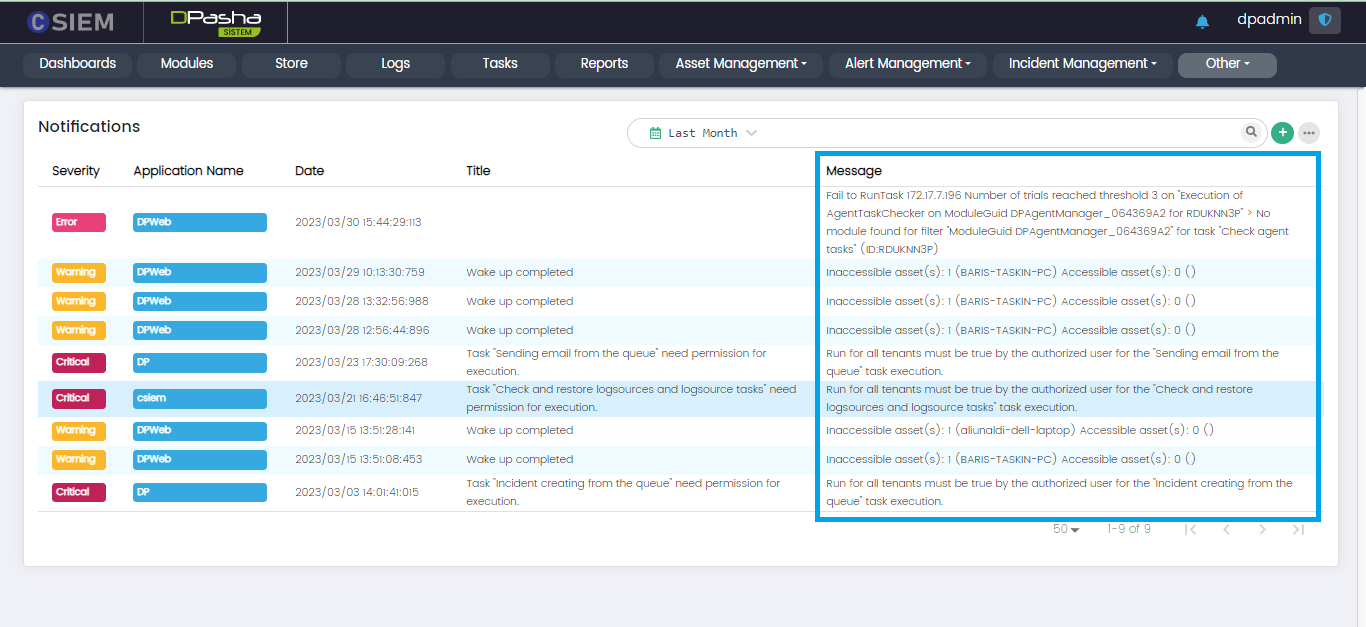
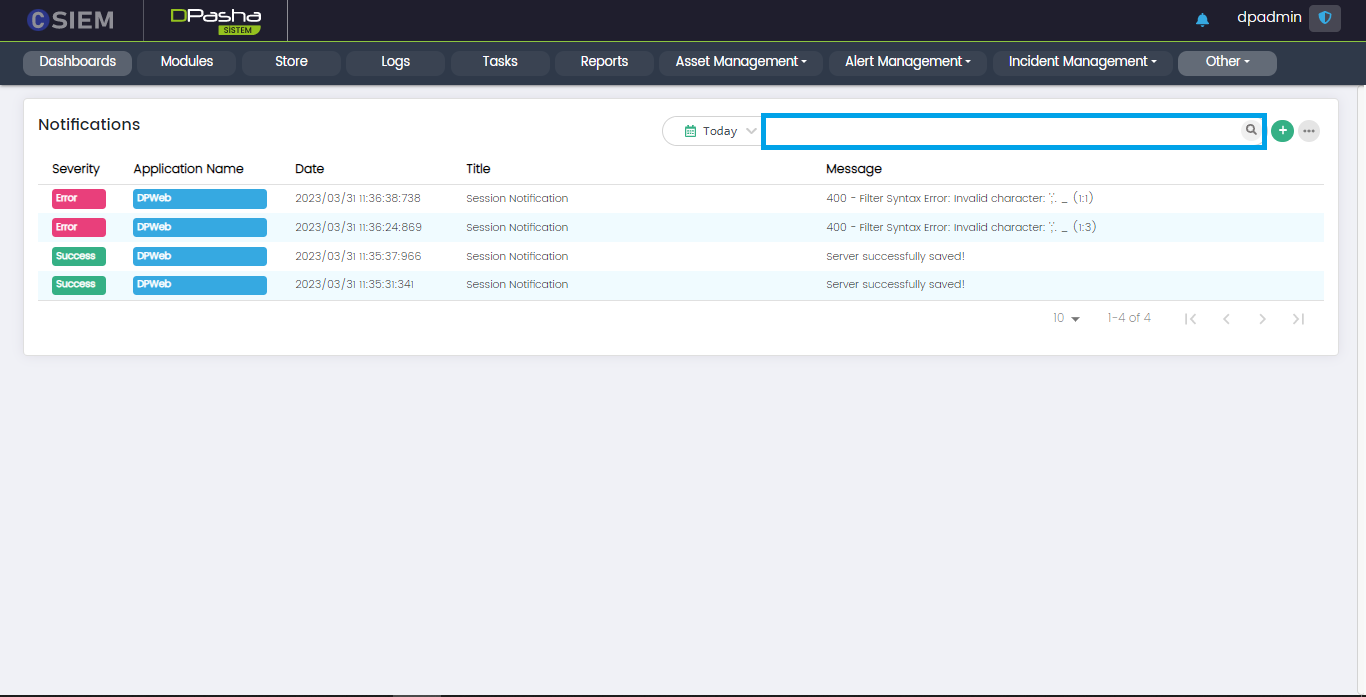
System Notifications
The administrators can view all the notifications regarding the software applications integrated with CSIEM. Administrators can also create new notification alert definition.
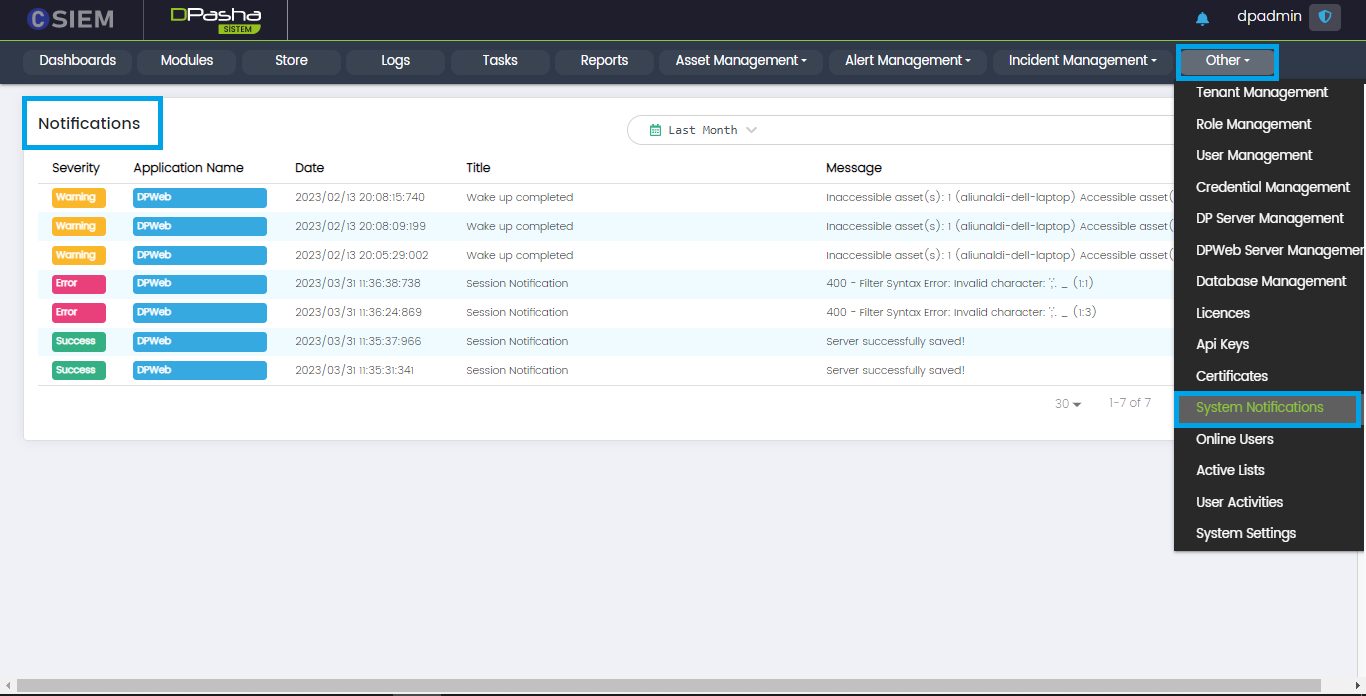
System Notifications Page Layout
The System Notification page has 5 columns I.e., Severity, Application Name, Date, Title and Message.
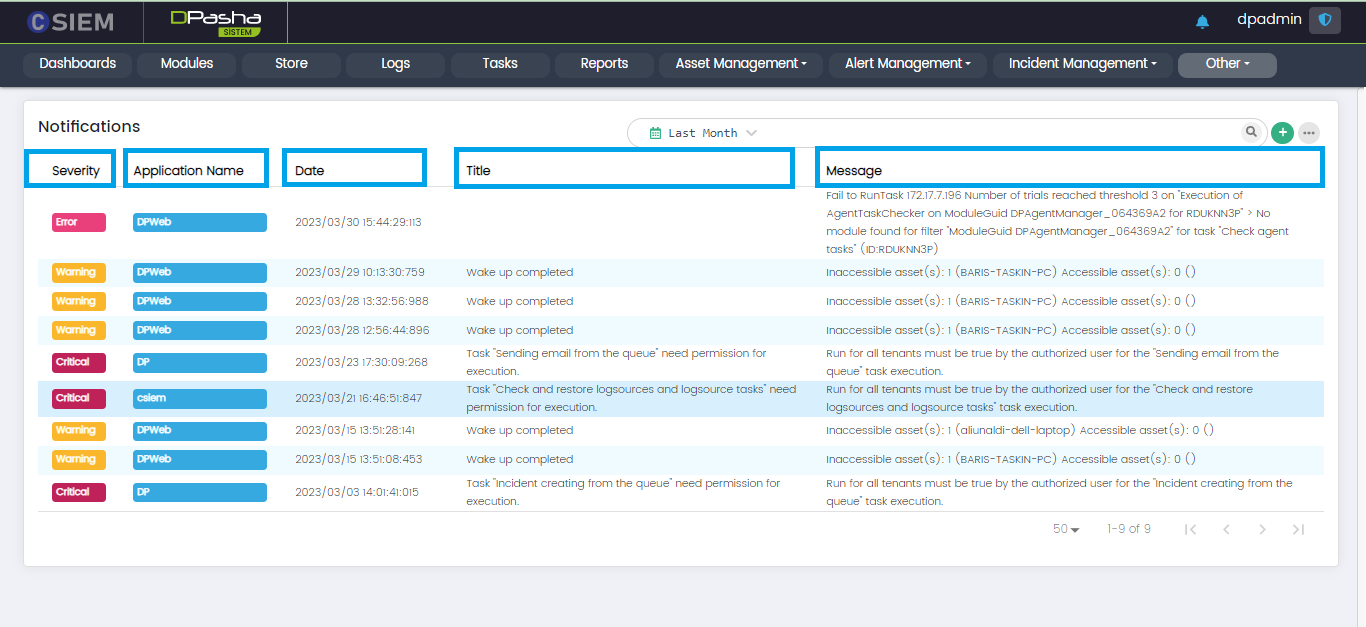
Severity
This column shows the severity of the notifications and has different levels as given below.
- Critical
- Error
- Warning
- Info
- Success
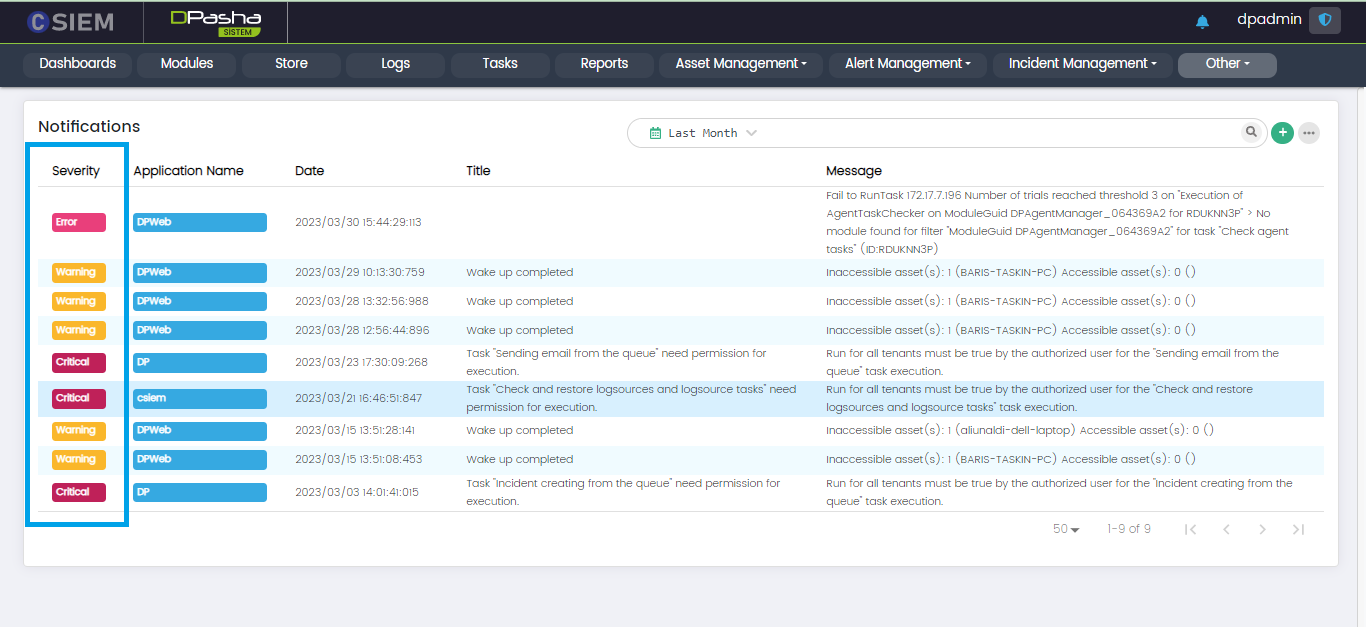
Application Name
This column contains the application names for which the notification has appeared.
Date
This column shows the date and time for each of the notifications.
Title
This column contains the title or headliner for each of the notifications.
Message
This column consists of the alert message or description for each of the notifications.
Search Bar
The search bar is used to search for any notification on the System Notifications page. It returns filtered results against the given keyword(s).
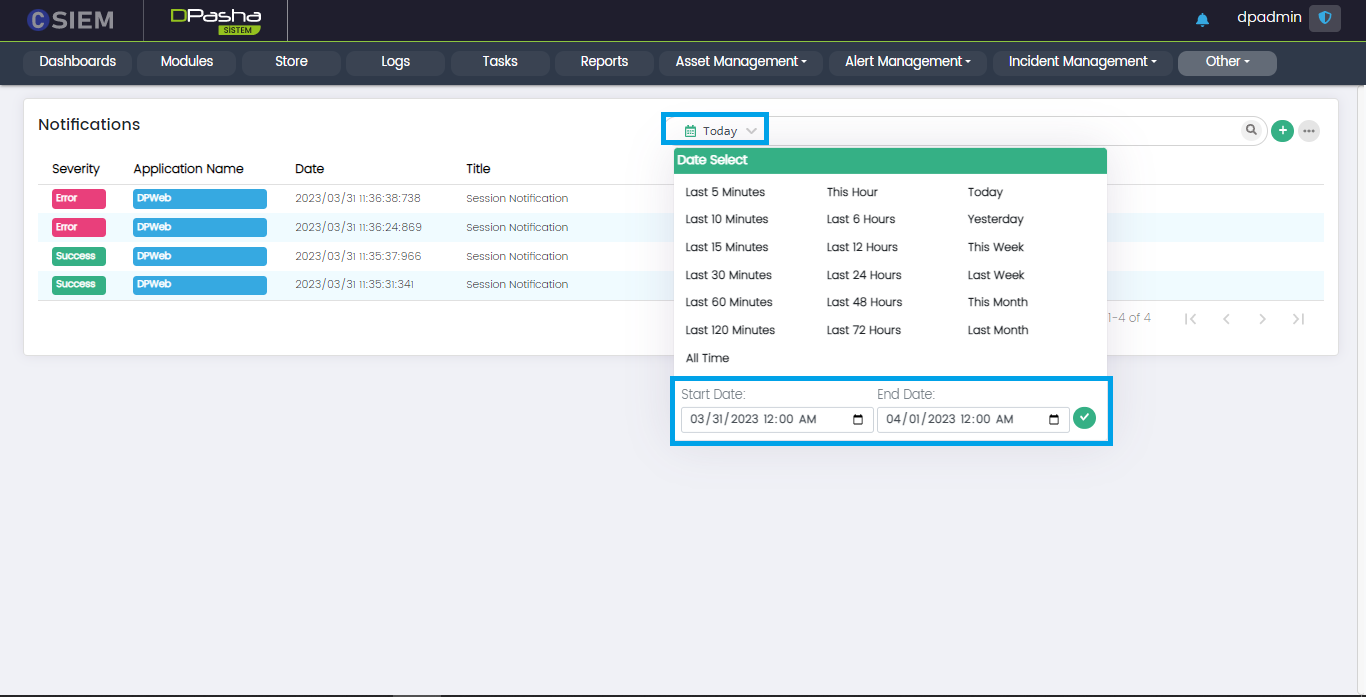
Search Time
Administrators can select date and time span for the specified searches as shown below.
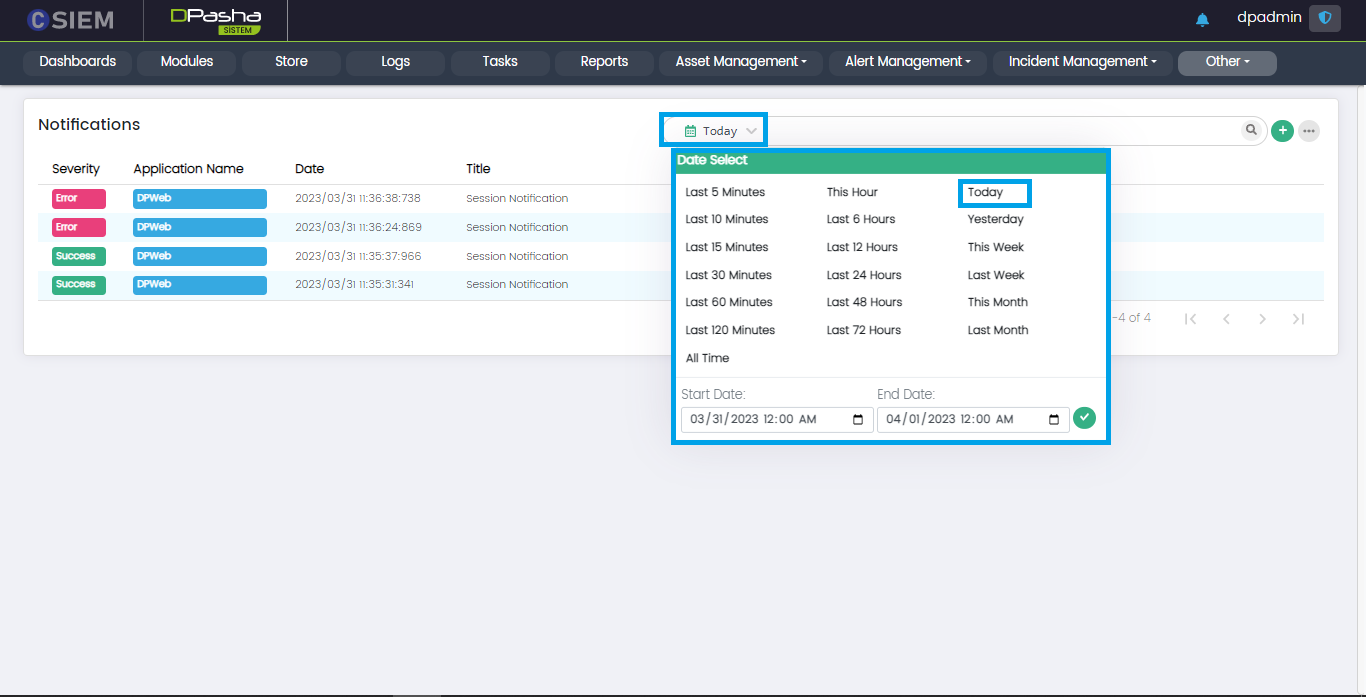
For dates, administrators can either select one of the predefined date ranges or specify a custom range of date, from date to date for their searches as shown below.
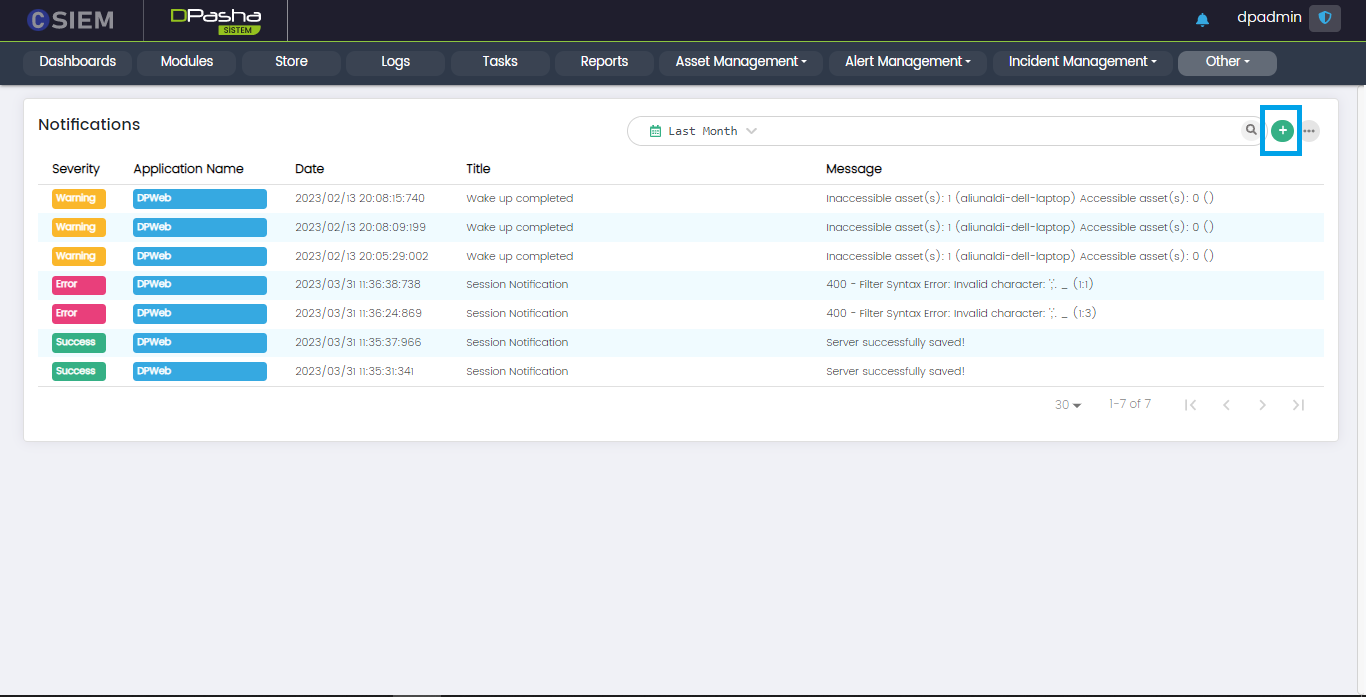
Add Button
Administrators can use the Add Button (+) on the top right, to add a new notification alert definition.
Options Menu
The System Notification page has the options menu button containing multiple options.
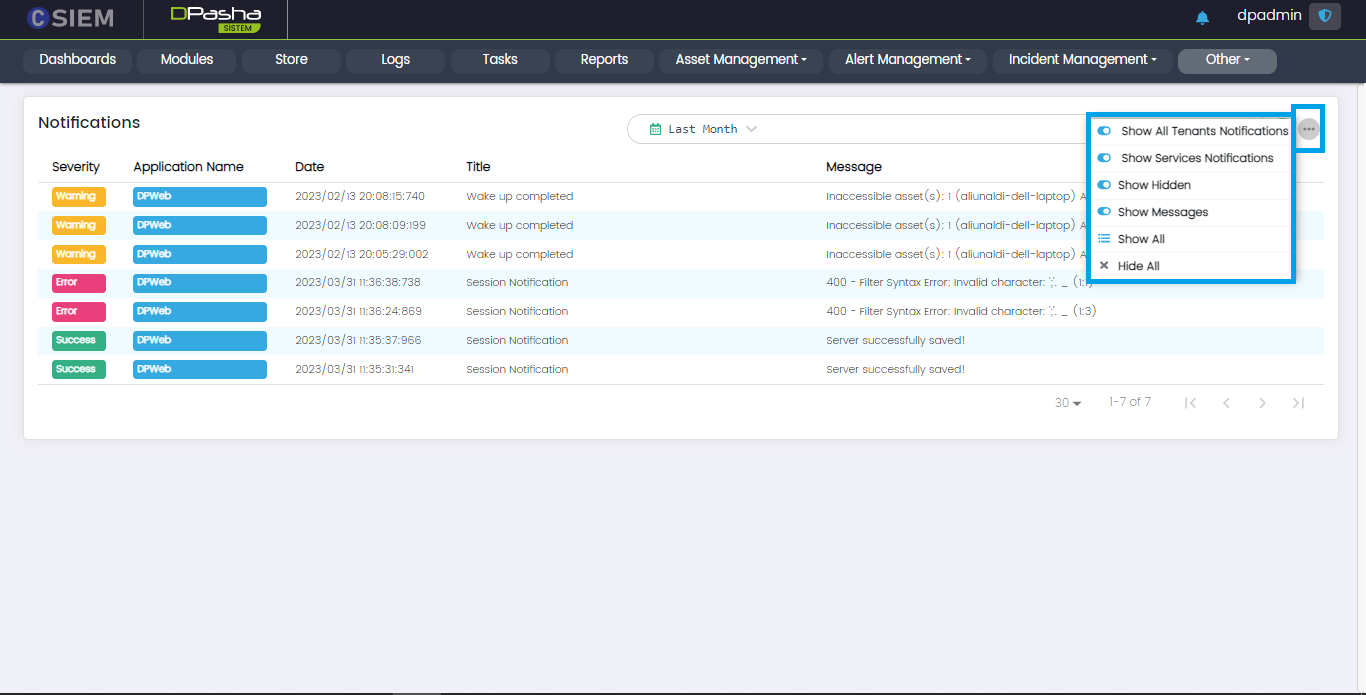
Options Menu List
- Show All Tenants Notifications (Toggle Button)
- Show Service Notifications (Toggle Button)
- Show Hidden (Toggle Button): This shows/hides the already read notifications.
- Show All (For showing all the notifications present on the system)
- Hide All (For hiding all the notifications present on the system)
Online Users
Online Users Page
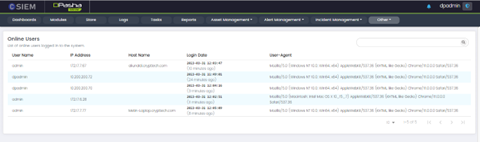
- User Name:
- IP Address:
- Host Name:
- Login Date:
- User-Agent:
Search Online Users

Active Lists
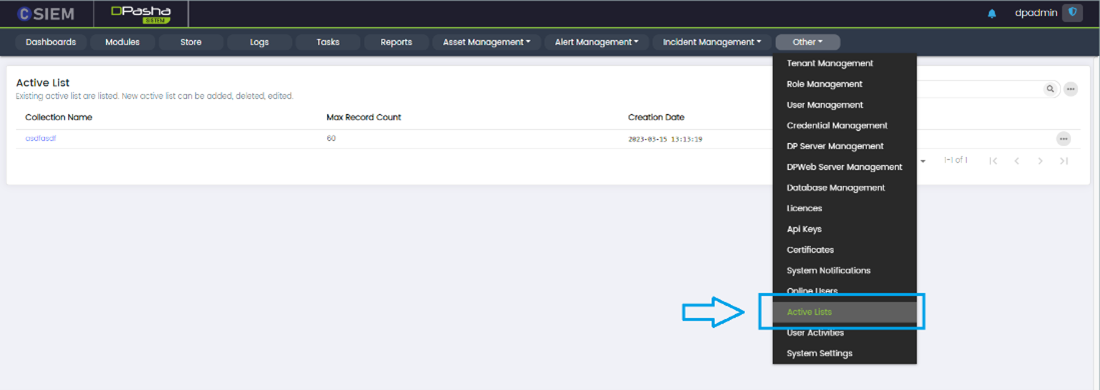
Active Lists Page

Active Lists Page Options
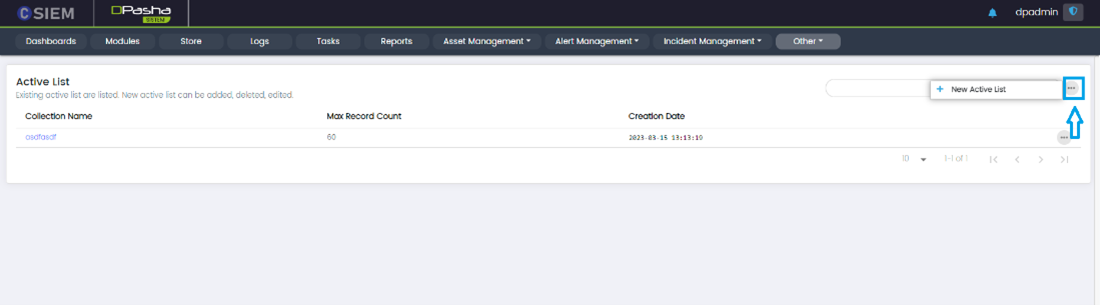
New Active List:
Add New Active List
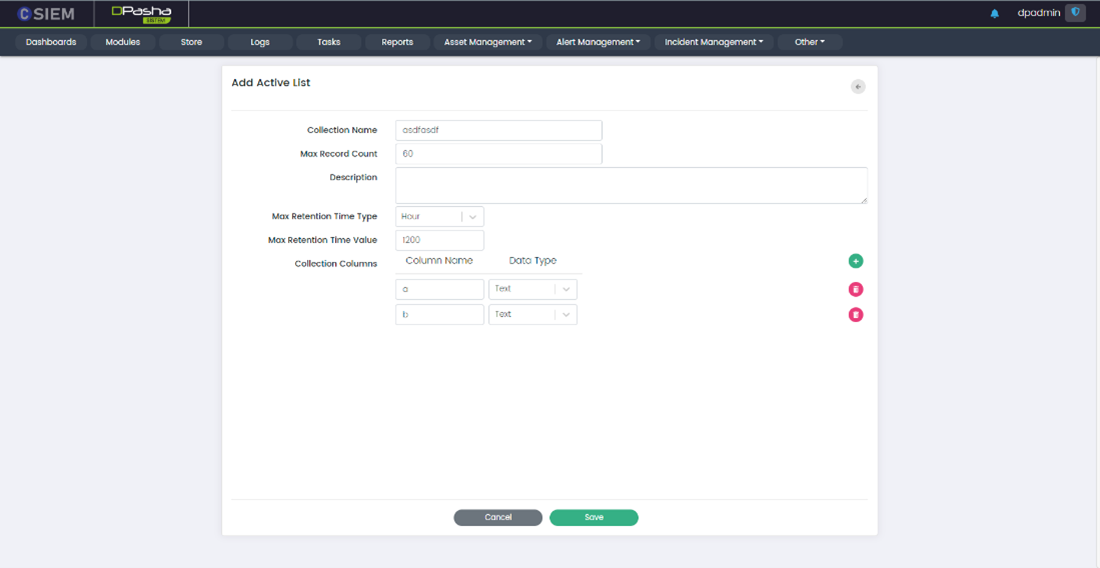
- Collection Name: This option allows administrators to name the collection of data.
- Max Record Count: This option allows administrators to set a limit on the number of records that can be stored in the collection.
- Description: This option allows administrators to add a description of the collection.
- Max Retention Time Type: This option allows administrators to specify the unit of time used to measure the retention period for the collection.
- Seconds
- Minutes
- Hours
- Max Retention Time Value: This option allows administrators to set the maximum amount of time that data will be stored in the collection.
- Collection Columns: This option allows administrators to define the data schema for the collection. They can specify the column names, data types (text, numeric, or date).
Active Lists Options
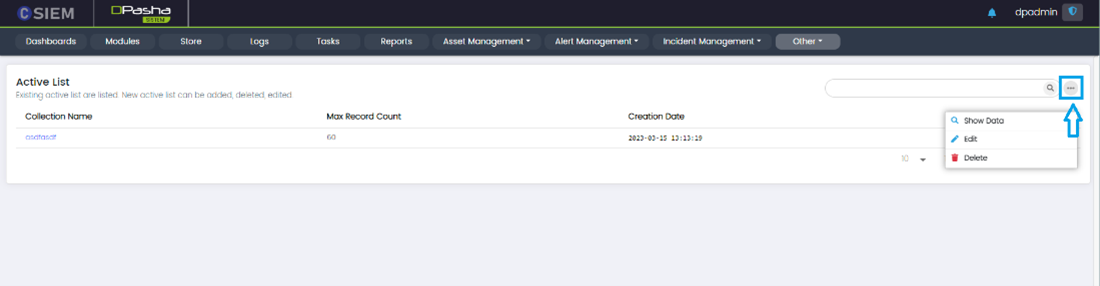
- Show Data
- Edit
- Delete
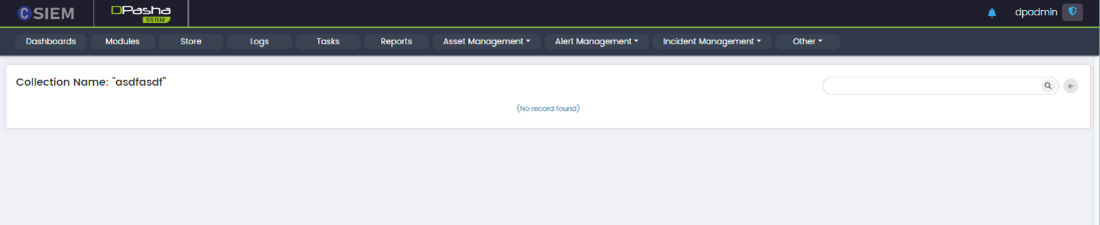
Show Data
This option allows administrators to view the data stored in the active list collection.
Edit
This option allows administrators to modify the settings for an active list.
Edit Active Lists Page

Edit Active List has the following fields:
- Collection Name: This option allows administrators to name the collection of data.
- Max Record Count: This option allows administrators to set a limit on the number of records that can be stored in the collection.
- Description: This option allows administrators to add a description of the collection.
- Max Retention Time Type: This option allows administrators to specify the unit of time used to measure the retention period for the collection.
- Seconds
- Minutes
- Hours
- Max Retention Time Value: This option allows administrators to set the maximum amount of time that data will be stored in the collection.
- Collection Columns: This option allows administrators to define the data schema for the collection. They can specify the column names, data types (text, numeric, or date).
Delete
This option allows administrators to remove an active list collection.
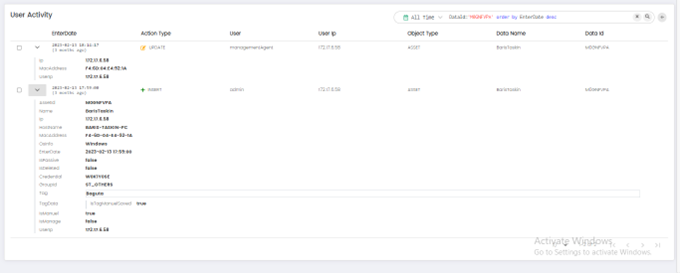
User Activities
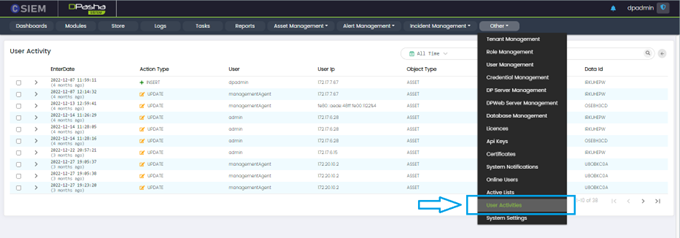
The User Activities page presents information in the following columns:
Enter Date: This column displays the date and time when the user activity was recorded in the SIEM system.
Action Type: This column displays the type of action performed by the user, such as Insert, update, or delete.
User: This column displays the username or ID of the user who performed the action.
User IP: This column displays the IP address from which the user performed the action.
Object Type: This column displays the type of object that was accessed or modified by the user, such as a file, database, server, or network resource.
Data Name: This column displays the name of the data object that was accessed or modified by the user.
Data ID: This column displays a unique identifier for the data object that was accessed or modified by the user.
User Activity Search
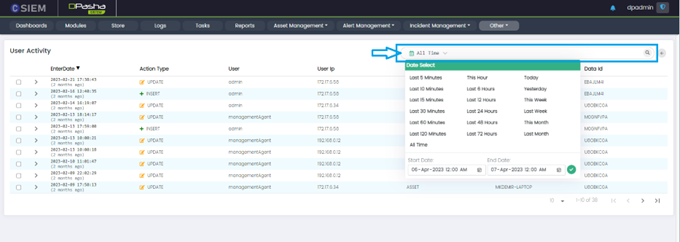
Administrators can search for specific keywords or phrases within the user activity data. For example, they can search for a particular user account or an IP address to see all the associated activity.
API Keys
Administrators can view, edit and add API Keys using this page.

Page Columns
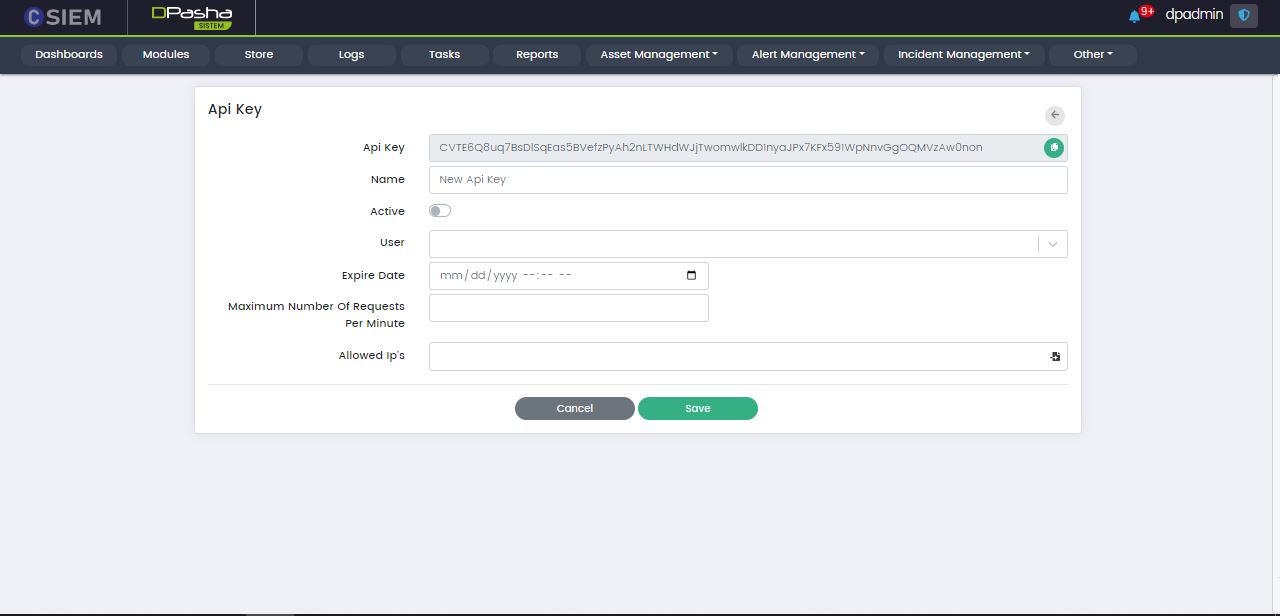
The API Keys pages has the following columns:
- Name
- API Key
- Active
- User Name
- Expiry Date
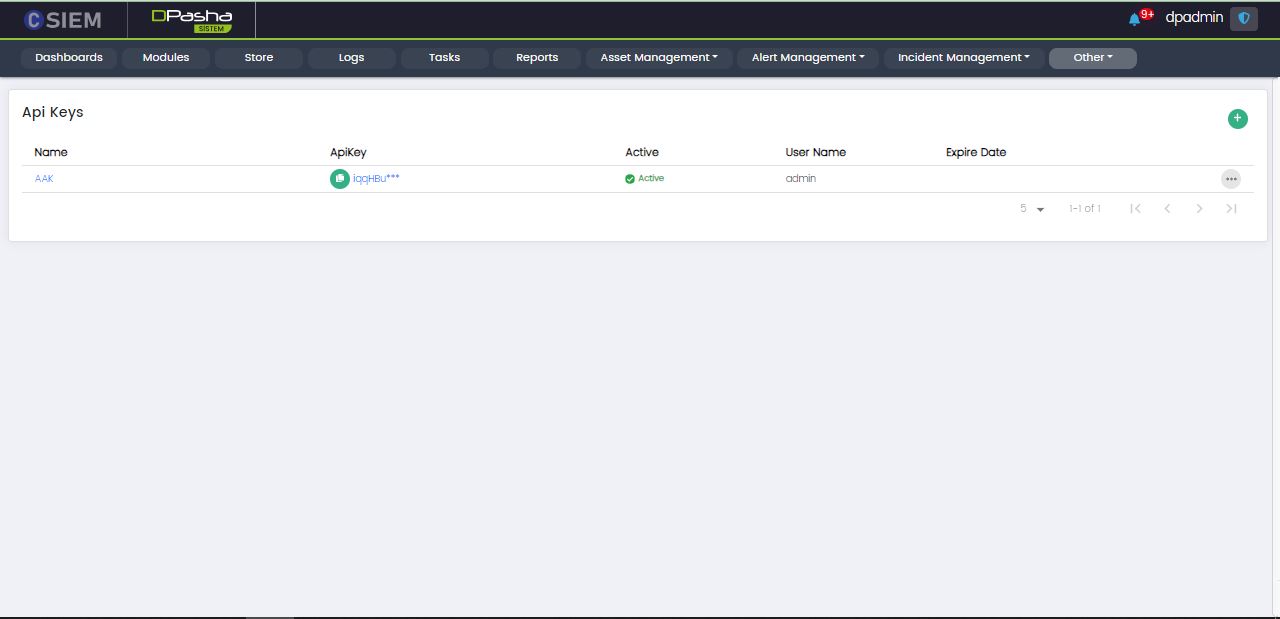
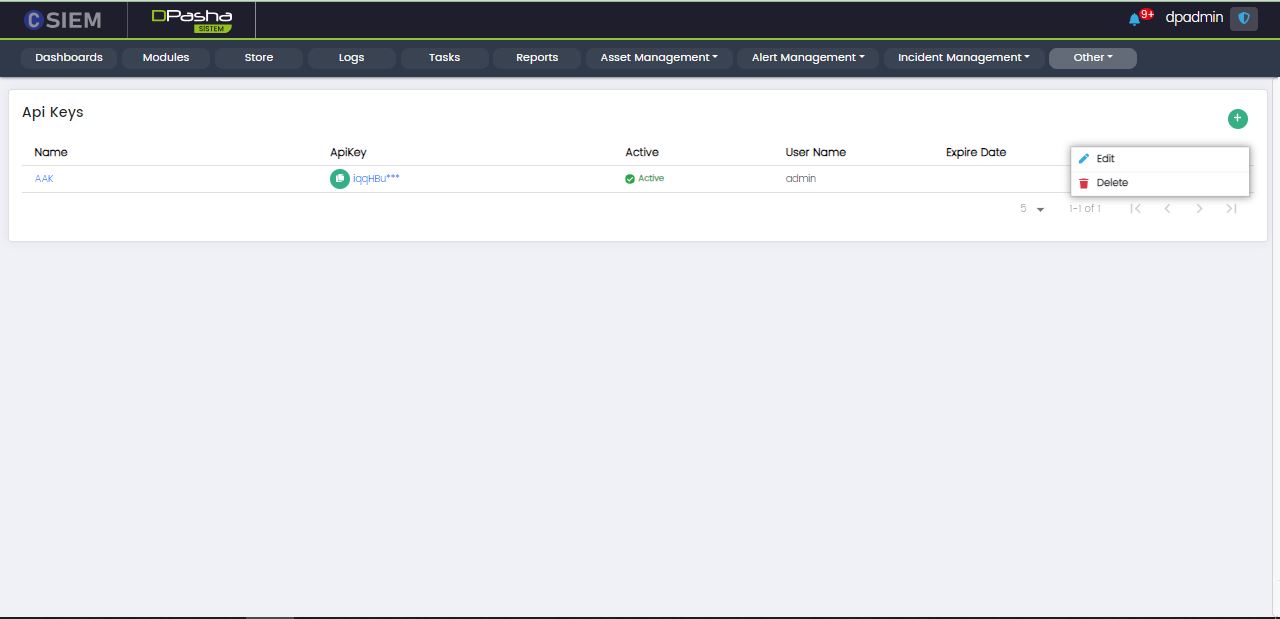
API Key Item
Each of the item/row is an API key with the following options.
- Edit (This page is same as Add API Key)
- Delete
Add API Key
This page allows administrators to add a new API Key.
Administrators can use the Save button to save the License.
Administrators can use the Cancel button to undo all the changes and go back to the Licenses page.
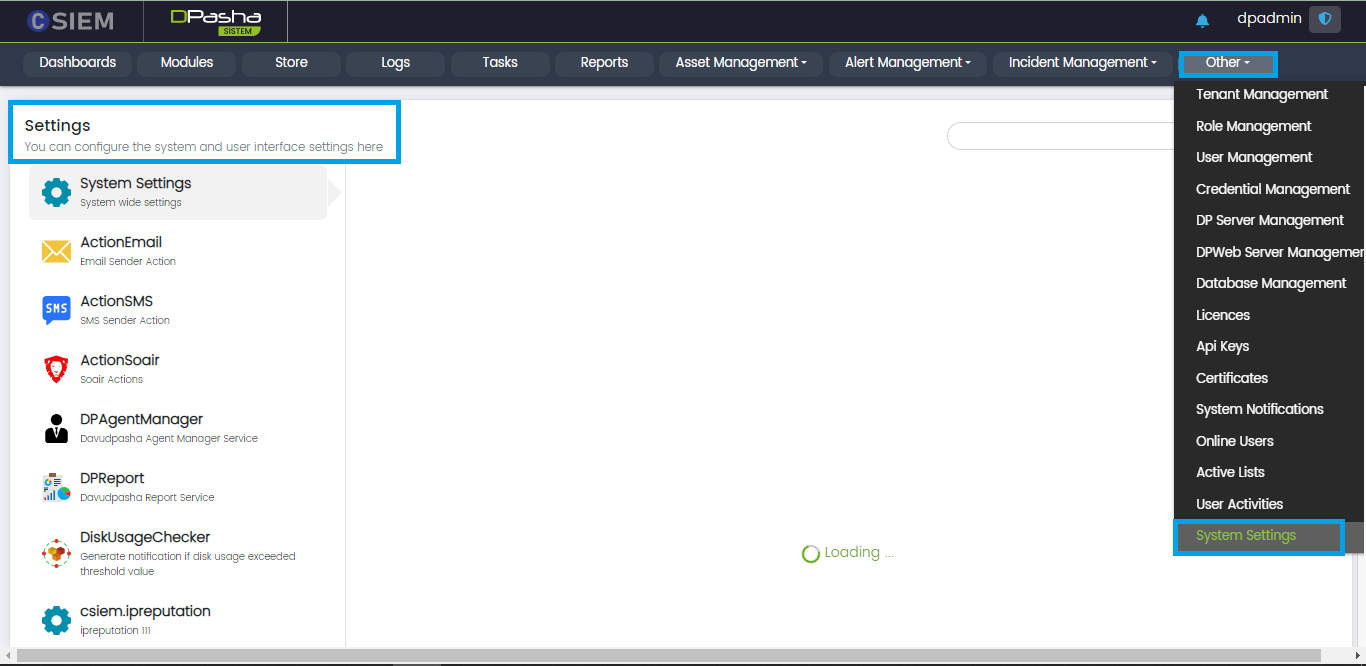
System Settings
This page allows the administrators to apply different settings to the User Interface of the system and also allows them to configure any module on the system.
Page Layout
Search Bar
The search bar is used to search for any notification on the System Settings page. It returns filtered results against the given keyword(s).
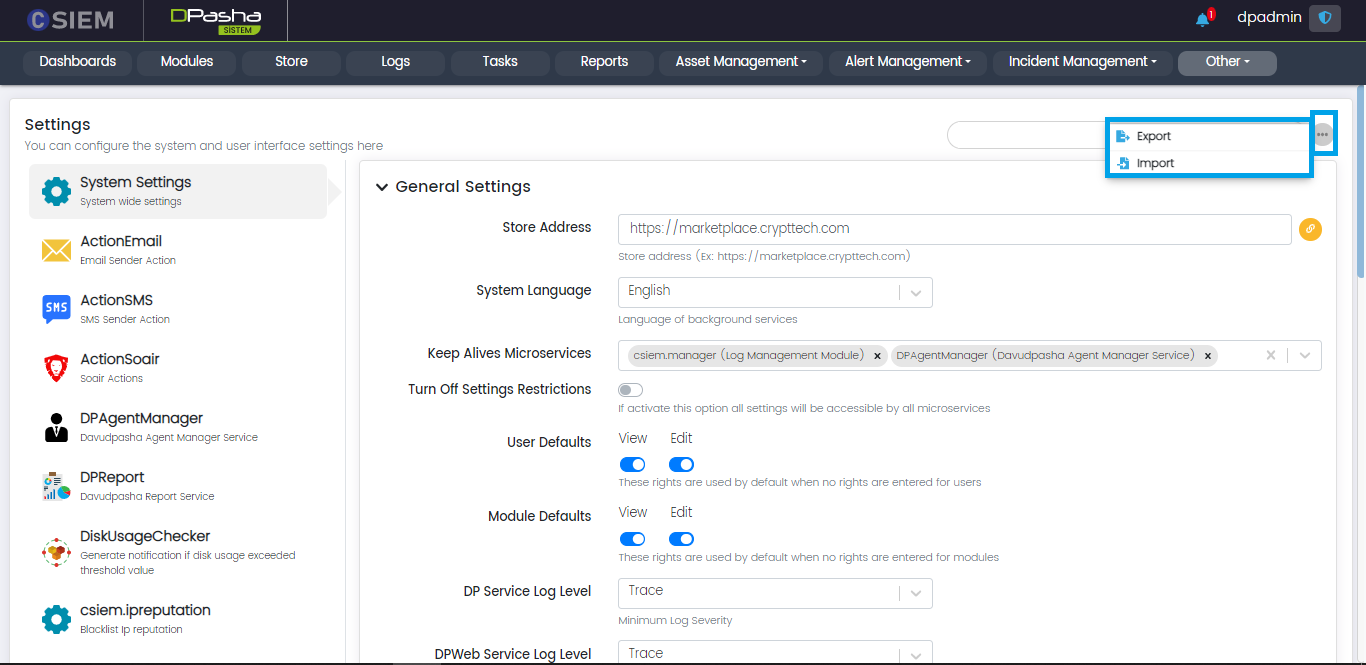
Options
System Settings page has the options menu button containing multiple options.
- Export: Administrators can export the settings from the system using this option.
- Import: Administrators can import the settings into the system using this option.
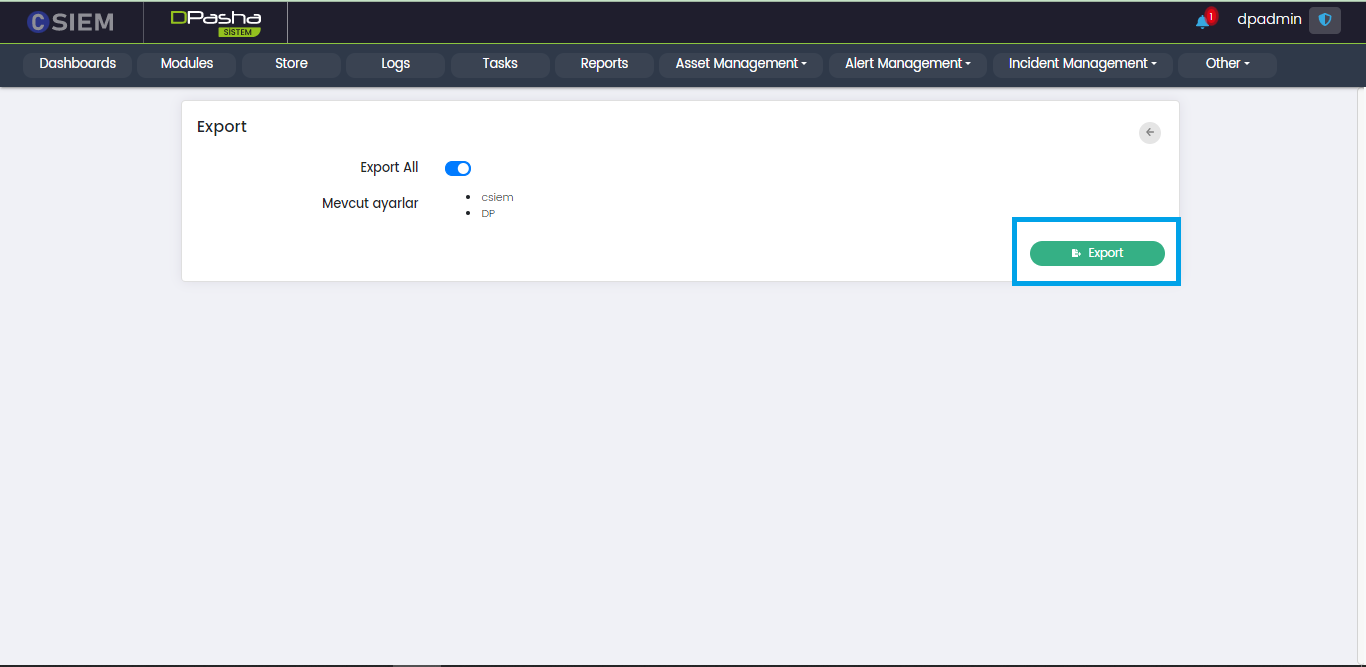
Export Page
This page appears when the export option is selected.
- Export All (Toggle Button) This will export settings for both CSIEM and DavudPasha.
- Settings to Import (This is a selection menu used when Export All is unselected)
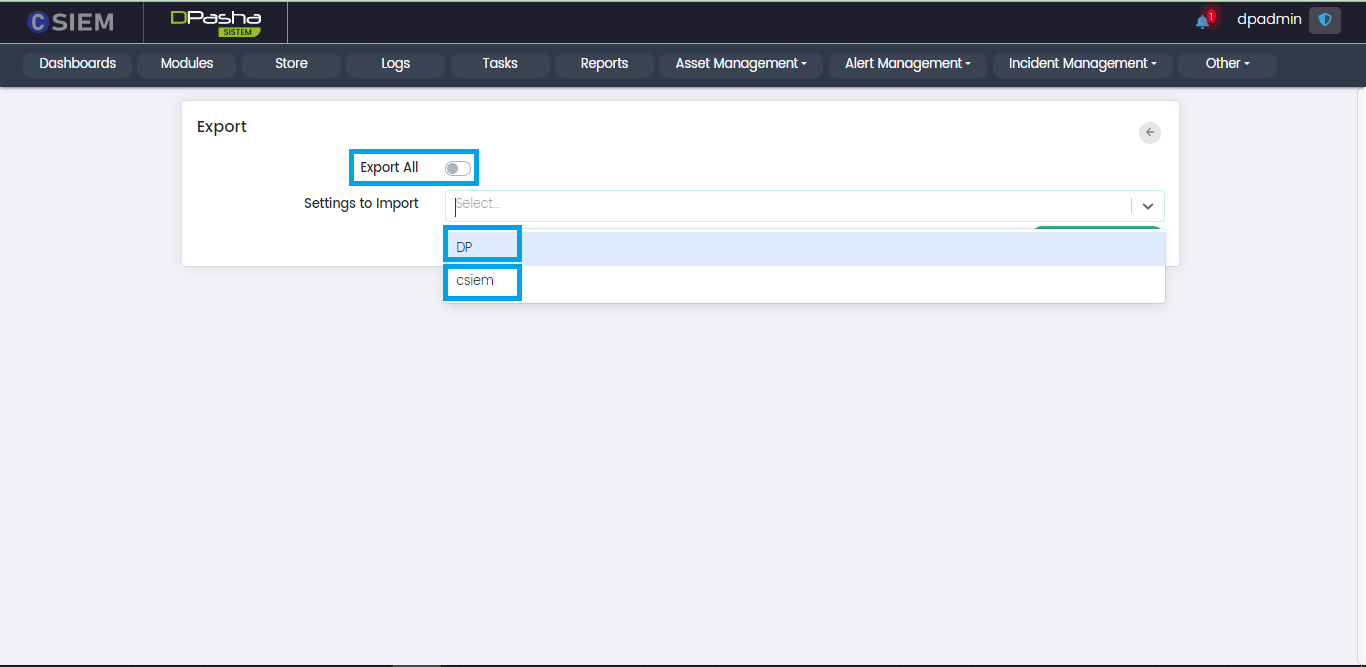
After selecting the required options from the export page, the administrators can click the Export button. The downloaded file will be a text file containing all the configurations.
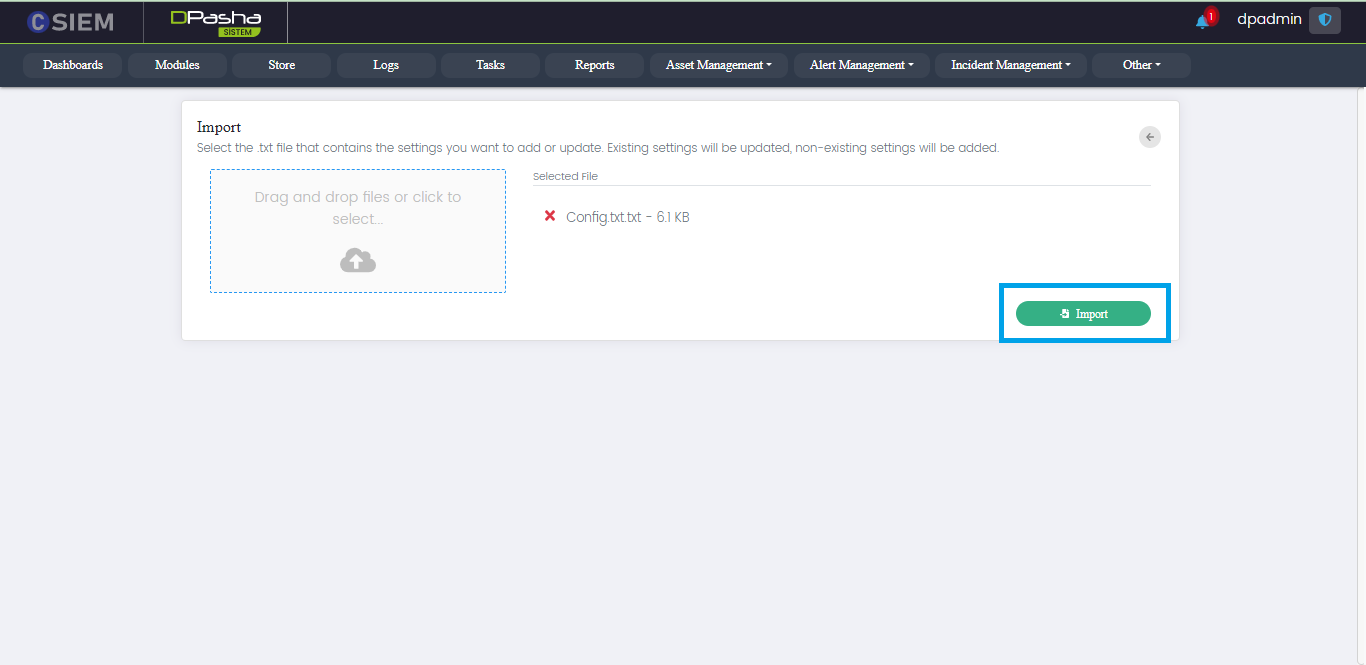
Import Page
This page appears when the import option is selected.
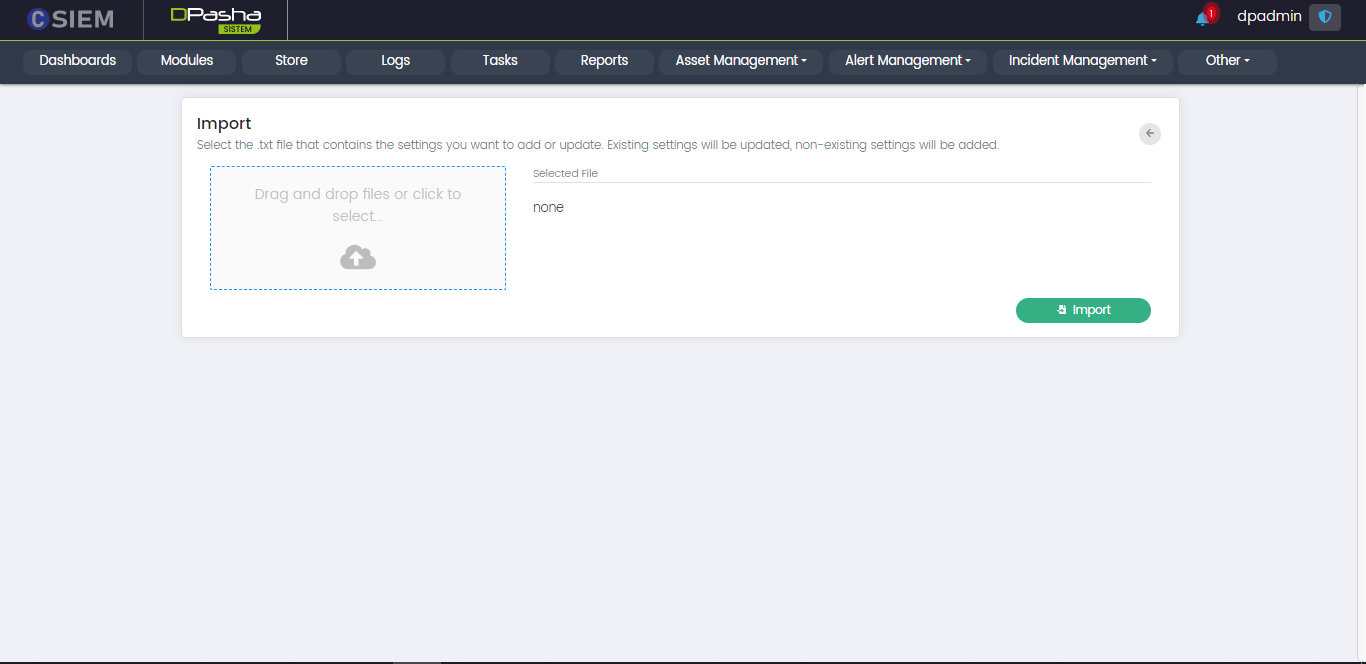
Administrators can upload the configuration file from their local system to the DavudPasha system.
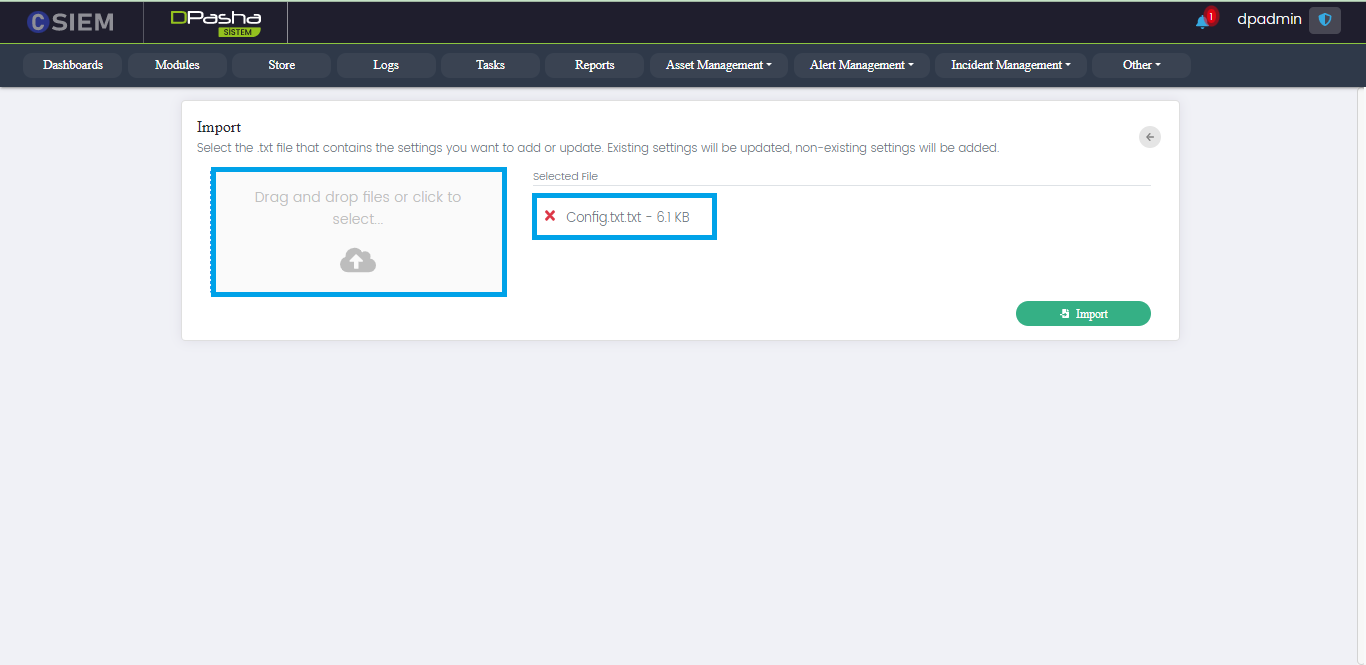
Once the file is uploaded to the system the administrators can click the import button to import the settings to the system.
System Settings
Administrators can use this module to set the system-wide settings.
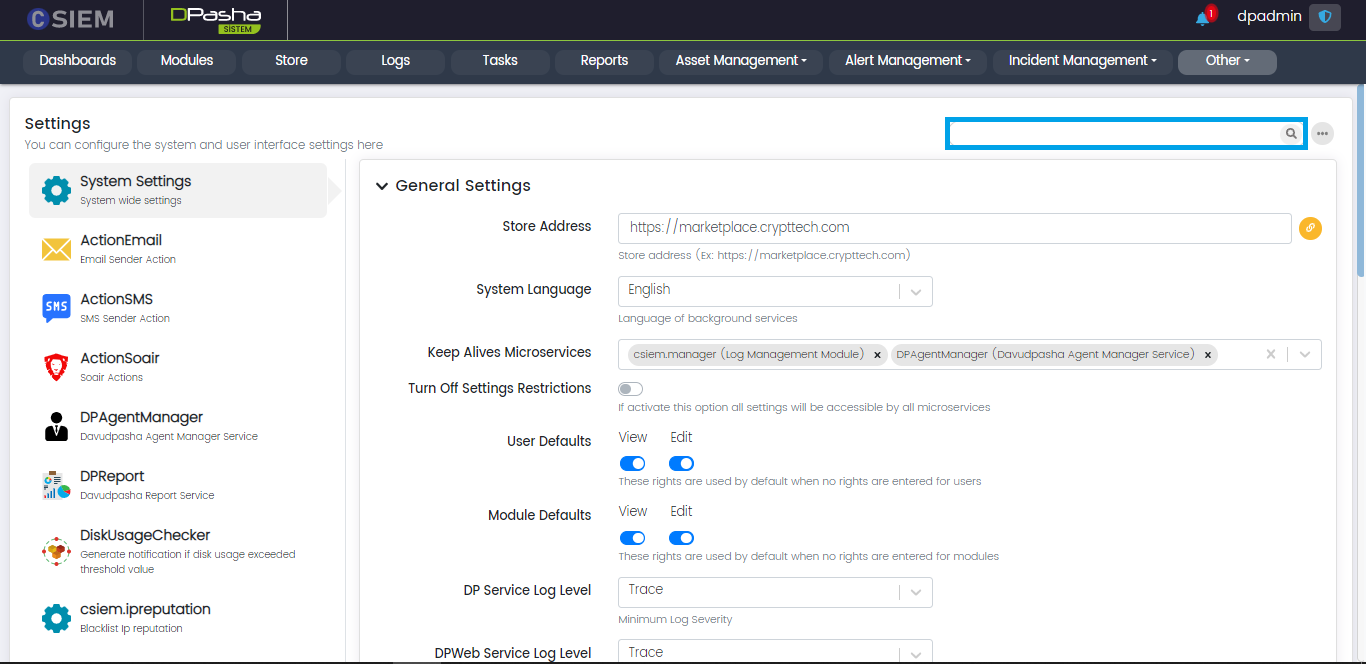
General Settings
This section of the System Settings page contains all the fields and options.
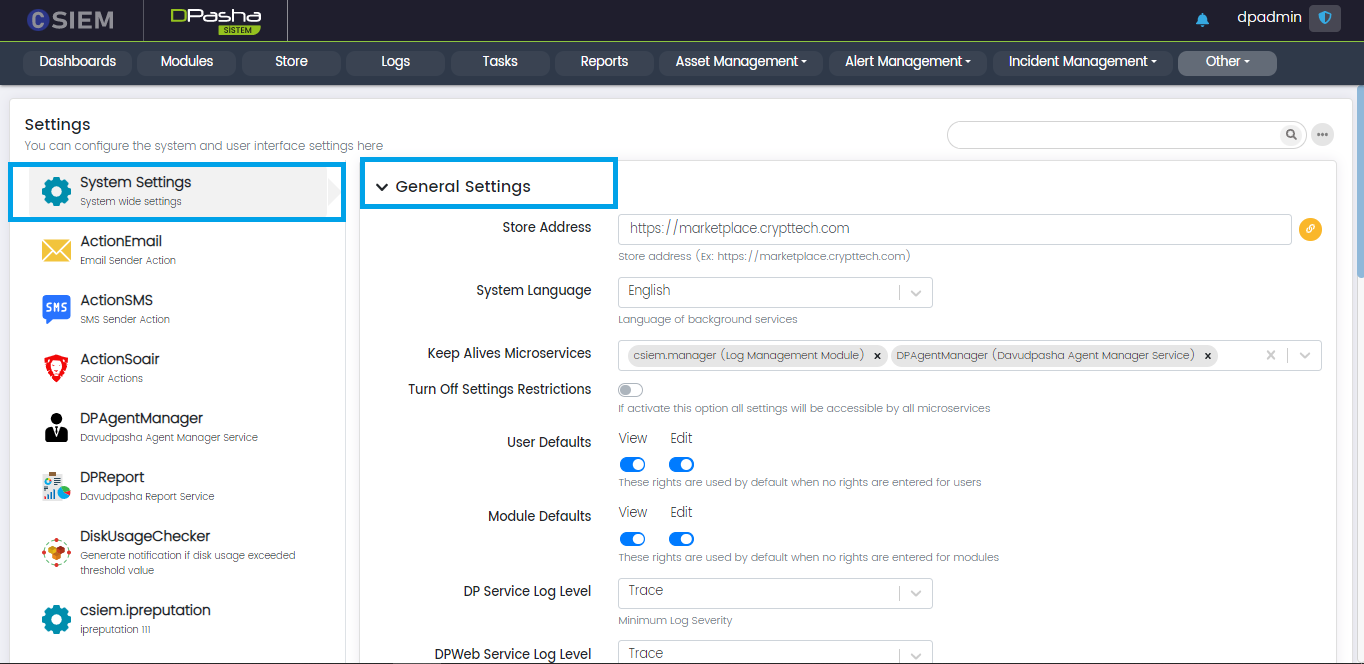
Respective fields are given below.
- Store Address: Administrators can set the store address or URL in this field. One example of the store is “https://marketplace.crypttech.com”.
- System Language: Administrators can select from the following options:
- English
- Turkish
- Keep Alive Microservices: The microservices added in this field will be automatically restarted by the DavudPasha system, in case these are stopped or become inactive.
- Turn off Settings Restrictions (toggle option): If this option is selected then it allows all the microservices to access all the settings.
- User Defaults: Administrators can check/uncheck the following toggle options to grant view of edit permissions to the users:
- View
- Edit
- Module Defaults: Administrators can check/uncheck the following toggle options to grant view of edit permissions to the system modules :
- View
- Edit
- DP Service Log Level: Administrators can select from the following options:
- Trace
- Debug
- Info
- Warning
- Error
- Critical
- DPWeb Service Log Level: Administrators can select from the following options:
- Trace
- Debug
- Info
- Warning
- Error
- Critical
- Modules Allowed to Sign with Certificates
- Modules Allowed to Advanced Authorization
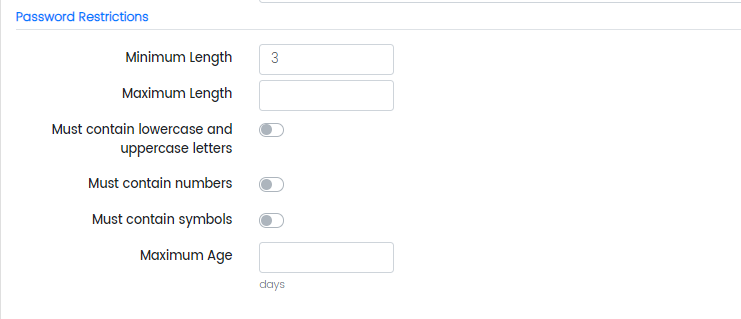
Password Restrictions
In this section, the administrators can specify the conditions for a valid password. These conditions or restrictions are as follows:
- Minimum Length
- Maximum Length
- Must contain lowercase and uppercase letters (toggle option)
- Must contain numbers (toggle option)
- Must contain symbols (toggle option)
- Maximum Age (in days)
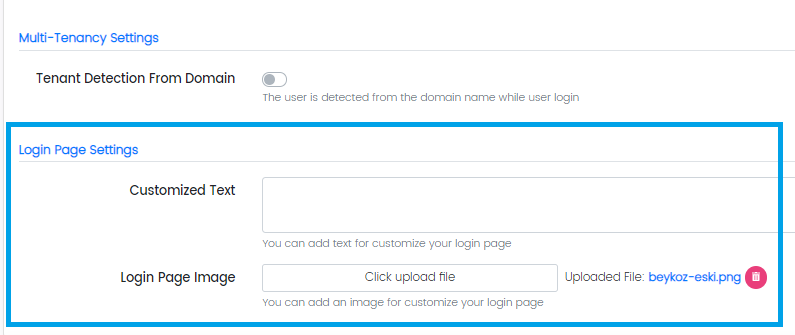
Multi-Tenancy Settings
This option allows the administrators to detect the user with its respective tenant. If a user is part of multiple tenants, the system will recognize the tenant based on that user’s domain name. For this purpose, the administrators can select the following toggle option:
- Tenant Detection from Domain (toggle option)

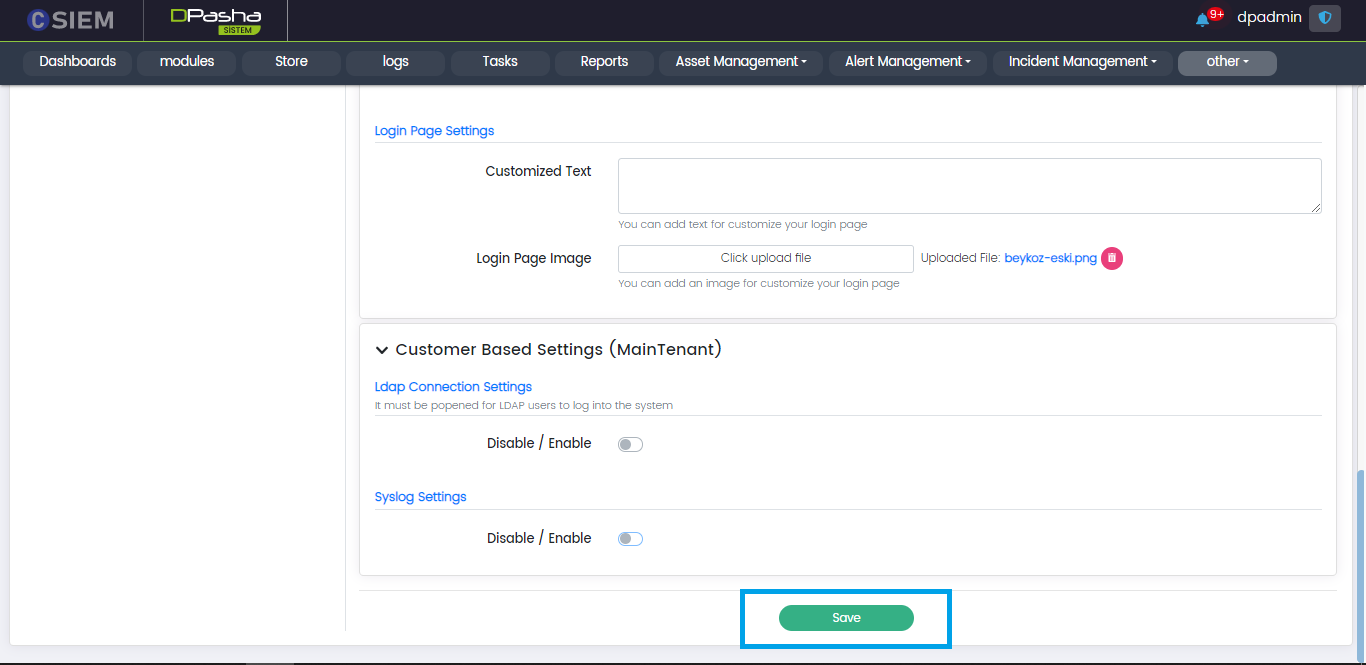
Login Page Settings
Administrators can change the looks of the login page in the following way:
- Customized Text (to display any text at the bottom of the login page)
- Login Page Image (to display any image on the login page)
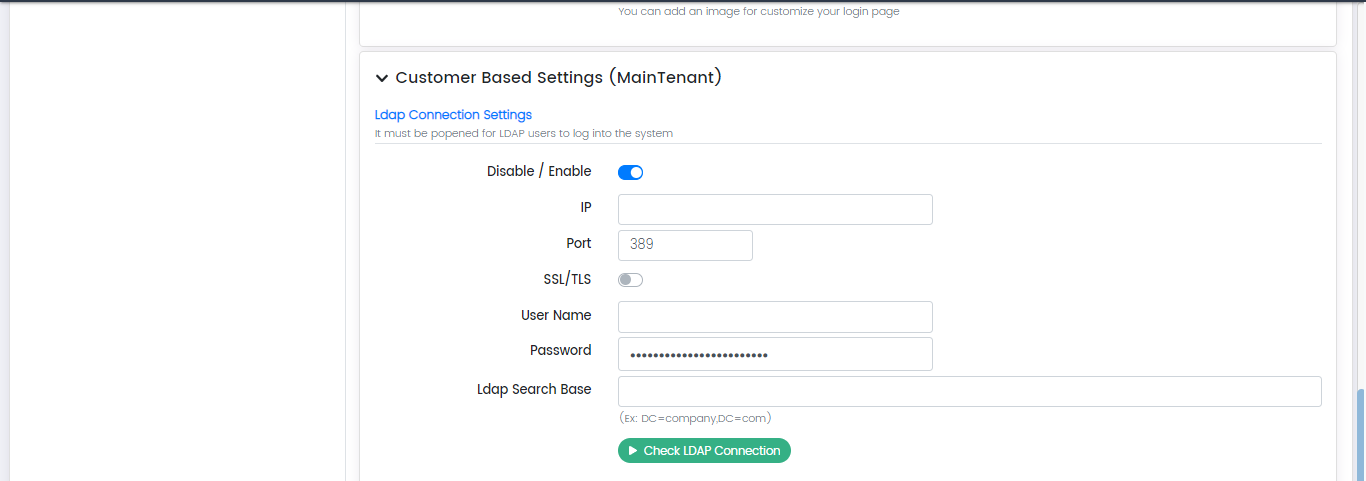
Customer Based Settings
Ldap Connection Settings
In this section, the administrators can provide settings for the LDAP connection to another server. LDAP is the utility or method to access the Active Directory on the servers. Active Directory is the place where all the devices connected to the domain on the local network are managed.
Respective fields are given below.
- Disable/Enable (toggle option)
- IP
- Port
- SSL/TLS (toggle option) (to encrypt traffic using the TLS or SSL certificates)
- User Name
- Password
- Ldap Search Base
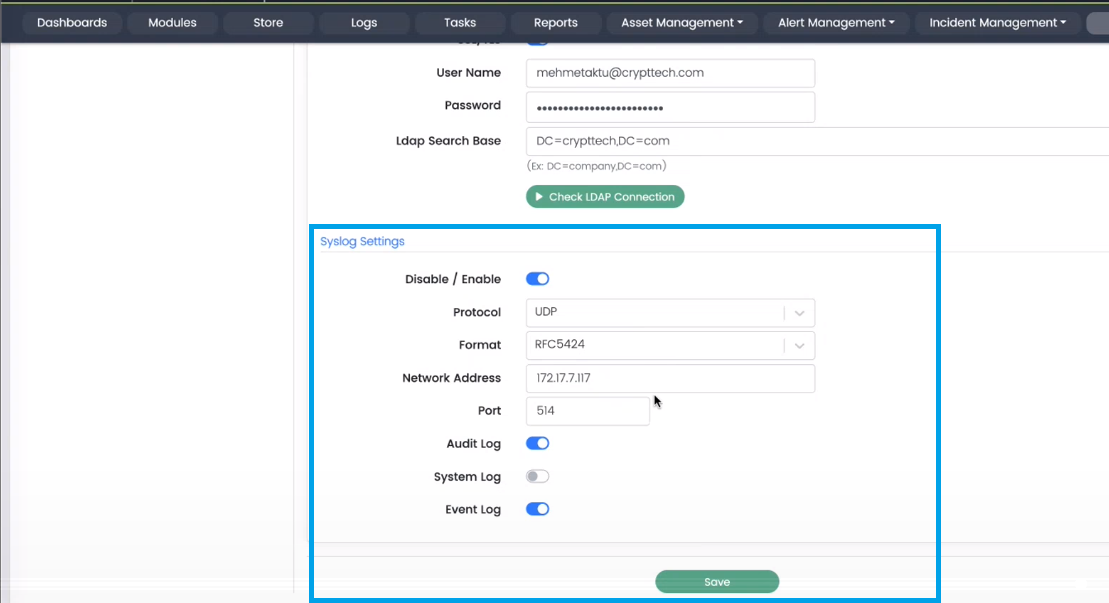
Ldap Connection Settings Example
Below are the example values for the respective fields:

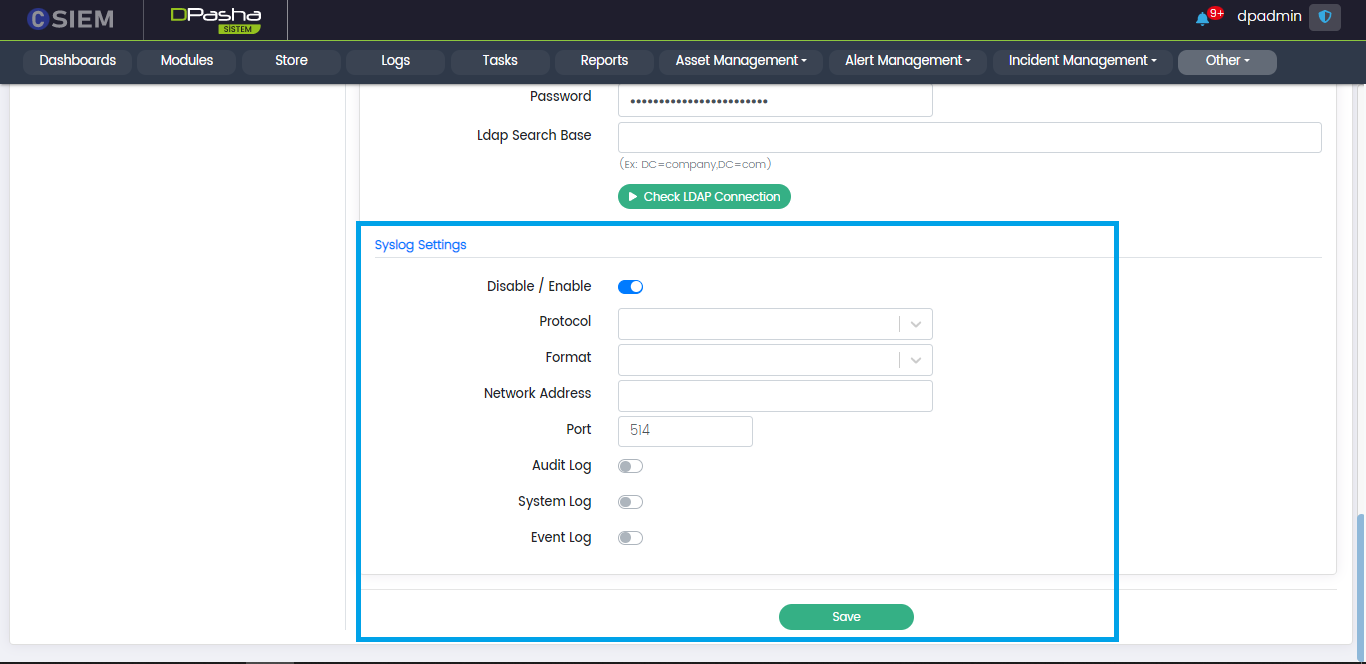
Syslog Settings
Administrators can use these settings to send logs to a server (e.g., another CSIEM server) using the syslog method. Respective fields are given below.
- Disable/Enable (toggle option)
- Protocol (UDP, TCP)
- Format (RFC3164, RFC5424)
- Network Address (IP Address)
- Port
Administrators can select the types of logs sent to other servers using toggle options as following:
- Audit Log
- System Log
- Event Log
Syslog Settings Example
Below are the example values for the respective fields:
Administrators can save the settings by clicking the Save button at the bottom of System Settings page.
Action Email
Administrators can provide the settings for email utility in this section. So, the modules can use this utility and send Emails to the recipients.
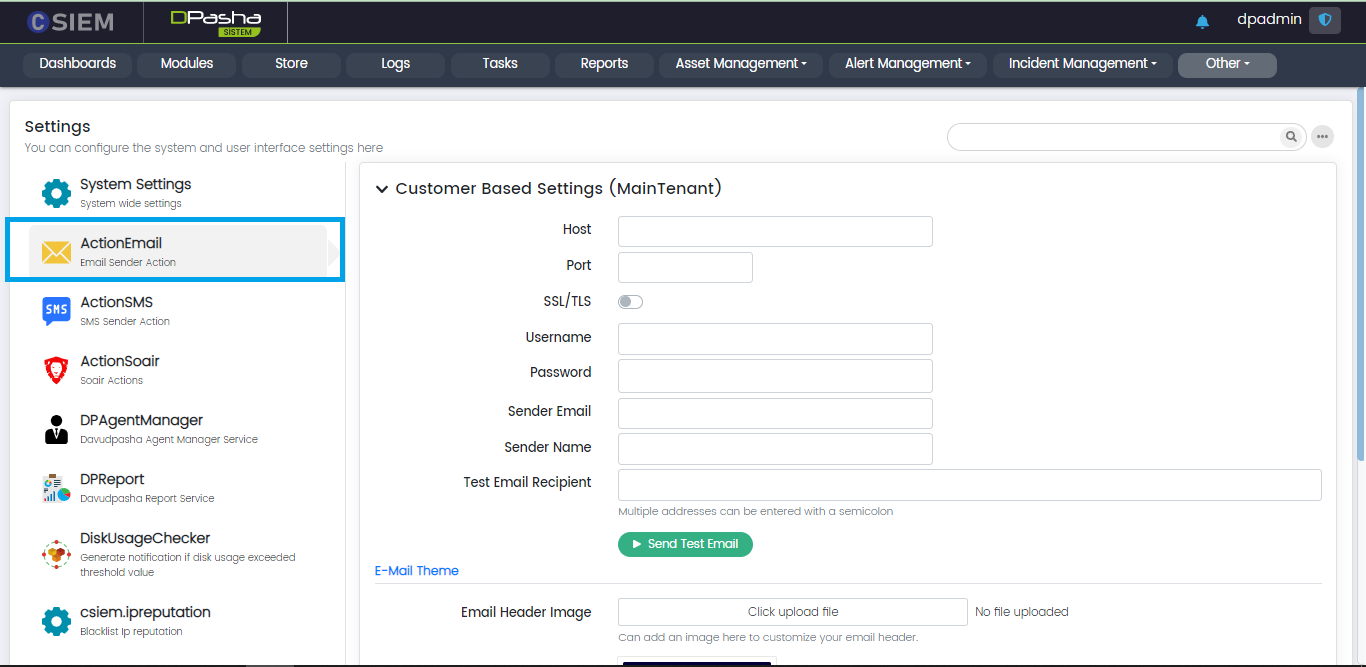
Customer Based Settings
This section contains the following fields:
- Host
- Port
- SSL/TLS (toggle option) (to encrypt traffic using the TLS or SSL certificates)
- Username
- Password
- Sender Email
- Sender Name
- Test Email Recipient (administrator can add multiple email addresses)
Send Test Email
Once all the fields are set, the administrators can use this button to send a test email to the recipient.
Email Theme
Administrators can choose the desired theme using the settings provided in this section. This section contains the following fields:
- Email Header Image (it is an image that goes on top of your email. It helps introduce your business and set the tone for the email)
- Header Background Color (different colors can be selected from this selection or created by using the HEX code i.e., #FFFF00)
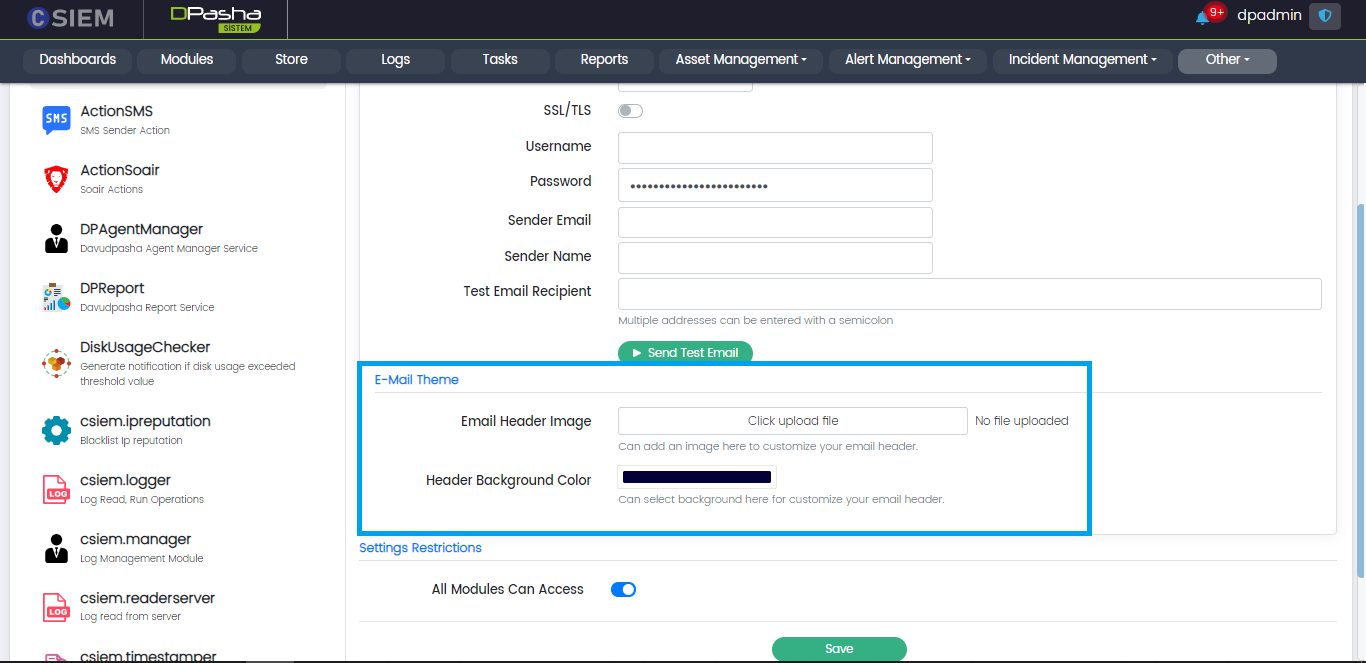
Settings Restrictions
This section allows the administrators to select the modules that can use the email utility of the system. Administrators can select all the modules or select specific modules and click the Save button.

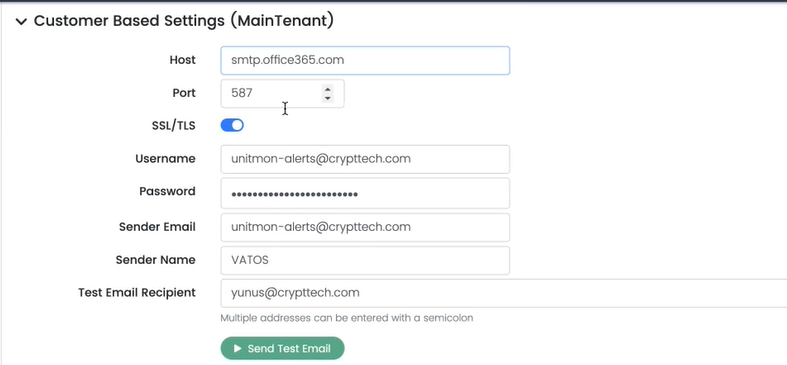
Action Email Example
Below are the example values for the respective fields:
Action SMS
Administrators can provide settings for the SMS utility. The modules can use this utility to send SMS to the recipients.
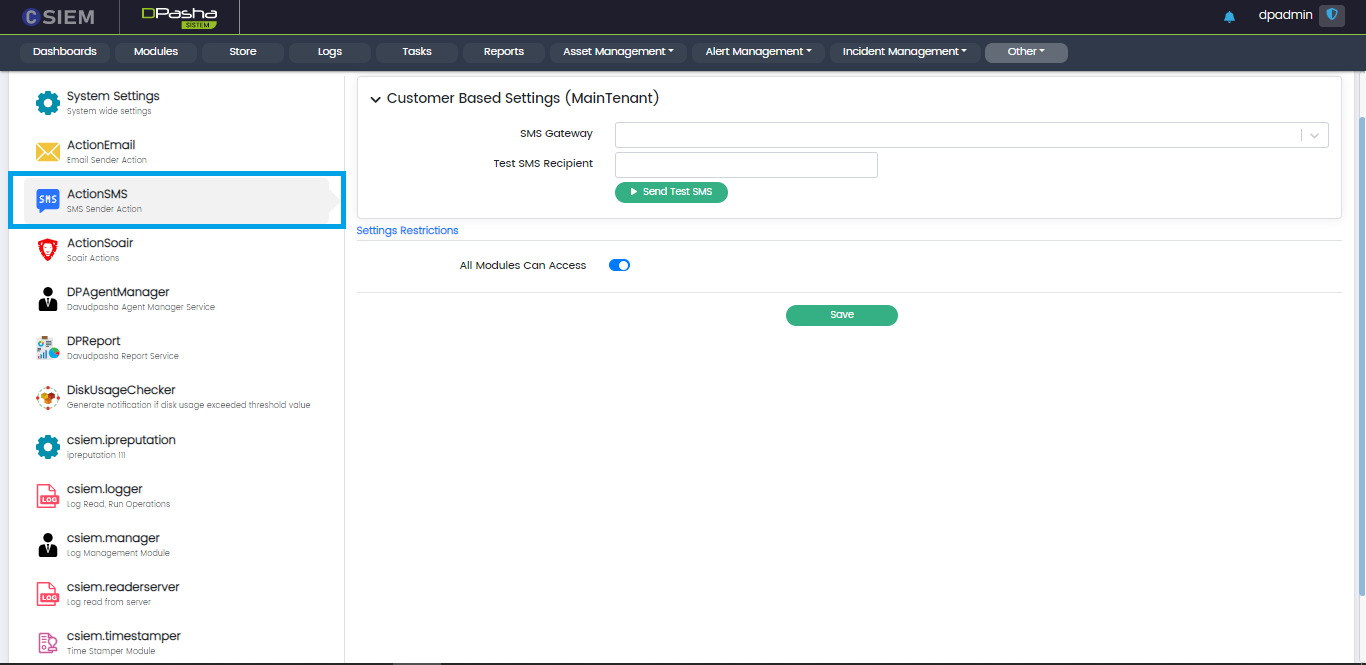
Customer Based Settings
This section contains the following fields:
- SMS Gateway
- Test SMS Recipient
Send Test SMS
Once the required fields are set, the administrators can use this button to send a test SMS to the recipient.
Settings Restrictions
This section allows the administrators to select the modules that can use the “Action Soair” utility of the system. Administrators can select all the modules or select specific modules and click the Save button.
Action Soair
Administrators can provide credentials for a SOAIR. This will allow the selected modules to invoke an action using this SOAIR instance to take action.
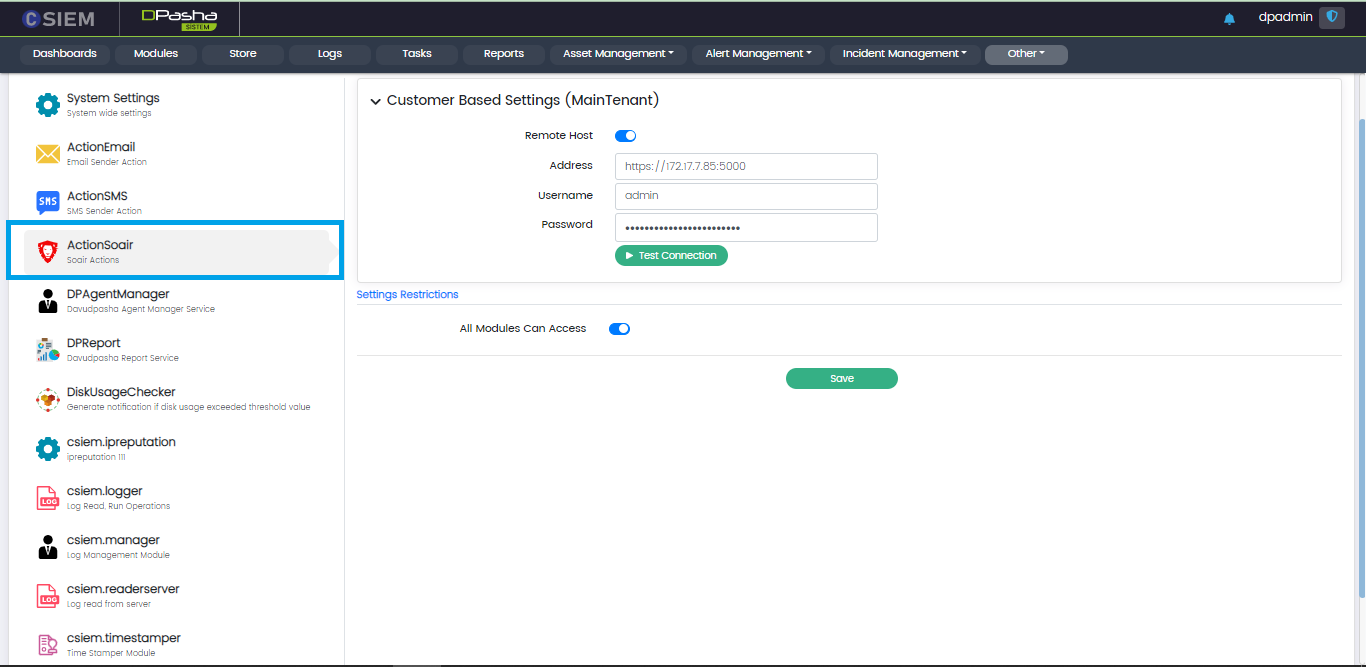
Customer Based Settings
This section contains the following fields:
- Remote Host (toggle option) (select this option if the host is not on local network)
- Address (consists of URL and PORT)
- Username
- Password
Test Connection
Administrators can use this button to test the connection to SOAIRinstance after providing credentials.
Settings Restrictions
This section allows the administrators to select the modules that can use the “Action Soair” utility of the system. Administrators can select all the modules or select specific modules and click the Save button.